X
wikiHow is a “wiki,” similar to Wikipedia, which means that many of our articles are co-written by multiple authors. To create this article, 18 people, some anonymous, worked to edit and improve it over time.
This article has been viewed 254,680 times.
Learn more...
The white balance setting you choose can make or break a photograph. This setting allows you to compensate for the slight colour differences in different types of light, or make the colours warmer or cooler to match the intended mood of your photograph. Once you know how to use it, you'll wonder how you ever coped without.
Steps
-
1Understand what white balance is and how it affects your digital camera's picture. Different kinds of lighting look the same to the human visual system (although once you, as a photographer, know that there is a difference, you'll look for and notice it everywhere!). Our brains compensate for it automatically, so that a white thing will look white under any light. But a subject in the shade is slightly bluer than the same subject in bright daylight, and incandescent lightbulbs are very orange compared to both.
People who shoot film need to use coloured filters on their lenses (or use special films). A digital camera can digitally alter the colour information from its sensors to compensate for the different colours coming from various light sources. The setting which controls how and to what extent this is done is called the white balance. Apart from compensating for the colour conditions, though, the white balance control can be used to warm or cool colours for artistic effect.[1]
Most cameras have a white balance control, and will have all or some of the following settings:- Automatic white balance. The icon for this is either "AWB" or "A". The camera will analyse the image and set the white balance automatically.
- Daylight. This is for shooting in direct sunlight.
- Cloudy light. The light on an overcast day is somewhat cooler (bluer) than it is in direct sunlight, so this setting compensates by warming the photograph.
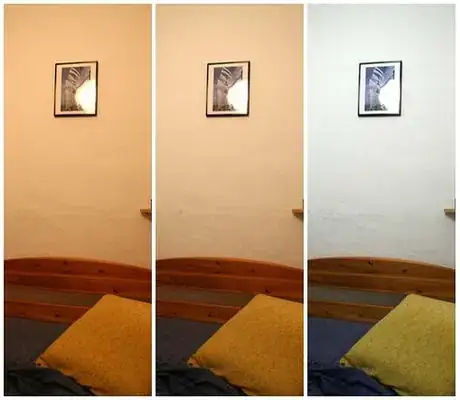
- Shade. Subjects in shady areas will be slightly bluer than daylight (and bluer than with overcast weather, too), so this setting compensates by warming the colours even more. You can also use this setting to get warm colours even in daylight. (The photograph at the top of the page compares Auto" with the Shade setting.)
- Flash. Flash light is slightly cooler than daylight, using this setting will warm the picture a tiny bit compared to the "Daylight" setting. This only applies for situations in which the flash is the sole source of lighting. If you're balancing ambient light and flash, and the ambient lighting also needs correction, then you might need to use coloured filters on your flash to match the ambient lighting and then use a white balance setting appropriate for the ambient lighting.
- Tungsten. Light from tungsten bulbs is substantially more orange than daylight, so the camera compensates by adding blue to the picture.
- Fluorescent light. Fluorescent lamps are somewhat redder than daylight (less so than tungsten bulbs, however), so this setting will compensate by cooling the picture somewhat.
-
Preset white balance. You take a photograph of something of a neutral colour under the lighting, then your camera effectively subtracts the colour of said image from your subsequent photographs. This is often the only way of getting good results under "energy saving" lighting. It can often get more accurate results under artificial lighting than the white balance settings dedicated to that kind of lighting.
Setting this differs from camera to camera, so read your manual. You can either use a grey card or an ExpoDisc (or make your own 'ExpoDisc' with a coffee filter). - Manual white balance. This allows you to specify a colour temperature for which to correct. Nikon cameras call this "K"; on most cameras you can specify the temperature by spinning the front command dial.
- Some compact cameras lack white balance settings entirely and put them as scene modes. You'll have to figure out the effects yourself. A "Foliage" mode will typically bias the colours towards green, "Sunset" will make them warm, "Fall Foliage" will also warm the picture.
-
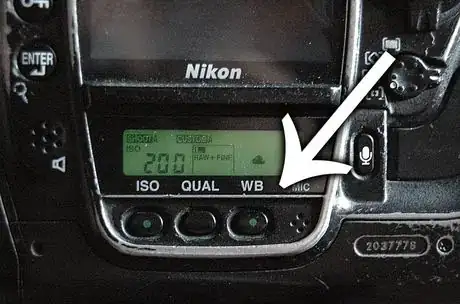
2Find the white balance control on your camera. See your manual for details, but here are a couple of hints:[2]
- Digital SLRs will usually have a button on the top or back of the camera that says "WB". You hold the button down while spinning one of the control dials, to adjust it. (The cheaper Nikon digital SLRs omit this.)
- On your compacts, it's generally buried fairly deep in the menus, because they really don't want you messing with it, but you can get there. Hit the menu and it's generally in the camera or shooting mode, you'll find the setting white balance or WB and once again, press the button and choose which white balance you want to use.
- If the white balance control does not do anything, or if you can't find it in your menus, it could mean you're in a "Scene" or Auto mode which locks out this control. Try shooting in a semi-automatic exposure mode, like Program.
Advertisement -
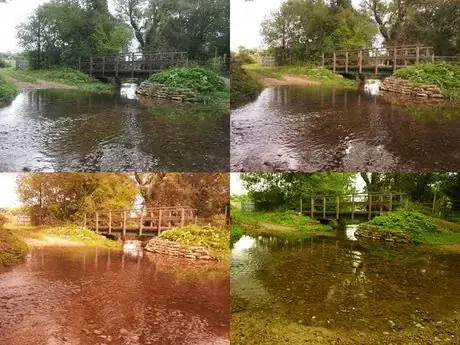
3Try your "Auto", "Daylight", "Cloud" and "Shady" white balance settings under daylight. Most of the time the colours will be too cool in "Auto", and you'll also find that things will look much nicer in the other settings. This differs from camera to camera; some cameras (specifically camera phones) have terrible white balance algorithms in some settings.[3]
-
4Try using your "cloudy" and "shade" settings to get warm colours, even in daylight! As said, these settings are intended to compensate for bluer light, but you can use them to warm your colours, too. Cameras have built-in colour correction algorithms, not built-in artists; they don't know that your photograph should be warm.[4]
-
5Use white balance trims to get your colours perfect. You might find, for example, that under certain kinds of indoor lighting your camera almost gets the white balance perfect in its "Auto" setting, but could do with being a little cooler, or that your sunsets would be perfect if they were a little bit warmer. This is where white balance trims (called "hue adjustment" on some cameras) come in: it allows you to take one of the camera's white balance presets, and adjust them slightly warmer or cooler to get perfect results. On all but the cheapest Nikon SLRs, you can do this by holding the white balance button and spinning the front control dial. Many cameras lack this adjustment entirely.
Advertisement
Community Q&A
-
QuestionCan I manually set the WB on automatic mode?
 Community AnswerYes, you can do it manually, depending on your camera. Just go to "menu," click on "white balance," then click on "auto settings."
Advertisement
References
- ↑ https://digital-photography-school.com/introduction-to-white-balance/
- ↑ https://digital-photography-school.com/introduction-to-white-balance/
- ↑ https://photographylife.com/what-is-white-balance-in-photography
- ↑ https://photographylife.com/what-is-white-balance-in-photography
- ↑ Lewis Collard, Kodak Ektar 100 review http://lewiscollard.com/films/kodak-ektar-100/
- ↑ See the WIkipedia article: http://en.wikipedia.org/wiki/Day_for_night
About This Article
Advertisement


_521.webp)


