This article was co-authored by Patricia Penker. Patricia Penker is an Interior Designer and the Owner of Exclusively To Design, one of the top residential design companies in South Florida. With over 25 years of experience, Patricia specializes in interior design, interior decorating, and home staging. Patricia holds a Bachelor’s degree in Fashion Design from the University of Cincinnati and a Master’s Certificate in Digital Design and 3D Modeling from CADDTrain. Patricia’s interior designs have been featured on HGTV’s Rip and Renew and Save My Bath and in celebrity homes. Exclusively To Design has been recommended on Houzz, Expertise - Best Home Staging in Miami and Best Interior Designers in Miami, and Best of HomeGuide.
This article has been viewed 283,577 times.
Gold leaf is gold that's been hammered into a thin foil and is usually sold in sheets or rolls. It’s often used to decorate picture frames, books, and even food. Gilding is the process of applying gold leaf. It requires specialized supplies, such as gilder’s primer and a leather gilding cushion, and consists of several steps involving sticky and delicate materials. However, gilding is actually quite easy to master. All you need are an object to gild and some patience.
Steps
Preparing the Object
-
1Cover the areas you don't want to gild. If you don’t want to gild your entire object, use painter’s tape to cover the parts you want ungilded. This will keep the sizer and gold leaf in the areas where you want them. Because the tape adhesive isn’t very strong, you can remove the tape easily without damaging anything.
-
2Sand the rest of the surface. Use a piece of sand paper to go over the areas that don’t have any painter’s tape. Continue sanding until the surface is smooth. Use a tack cloth to remove the dust you created by sanding.Advertisement
-
3Prime the object. Use a primer that's formulated especially for gilding. Gilder’s primer works with gilding sizer to form a tacky surface that will permanently hold gold leaf. It’s also pigmented to hide any flaws that might remain visible after the leaf is applied. If you use regular primer, you will have to apply a base layer of pigmented paint called a bole before applying the primer.
- Alternatively, you can use a paint color as a base color to the gold leaf since there will not be a perfectly smooth gold finish.
- Paint two coats of the new paint color.
- Once dry, cover the area you want to gold leaf with a coat of adhesive.[1]
-
4Apply the gilding sizer with a paintbrush. Wait at least 30 minutes until the sizer has dried to a clear finish.[2] At this point, the sizer will still feel tacky (fairly dry but sticky to the touch). It will then remain tacky for several more hours, giving you time to apply the gold leaf.
- An alternative way of testing for tackiness is to glide your knuckle down the surface of the object. If you can hear a squeak, it’s ready for the gold leaf.
- While the sizer is drying, clean the gilding cushion.


Cleaning the Gilding Cushion
-
1Take out the gilding cushion. A gilding cushion is used in the process of cutting the gold leaf. It consists of leather stretched over a wooden block. The leather provides a smooth surface that won’t tear the leaf.
-
2Open the package of pumice powder. Scoop out a small amount with the gilding knife. This should be enough to cover about the first inch (25.4mm) of the blade. Slowly bring the knife to the gilding cushion.
-
3Degrease the gilding cushion. Spread the powder over the surface of the cushion using the long edge of the blade. Lightly distribute the powder across the surface of the cushion by moving the blade back and forth. Continue doing this until the powder covers the entire surface. This will absorb any remaining grease that would make the leaf stick to the cushion.
-
4Remove excess powder. Using the flat side of the blade, scrape the remaining powder on to the cushion. Gently brush away and leftover powder from the cushion. Thoroughly wipe the blade with a cloth to remove any lingering pumice particles.[3]


Applying the Gold Leaf
-
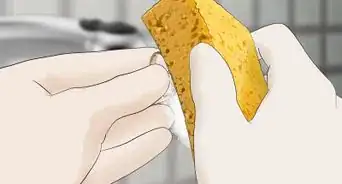
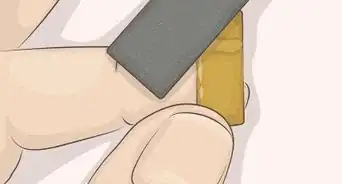
1Cut the gold leaf into smaller pieces. This will make it easier to apply. Lay the leaf flat on the gilding cushion. The matte side with the backing should be face-up. Gently apply pressure with the blade of the knife to begin cutting. You should do this while you’re waiting for the sizer to dry.
-
2Remove the leaf from the backing. Do this while the leaf is still laying flat on the cushion. A common way to do this is to carefully insert the knife between the leaf and the backing. Keep the tissue paper backing for burnishing the leaf in the application process. Alternatively, you can:
- Lay the leaf and backing on the surface of the object. The backing side should face you.
- Burnish the leaf with a brush or your fingers.
- Carefully pull the paper backing away.
- Blow on the gold leaf. This will encourage it to lay flat enough to work with.
-
3Lay the gold leaf on the object. It will only stick to the tacky areas of the surface. If your sheets of leaf don’t cover the entire width of the surface, you can arrange the pieces in a simple grid pattern.[4]
- Don’t worry if areas seem to overlap. You can remove those later.
-
4Smooth the leaf. Lay the tissue paper backing on top of the leaf. Use your index finger to gently burnish the leaf and remove any air pockets. Keep the paper still to avoid tearing or scratching the leaf.
-
5Brush the leaf. Use a soft gilder's brush to make the leaf adhere to the object completely and smoothly. Move in a gentle back-and forth motion. The movement of the brush will remove the excess pieces of leaf. The object should look as if it’s made of gold rather than covered in gold leaf.
-
6Look for imperfections. This includes holes or other places where the gold leaf didn't adhere. Apply small bits of leaf to cover them. Smooth and brush the new bits before moving to the final step.
-
7
-
8Glaze the object. This optional step will give the surface an antique look. Using a dry paintbrush, apply the glaze. Move in straight lines, going back and forth as you progress across the surface. Wipe off excess glaze with a soft dust cloth.


Community Q&A
-
QuestionCan I paint over gold leaf with egg tempera or acrylic paint?
 Community AnswerYes, you can use either medium. Medieval artists would often use tempera paint on gilded icons. You can find a tutorial on using acrylic paint at https://www.youtube.com/watch?v=rTKy5Tx9hso.
 -
QuestionCan I apply gold leaf over an oil painting?
 Community AnswerYes you can! Use a water gilding method instead of oil gilding. The gold will take instantly to any shape left on surface, such as brush strokes or indents.
 -
QuestionI have a 50th anniversary cup that has gold trim and lettering. Can I use an 18k gold pen to add names and if so will it stay on if washed?
 Community AnswerYou can use it, but you should wash it by hand only.
Things You’ll Need
- The object you want to gild
- Sand paper
- Gold leaf
- Gilding cushion
- Pumice powder
- Gilding sizer or water-based glue
- Gold leaf sealer
- Paintbrush
- Gilding primer
- Gilder’s brush
- Cloth
- Gilding knife or butter knife
- Protective topcoat
- Painter’s tape
- Oil-based glaze (optional)


References
- ↑ https://www.artsupplies.co.uk/blog/beginners-guide-to-starting-out-with-gold-leaf/
- ↑ http://www.bhg.com/decorating/lessons/how-to-gold-leaf/
- ↑ http://www.gold-vault.com/how_to_handle_the_leaf.html
- ↑ https://www.youtube.com/watch
- ↑ http://www.bhg.com/decorating/lessons/how-to-gold-leaf/
- ↑ http://www.architecturaldigest.com/story/bronsons-last-call-gold-leaf
About This Article

To apply gold leaf, start by brushing on a layer of Gilder’s primer over the area you want to gild, followed by a layer of gilding adhesive. While the adhesive is drying, cut the leaf into smaller pieces to make it easier to work with. Then, remove the leaf from the tissue paper backing, lay it over your object, and place the tissue backing on top of the gold. Press down on the tissue paper with your finger to remove any air pockets, then smooth out the leaf with a gilder’s brush. Finally, seal the gold leaf with an acrylic topcoat to protect the leaf from damage. To learn more, including how to give your gilded surface an antique look, scroll down.