This article was co-authored by wikiHow Staff. Our trained team of editors and researchers validate articles for accuracy and comprehensiveness. wikiHow's Content Management Team carefully monitors the work from our editorial staff to ensure that each article is backed by trusted research and meets our high quality standards.
There are 7 references cited in this article, which can be found at the bottom of the page.
This article has been viewed 26,760 times.
Learn more...
Blocking your Floyd Rose tremolo is a modification that enables you to dive bomb like Eddie Van Halen. This is sometimes called hard-tailing your guitar. All you will need is a small block of wood, a screwdriver, and the equipment needed to change your strings. If you’re not totally confident about your ability to perform this modification to your instrument, you may want to talk to a qualified technician.
Steps
Loosening Your Tremolo
-
1Remove the tremolo bar’s cavity cover on the back of the guitar. Using a Phillips screwdriver, carefully remove all 6 screws holding on the cavity cover. Lift off the cover.[1]
- Set the cover and screws aside in a safe place, so nothing gets lost.
-
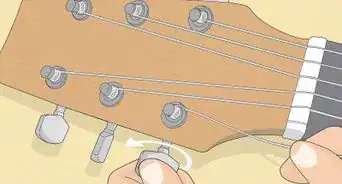
2Remove all of the strings from the guitar (optional). Use your guitar string winder to loosen and detach all of your strings from the headstock. Use your guitar string cutter to clip of the curly frayed ends of each string. Press your strings down through the bridge until they poke out the back. Pull on the bottom end of each string and slide it all the way through the bridge.[2]
- Some technicians advocate for removing the strings, while others do not.
- Removing the strings from the guitar removes tension from your tremolo. This can make it easier to fit the block into the tremolo opening.
- Performing this modification with the strings still attached keeps the tremolo in your natural playing position. If you install the block without moving the tremolo, your guitar will be ready to play as soon as you close the back cavity.
Advertisement -
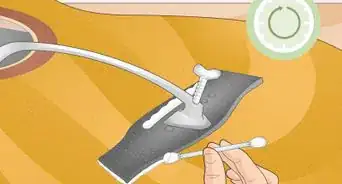
3Loosen the 2 screws at the top of the tremolo. Locate the 2 screws at the top of your tremolo (toward the neck of the guitar). Use your Phillips screwdriver to carefully loosen these screws.[3]


Creating Your Block
-
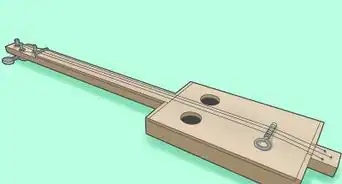
1Measure the open space below the tremolo. Locate the space that sits just below the tremolo (between the spring block and the back of the body cavity). This space is bordered on 1 side by the tremolo itself, and on the other 3 sides by the body cavity. Use a ruler to measure the width and depth of this opening. Write these numbers down.[4]
- The length of the opening should be about 1–1.5 inches (2.5–3.8 cm). There is no need to measure this.
-
2Measure your 1 inch (2.5 cm) thick wooden plank. You are going to create a small block of wood that will fit in the opening below your tremolo. Start with a 1 inch (2.5 cm) thick wooden plank. Use a ruler and a permanent marker to mark the correct width and depth.[5]
-
3Use a hand saw to cut your plank of wood. Place your plank of wood on a flat surface, with the portion you plan to cut first pointing up. Steady your plank of wood with your non-dominant hand. Place the sharp side of your saw on the wood, and begin sawing with a backward motion. Move the saw back and forth until you’ve made the cut. Turn your plank and cut the other side.
- Wear gloves and protective eyewear before using a saw.
-
4Sand the block you’ve created with 150-grit sandpaper to make it smooth. Run sandpaper over the edge of your block to remove any loose wood or dust. If the block you created is slightly too large, you can also use sandpaper to make it a little smaller.[6]
- 220-grit sandpaper will also work.


Installing The Block
-
1Slip the block into the space under the tremolo. Your wooden block should drop right into the space below your tremolo. If it is too big, you can sand it down a little more.[7]
-
2Tighten the 2 screws at the top of the tremolo just slightly. Use your Phillips screwdriver. You want these screws to be secure, but you still want slack from the tremolo strings to put pressure down on your block.
-
3Restring your guitar if you removed the strings. Slide your new strings in through the holes on the back of the guitar. Pull each string up through the tuning key, add about 3 inches (7.6 cm) of slack, and then bend the string sharply to hold it in place. Use a string cutter to remove the excess string, and wind your guitar strings until they have good tension.[8]
- You will need to tune your guitar after this.
-
4Close up the cavity cover and replace the screws. Place the cavity cover on the back of your guitar. Locate your screwdriver and 6 screws. Carefully tighten the screws on the back of the cavity cover.[9]


Things You’ll Need
- Phillips screwdriver
- Ruler or tape measure
- Pack of guitar strings
- Guitar string winder
- Guitar string cutter
- 150-grit sandpaper
- 1 inch (2.5 cm) thick plank of wood
- Saw
- Marker
Warnings
- Wear gloves and protective eyewear when operating a saw.⧼thumbs_response⧽
- Be sure to saw on a flat and stable surface.⧼thumbs_response⧽
- Use a clean, sharp saw.⧼thumbs_response⧽
- When sawing, apply pressure on the downstroke only.⧼thumbs_response⧽


References
- ↑ https://www.youtube.com/watch?v=xkj8p4Z3Rjg&feature=youtu.be&t=142
- ↑ https://www.youtube.com/watch?v=xkj8p4Z3Rjg&feature=youtu.be&t=81
- ↑ https://www.youtube.com/watch?v=xkj8p4Z3Rjg&feature=youtu.be&t=195
- ↑ https://www.youtube.com/watch?v=xkj8p4Z3Rjg&feature=youtu.be&t=246
- ↑ https://blog.zzounds.com/2017/04/18/how-to-deck-or-block-your-tremolo/
- ↑ https://blog.zzounds.com/2017/04/18/how-to-deck-or-block-your-tremolo/
- ↑ https://blog.zzounds.com/2017/04/18/how-to-deck-or-block-your-tremolo/
- ↑ https://www.youtube.com/watch?v=xkj8p4Z3Rjg&feature=youtu.be&t=372
- ↑ https://www.youtube.com/watch?v=xkj8p4Z3Rjg&feature=youtu.be&t=337
About This Article