wikiHow is a “wiki,” similar to Wikipedia, which means that many of our articles are co-written by multiple authors. To create this article, 263 people, some anonymous, worked to edit and improve it over time.
The wikiHow Video Team also followed the article's instructions and verified that they work.
This article has been viewed 2,027,428 times.
Learn more...
Bottle rockets are great projects for you to make, or to give your students to make. Anyone can make bottle rockets because they are quite easy to build.The materials are also pretty easy to find, which makes it a great fit for day off from school or fun in the summer. But, figuring out exactly what to do can be hard, and it can be hard to know where to start. This article will teach you two different ways to make a bottle rocket that is definitely going to be a success.
Steps
Making a One Bottle Rocket with a Launcher
-
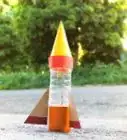
1Roll a piece of paper into a cone or use a plastic cone that is easily available in the market. This will be the nose cone of the rocket. Feel free to use colored or patterned paper to design the rocket.[1]
- Colored construction paper is both durable and nice-looking!
-
2Wrap the nose cone with duct tape. This will have it stronger and more water-resistant.
- If you want to add a bit of color to your rocket, you can use colored duct tape to wrap the nose cone.
- You can also paint the plastic bottle if you’d like to decorate it further. Feel free to also add a design or logo to the plastic bottle (or body of) the rocket.
Advertisement -
3Attach the nose cone to the bottom of the bottle. You can glue it or use duct tape and, if you have it, wire tape.
- Try to put it on as straight as you can onto the bottle and make sure it is secure.
-
4Take thin cardboard and cut out 3-4 triangles. Since these will be the fins of your rocket, try to cut them at right angles so they can help the rocket stand straight.
- Use cardboard, construction paper, or normal paper as material for the fins. Signboards, such as the ones that say “For Rent” or “For Sale” are also very good fin material.
- Place the fins on the lower part of the rocket.
- Bend “tabs” into the sides of the fins so that they can attach to the rocket body more easily. Then, tape or glue them on.
- If you line up the bottoms of the fins with the bottom of the rocket, it should be able to stand on its own.
-
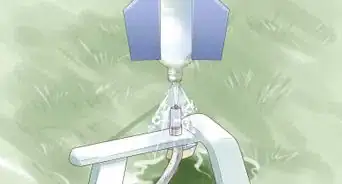
5Add ballast to give the rocket weight. Ballast can be any material that provides weight for the rocket and ensures the rocket can coast once it is launched. The mass should be *above* the fins. The farther the better.
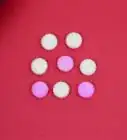
- Use Play-Doh or clay as ballast as it is soft, malleable, and unlike pebbles or marbles, won’t fall out or scatter when the rocket launches.
- Mold about half a cup of Play-Doh or clay into the ridges on the bottom of the bottle to form a rounded end on the outside of the bottle.
- Cover it with duct tape to keep it secure.
-
6Fill up the bottle with water. Pour 1 liter (0.26 US gal) of water into the bottle.[2]
-
7Make a very small hole through a cork. Make sure the hole is the same size as the valve of your bicycle pump valve.
-
8Stuff the cork into the bottle opening. You can also wedge it in with pliers for a tighter squeeze.
-
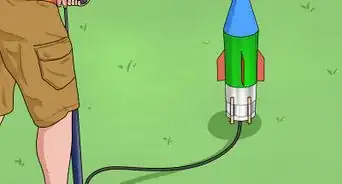
9Place the needle-like valve of a bicycle pump into the opening of the cork. Make sure it fits into the cork tightly.
-
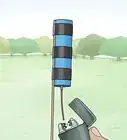
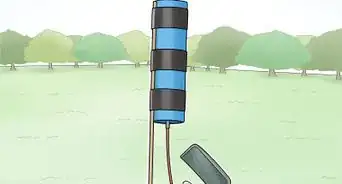
10Turn the rocket right-side up. Hold it by the neck of the bottle onto the bicycle pump valve, and aim it away from your face.
-
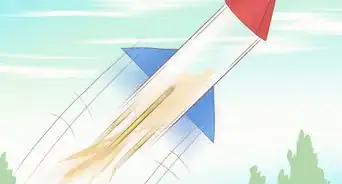
11Launch the bottle rocket. Make sure you are in an open, outdoor area. The rocket will shoot up quite fast and high so remove any obstructions and warn anyone around you before you launch it. To launch the rocket:[3]
- Hold the rocket by the neck of the bottle and pump air into it. The rocket will go off when the cork can no longer withstand the pressure building up in the bottle.[4]
- Let go of the bottle. The water will shoot out everywhere when the bottle rocket takes off, so be prepared to get a bit wet.
- Do not approach the rocket once you start pumping, even if it appears that nothing is happening with the launch, as this can lead to injury.[5]

Making a Two Bottle Rocket with a Launcher
-
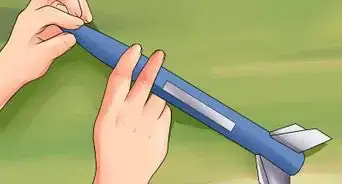
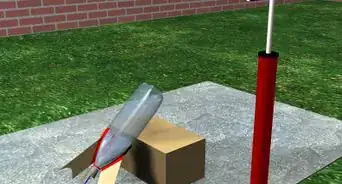
1Cut off the cap end of one of the bottles. Use scissors or a box cutter. You want a nice, clean-cut so the bottles can be taped together cleanly and straight.
- Cutting off the cap end of the bottle will make the rocket more aerodynamic and durable. A rounded end is also softer so it will do less damage to any objects if the rocket hits something when it lands.
-
2Keep the other bottle intact. It will act as the firing chamber that will hold the water and pressurized air. It will also be attached to the launcher or another bottle.
-
3Add any decorative paint or designs to the bottles. Feel free to personalize the two bottle rocket with any logos or patterns. Be creative!
-
4Put ballast into the cut bottle. You can use Play-Doh, similar to the procedure for the one bottle rocket, or kitty litter. Kitty litter is cheap, heavy, and when wet, will stay in place well.
- To put in the kitty litter, tip the cut bottle and pour in about ½ inch of kitty litter. Then, add enough water to wet the kitty litter completely. Add another ¼ inch of kitty litter and soak it again.
- Avoid dumping in too much kitty litter as this can create a dry layer of kitty litter than could get loose and scatter when the rocket is launched. Too much kitty litter, or weight, in the rocket, can also cause the rocket to hit hard when it comes down.
- Dry the inside walls of the bottle and use duct tape to help hold the kitty litter in place.
-
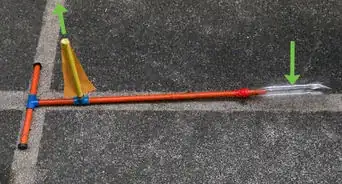
5Tape together the two bottles. Line them up so that the cut bottle is on the bottom of the intact bottle. Press the bottles together, so that the edge of the bottom, cut bottle goes over the intact bottle and tape them together with duct tape.
-
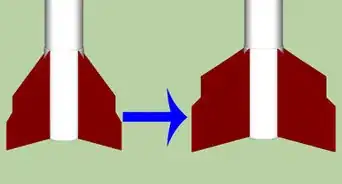
6Take thin cardboard and cut out 3-4 triangles. These will be the fins of your rocket, so try to cut them at perfect right angles. This way, they will hold the two bottle rocket straight and make sure it coasts smoothly.
- Place the fins on the lower part of the cut bottle.
- Bend “tabs” into the sides of the fins so that they can attach to the rocket body more easily. Then, tape or glue them on.
-
7Make a very small hole in a cork. Ensure the hole is the same size as the valve of your bicycle pump valve.
-
8Stuff the cork into the opening of the intact bottle. You can also wedge it in with pliers for a tighter fit.
-
9Place the needle-like valve of a bicycle pump into the opening of the cork. Make sure it fits into the cork tightly.
-
10Turn the rocket right-side up. Hold it by the neck of the bottle and place it onto the bicycle pump valve.
-
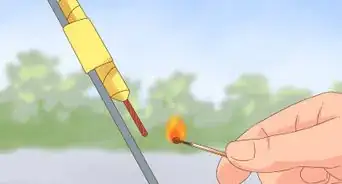
11Launch the bottle rocket. Make sure you are in an open, outdoor area. The rocket will shoot up quite fast and high so remove any obstructions and warn anyone around you before you launch it. To launch the rocket:[6]
- Pump air into the bottle. The rocket will go off when the cork can no longer withstand the pressure building up in the bottle.[7] This is usually at around 80 psi.
- Release the bottle. The water will shoot out everywhere when the bottle rocket takes off, so be prepared to get a bit wet.
- Be cautious once you start pumping and do not approach the rocket, even if it appears that nothing is happening with the launch, as this can lead to injury.[8]


Community Q&A
-
QuestionIs this safe for school?
 Community AnswerYes. In fact, bottle rockets are a common school science project!
 -
QuestionWhat kind of bottle do I have to use?
 Community AnswerA good type of bottle would just be a regular 1L soda bottle such as a Coke bottle.
 -
QuestionIs there any easier way to make a model of a rocket?
 Community AnswerGet an empty bottle and put wings on the side. Add vinegar and baking soda. Put it on the ground upside-down, and it will fly up.
Warnings
- Be careful when using sharp objects to cut the bottle or the cardboard, especially if you are under 10 years old.⧼thumbs_response⧽
- Keep your watchers (spectators) away from at least 5 meters.⧼thumbs_response⧽
Things You'll Need
Method 1:
-
For the rocket:
- A sheet of 8” x 11” paper
- A bottle (a 2-liter bottle works great for a regular-sized rocket, but if you want to build a mini-rocket, you can use a regular-sized water bottle)
- Fin material (thick cardstock or thin cardboard would work well)
- Duct tape (to decorate and hold together your rocket)
- Scissors
- Play-Doh or clay
- Glue (optional)
-
For the rocket launcher:
- Water
- Bicycle pump with needle valve
- Cork
- Drill
- Drill bit the size of the bicycle pump valve
Method 2:
-
For the rocket:
- Two bottles (two 2-liter bottles, or two regular-sized water bottles)
- Fin material
- Scissors
- Duct tape
- Play-Doh or kitty litter
-
For the rocket launcher:
- Water
- Bicycle pump with needle valve
- Cork
- Drill
- Drill bit the size of the bicycle pump valve
References
- ↑ http://www.science-sparks.com/2012/03/12/making-a-bottle-rocket/
- ↑ http://www.tclauset.org/21_BtlRockets/BTL.html
- ↑ http://www.science-sparks.com/2012/03/12/making-a-bottle-rocket/
- ↑ http://www.tclauset.org/21_BtlRockets/BTL.html
- ↑ http://www.science-sparks.com/2012/03/12/making-a-bottle-rocket/
- ↑ http://www.science-sparks.com/2012/03/12/making-a-bottle-rocket/
- ↑ http://www.tclauset.org/21_BtlRockets/BTL.html
- ↑ http://www.science-sparks.com/2012/03/12/making-a-bottle-rocket/
About This Article
To build a bottle rocket, start by rolling a piece of paper into a cone and covering the outside of it with duct tape. Then, attach the cone to the bottom of an empty plastic bottle and cut out 4 cardboard triangles to make your rocket's fins. Attach the cardboard to the bottle and then fill up the bottle with water. Once you've done that, poke a hole in a cork and plug the opening of the bottle with it. Finally, attach a bicycle pump valve to the cork. To learn how to launch your bottle rocket, scroll down!