This article was co-authored by Kevin Turner. Kevin Turner is a handyman and the owner of Red Gator Maintenance, a handyman business based in Fresno, California. Working on handyman-related projects since the age of 12, Kevin specializes in a wide variety of home improvement projects such as (but not limited to) lighting/electrical, plumbing, deck staining, drywall repairs, cabinet installation, air conditioning, trash removal, and window, roof, and appliance repairs.
wikiHow marks an article as reader-approved once it receives enough positive feedback. In this case, 100% of readers who voted found the article helpful, earning it our reader-approved status.
This article has been viewed 300,355 times.
An energy efficient home can save money on utility bills and keep the internal temperature at consistent levels. Properly caulked windows are the first step to seal off air leaks and keep out moisture. Learning how to caulk windows is a smart move, and should be part of a thorough plan for weatherizing your house against the elements.
Steps
Planning and Prepping
-
1Inspect the house. How many windows need to be caulked? Is there damage to the window casings that also may prevent a good seal? Determine how many windows need to be worked on and how much time each one will require before you begin this project. For reasons that will become clear, timing is important. You must have a sense of how long this project will take.
-
2Identify the materials you need before you go to the store. If you don't already have one, you will need a caulking gun (a tool that pushes the caulk out of its tube). You may also need materials to repair your window frames if they are rotting (if wooden) or damaged. However, the biggest decision you need to make regarding materials pertains to the type of caulk you choose.There are a number of varieties, and each has attributes that make it suitable for certain situations.[1]
- Acrylic latex caulk is not responsive to temperature changes--i.e., it will not flex or expand as it clings to the bonded materials. It is also not as durable in moist environments. It can be painted over, but in most places it is really not suitable as a caulk for window frames.
- Siliconized latex caulks have better adhesive properties than acrylics. The best quality siliconized latex caulks are also used as sealants in bathrooms because of the resistance to moisture. Like acrylic latex caulks, siliconized latex products can be painted over.
- Silicone caulk (different from siliconized latex) is considered one of the most durable caulks available. It is used as a sealant in a wide variety of places, and is especially noted for its water resistance. However, it does not seal as well to wood, and certain varieties even encourage metal corrosion. If you do have difficulties with it, you may be out of luck after you have applied it; it is very difficult to remove. Also, most varieties cannot be painted over.[2]
- Polyurethane caulks are considered to be high-quality outdoor sealants, and especially good at sealing together surfaces of different types (such as metal and wood or wood and glass). It is considered relatively easy to work with, but if used outdoors they must be painted over because polyurethanes are not ultra-violet resistant and could break down in the sun. They also are one of the more expensive varieties, and that may be significant if you have a large number of windows to caulk.
Advertisement -
3Watch the weather. If you are caulking or recaulking all of the window frames of your house, understand that it is a substantial project. It is also one that requires the right weather conditions. Exterior caulk should be applied when the temperature is at least 45 °F (7 °C), and it is also best if the humidity is low. The caulk may take 24 hours or more to dry, and wild temperature swings or rainstorms can ruin a hard day's work.[3]
Caulking the Windows
-
1Begin at a practical starting point. Choose a window that is safely accessible on the ground floor then move on to the upper levels where you may need to climb a ladder.
-
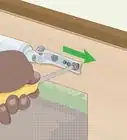
2Remove any old caulk from around the window frames. You will get the best possible seal by creating two clean surfaces for the new caulk to attach itself. After the largest pieces are removed, use a putty knife to remove any remaining bits of the material.
-
3Prepare the surface of the windows. Repair any rotted wood or damage on or around the window before applying caulk. Remove any dirt, debris, and old paint that will hinder adhesion. Wash the area, but make sure it is dry before caulk is applied.
-
4Place the tube in the caulk gun. Pull the notched rod back. Place the tip of the tube in the yoke. Turn the rod so that the notching mechanism engages. Squeeze the handle just enough to move the plunger cup securely against the end of the tube, inside the cylinder.[4]
-
5Cut the tip of the tube. Cut it at a 45 degree angle about a 1⁄4 inch (0.6 cm) back from the tip. Use a slender nail to break the seal inside the tip.[5]
-
6
-
7Use an object to smooth over the sealant and remove excess caulk.[8] This process is referred to as "tooling." Some people use a popsicle stick or a rag over their finger (some also advocate use of an exposed finger, but that is inadvisable for certain varieties of caulk).
-
8Allow the caulk to dry for at least 24 hours. Though a "skin" will develop before it has fully hardened, the caulk may still be unstable and should be left alone. As long as it gets a chance to dry in place, your project will be a success.

Expert Q&A
Did you know you can get expert answers for this article?
Unlock expert answers by supporting wikiHow
-
QuestionHow much of the tip do you cut off on a fresh tube of caulk?
 Barry ZakarBarry Zakar is a professional handyman and the founder of Little Red Truck Home Services based in the San Francisco Bay Area. With over ten years of experience, Barry specializes in a variety of carpentry projects. He is skilled at constructing decks, railings, fences, gates, and various pieces of furniture. Barry also holds his MBA from John F. Kennedy University.
HandymanThis is one of the most common mistakes people make. Just clip the smallest portion off that you possibly can. You don't need a giant bead of caulk in most cases and you can always go over a section twice if you want the caulk to be thicker.
Support wikiHow by unlocking this expert answer.
-
QuestionHow do you get an even bead?Barry ZakarBarry Zakar is a professional handyman and the founder of Little Red Truck Home Services based in the San Francisco Bay Area. With over ten years of experience, Barry specializes in a variety of carpentry projects. He is skilled at constructing decks, railings, fences, gates, and various pieces of furniture. Barry also holds his MBA from John F. Kennedy University.
HandymanJust try to maintain an even amount of pressure while you're pulling the trigger on the gun. If you squeeze really hard, you have to move the gun quickly, so work slow instead of fast if you want a consistent thickness.Support wikiHow by unlocking this expert answer.
-
QuestionWhat's the easiest way to smooth the caulk down?Barry ZakarBarry Zakar is a professional handyman and the founder of Little Red Truck Home Services based in the San Francisco Bay Area. With over ten years of experience, Barry specializes in a variety of carpentry projects. He is skilled at constructing decks, railings, fences, gates, and various pieces of furniture. Barry also holds his MBA from John F. Kennedy University.
HandymanStick your index finger under the sink, get it wet, and use your finger to smooth it down. This will give you a clean, even look.Support wikiHow by unlocking this expert answer.
Warnings
- Silicone caulk will stain clothing, so be sure to dress appropriately.⧼thumbs_response⧽
- An essential part of weatherizing your house is adequate ventilation. Learning how to caulk windows prevents air from being displaced, but intentional exchange of inside air with outside air is necessary.⧼thumbs_response⧽


References
- ↑ http://www.motherearthnews.com/diy/how-to-choose-the-best-caulk.aspx#axzz3Hej6Voym
- ↑ http://www.thisoldhouse.com/toh/asktoh/question/0,,422884,00.html
- ↑ http://state.ces.ncsu.edu/wp-content/uploads/2014/03/DIY-Caulking-Around-Doors-and-Windows.pdf
- ↑ http://www.bobvila.com/articles/how-to-use-a-caulking-gun/#.VFKvB_nF-So
- ↑ Barry Zakar. Handyman. Expert Interview. 16 July 2020.
- ↑ Kevin Turner. Commercial Handyman. Expert Interview. 15 July 2020.
- ↑ Barry Zakar. Handyman. Expert Interview. 16 July 2020.
- ↑ Kevin Turner. Commercial Handyman. Expert Interview. 15 July 2020.
- ↑ Kevin Turner. Commercial Handyman. Expert Interview. 15 July 2020.
About This Article

Before caulking your windows, start by removing the old caulk from the window frame with a putty knife and cleaning off any dirt, debris, and old paint. Afterwards, press the tip of your caulk gun against 1 corner of the window, and squeeze the trigger to apply the caulk in 1 continuous bead until you reach the other corner. Then, repeat the process for the other sides of the window. Finally, remove any excess caulk using a popsicle stick or a rag placed over your finger, and let it dry for at least 24 hours. For more advice, including how to choose the right type of caulk for your windows, keep reading.