This article was co-authored by Lui Colmenares and by wikiHow staff writer, Hunter Rising. Lui Colmenares is a handyman and licensed home improvement contractor for Mr. Handy NYC based in New York City, New York. Lui is trained and educated as an industrial engineer and specializes in carpentry, painting, and general handyman work such as mounting TVs, doorknob and deadbolt installation, furniture assembly, tile repair, and grouting. Mr. Handy NYC prides itself on quality work performed with speed, skill, and punctuality.
There are 7 references cited in this article, which can be found at the bottom of the page.
wikiHow marks an article as reader-approved once it receives enough positive feedback. In this case, 94% of readers who voted found the article helpful, earning it our reader-approved status.
This article has been viewed 147,530 times.
Putting posts in the ground is an important step in building a fence, and pouring cement into the holes will keep your posts sturdy and protected. After digging the hole, all you need to do is mix your cement and let it set. In just 1 day, you can have posts in the ground that will last for a long time!
Steps
Making the Hole
-
1Check for utility lines in your yard before you dig. Many yards have utility lines for electricity, plumbing, or gas running underneath them. Contact your local utility companies 2-3 days before you plan on digging your post to see if there are any lines running underneath the area.[1]
- If you’re in the United States, you can call 811 a few days before you dig so utility companies can come mark where they have lines.
-
2Measure your post, and make your hole 3 times its width. Use a tape measure to find the width of your pole. When you have the measurement, mark the ground where you want to place your post. Make sure there is enough room to make the hole 3 times the width of your fence post so you can pour the cement.[2]
- For example, if you’re putting in a 4 in × 4 in (10 cm × 10 cm) post, your hole should be 12 inches (30 cm) in diameter.
Advertisement -
3Use post hole diggers to make your hole. Hold your post hole diggers so the handles are together and the jaws are open. Press the jaws into the ground and pull the handles apart to clamp the soil. Turn the diggers to cut out a circle, and lift the soil out of the ground. Continue digging the hole until you reach a depth equal to ⅓ of the post’s above-ground height plus 6 inches (15 cm).[3]
- For example, if you want a 6 ft (1.8 m) post, your hole should be 30 inches (76 cm) deep.
- You need a solid foundation for your posts, so don't dig holes in muddy soil.[4]
-
4Layer gravel at the bottom of the hole to increase drainage. Wood will prematurely rot and metal will rust if it sits in water. To make sure your hole doesn’t hold water, fill it with 6 inches (15 cm) of gravel. Use a hoe to press the gravel down to pack it tight.[5]
- Gravel can be purchased at any home and garden store.


Setting the Post
-
1Put the post in the center of your hole. Set the end of the post on top of your gravel in the middle of the hole. Use a two-sided post level to check if your post is straight and plumb. [6]
-
2Mix fast-setting concrete in a wheelbarrow. Purchase a quick-setting concrete from your local hardware store. Pour the dry mix into a clean wheelbarrow and make a depression in the middle of the mix. Pour 3 US quarts (2.8 L) of water per 80 lb (36 kg) bag of concrete into the depression and mix it together with a hoe. Keep mixing the concrete until it has the consistency of a thick oatmeal and holds its shape when you squeeze it.[7]
- Avoid adding extra water to your concrete mix since it will make it weaker.
- Wear rubber gloves before touching concrete so it doesn’t dry on your skin.
- Have someone help you lift the bag of concrete if you can’t do it by yourself.
-
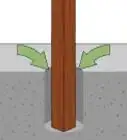
3Pour the concrete into the hole until it’s 2–3 in (5.1–7.6 cm) below ground level. Use a shovel or hoe to transfer your concrete into the hole. Make sure to evenly pour the concrete on all sides of your post so the hole fills in completely. Leave at least 2 inches (5.1 cm) between your cement and ground level so you can cover it later. Slope the concrete away from the post so it drains water better.[8]
- If you can, have someone hold the post while you pour the concrete so your post doesn’t move around.
-
4Check if your post is plumb using a level. Once your concrete is in the hole, use your two-sided post level to make sure your post is straight. Move and adjust the post if you need to until it sits plumb. Tamp the concrete again with the end of your hoe if you made any adjustments to the post.[9]
- If you don’t have a two-sided level, use a straight level and switch between checking each side of the post.
-
5Let the concrete set completely overnight. Although fast-setting concrete dries within 20 minutes, don’t put any weight or heavy loads on your post until the next day. That way, you can ensure that it stays plumb while it dries.[10]
Tip: If your post isn't level once the cement is dry, dig around the cement base and shift your post so it's level. Fill the area around the post with more concrete.[11]


Warnings
- Wear gloves before handling concrete so you don’t damage your skin.⧼thumbs_response⧽
- Never dig directly over a utility line since you could break it.⧼thumbs_response⧽
Things You’ll Need
Digging the Hole
- Earth auger or post hole digger
- Gravel
- Hoe
Setting the Post
- Concrete
- Water
- Wheelbarrow
- Hoe
- Shovel
- Level


References
- ↑ http://call811.com/before-you-dig/how-811-works
- ↑ http://www.acmehowto.com/concrete/set-post-concrete.php
- ↑ https://youtu.be/cG_vRZjLSq8?t=25
- ↑ Lui Colmenares. Handyman. Expert Interview. 18 August 2020.
- ↑ http://www.acmehowto.com/concrete/set-post-concrete.php
- ↑ http://www.acmehowto.com/concrete/set-post-concrete.php
- ↑ https://youtu.be/ANkPGzAEAHI?t=22
- ↑ https://youtu.be/ODH_Xj3RrGQ?t=201
- ↑ https://youtu.be/ODH_Xj3RrGQ?t=211
About This Article

To cement a post in the ground, you’ll need a post hole digger, fast-setting concrete, gravel, a shovel, and a wheelbarrow. Before you dig your hole, contact your local utility companies to make sure there are no lines running where you want to dig. Plan on making the hole for the post 3 times wider than the width of the post and 1/3 deeper than the height of the post. Use your post hole digger to dig out the hole, then layer the bottom 6 inches with gravel. Then, place your post in the center, mix your concrete, and pour it into the hole. Leave 2 to 3 inches at the top so you can cover it with soil. Although fast-setting concrete can dry within 20 minutes, leave it overnight before putting any weight on the post. For more tips, including how to make sure your post is level, read on!