X
wikiHow is a “wiki,” similar to Wikipedia, which means that many of our articles are co-written by multiple authors. To create this article, volunteer authors worked to edit and improve it over time.
This article has been viewed 27,673 times.
Learn more...
The valve spring is a crucial component to the valve train of your engine. Its basic purpose is to allow the valve to be opened, and then return each valve to the closed position while keep it tight against the seat throughout the combustion process. The following instructions can be applied to the replacement process of valve springs, from start to finish, on any Gen III/IV GM LS based V-8.
Steps
Part 1
Part 1 of 3:
Valve Cover Removal
-
1Locate the coil packs on the drivers side valve cover.
-
2Disconnect the spark plugs. Beginning with the forward most coil, trace the spark plug wire down to the spark plug. Remove the wire from the spark plug by firmly grasping the boot at the end of the wire and pulling on it. Let the plug wire dangle from the coil. Repeat this process working front to back until all four wires on the drivers side are disconnected from their respective spark plug.Advertisement
-
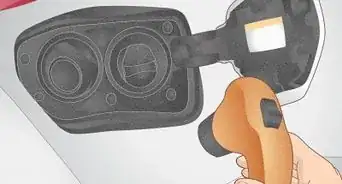
3Locate the large connector between the center-most coils. Using a flat head screwdriver, apply gentle upward pressure on the clip by prying between the clip and the connector body, while gently pulling the male end of the connector out towards the center of the engine. Tuck the male end out of the way for now.
-
4Loosen the bolts. Using a 3/8 drive ratchet and a 10mm socket, loosen the five bolts attaching the coil bracket to the top of the valve cover. Carefully thread each bolt out by hand, being sure to keep the coil pack assembly from falling. Once the assembly is free, remove from the engine bay and set it aside for now.
- Using a 3/8 drive ratchet and a 8mm socket, loosen the four valve cover bolts in the center of the valve cover. Once loose, gently lift the valve cover off of the cylinder head. If the valve cover sticks, gently pry between the cover and cylinder head. Set the valve cover off to the side.
- Repeat the procedure to remove the passenger side valve cover.


Advertisement
Part 2
Part 2 of 3:
Valve Spring Replacement
-
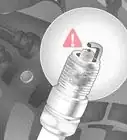
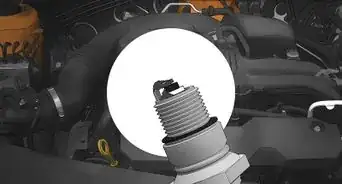
1Locate the forward most spark plug on the driver’s side. Using a 3/8 ratchet, a 3 inch (7.6 cm) extension, and a 5/8 spark plug socket, loosen the spark plug. Once loose, remove the ratchet from the extension and thread the spark plug out the rest of the way by hand. Remove plug and set aside. Repeat this process until all four spark plugs are removed from the driver side cylinder head.
-
2Locate the rocker arms above each valve spring. Beginning with the forward most rocker arm, use a 3/8 ratchet and a 10mm socket to loosen and remove the rocker arm bolt. Remove the rocker and mark as number one with grease marker. Set aside. Continue this process for the remaining 7 rockers, numerically labelling the order of which they are removed.
-
3Thread air fitting into forward most spark plug hole. Tighten firmly by hand.
-
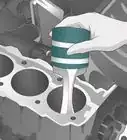
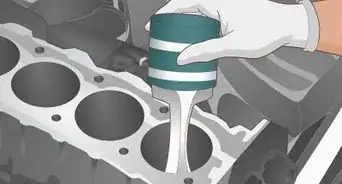
4Install the base of the valve spring compressor. It is installed on to the cylinder head between the first two valve springs, by threading the supplied hardware into the rocker arm bolt receptacles. Slide the compressor onto the stud, ensuring ample space between the valve spring locks and edges of the compressor. Thread the provided nut onto the stud until it's snug against the compressor.
-
5Apply air to air fitting using and air compressor.
-
6Tighten the nut on the compressor. Use the 3/8 drive ratchet with the 1/2in socket. The valve stem and locks will begin to protrude from the valve spring retainer. Continue until the spring has been compressed approximately ¼ of an inch. Using a pen magnet, pick up the lock halves from the valve stem.
-
7Loosen and remove the nut on the valve spring compressor. Slide the compressor off the stud. Remove the two valve springs and retainers.
-
8Place the new valve springs around the valve stems and into the seats. Reinstall the retainers on top of each spring. Slide the compressor onto the stud and thread the nut onto the stud until the compressor is snug against the springs.
-
9Tighten the nut on the compressor. Use a 3/8 ratchet and a ½ inch socket. Ensure the valve stem will pass unobstructed through the retainer as you continue to compress the valve springs. Continue until approximately ¼ inch of the valve stem protrudes from the retainer.
-
10Apply a pea sized amount of white lithium grease around the tip of the valve stem. Install both valve lock halves directly on to the valve stem, using the grease as a sort of temporary adhesive. Ensure the locks are properly seated. Repeat the process on the second valve stem.
-
11Slowly loosen nut on compressor. Be sure the locks remain in place and seat properly in the retainer as the valve spring decompresses.
-
12Release air from the cylinder. Do this once the valve springs are installed. Remove air fitting from the spark plug boss. Remove the valve spring compressor and base from the cylinder head.
- Do the same process for the remaining 6 valve springs, working front to back 2 by 2.
-
13Reinstall the rocker arms into their respective numerical position. Ensure the pushrod is properly seated in the cup of each rocker. Reinstall the rocker arm bolts and snug by hand.
-
14Set torque wrench to 20 ft lbs. Using the torque wrench and a 10mm socket, tighten each rocker bolt until audible click is heard from torque wrench.
-
15Reinstall each spark plug. Thread them back in using a 3in extension and a 5/8 spark plug socket. Attach a 3/8 ratchet to the extension and tighten the spark plug.
- Do the same process on the passenger side valve springs.


Advertisement
Part 3
Part 3 of 3:
Valve Cover Reinstallation
-
1Set the driver side valve cover onto its respective cylinder head. Thread the 4 valve cover bolts through the cover and into the cylinder head. Snug all four by hand.
-
2Set torque wrench to 8 feet (2.4 m) lbs. Tighten inner two valve cover bolts with torque wrench and 8mm socket until audible click is head from torque wrench. Repeat for the outer two.
-
3Place the driver side coil pack assembly on the respective valve cover. Be sure the bolt holes line up with the receptacles. Thread 8 coil bracket bolts into the valve cover by hand. Using a 3/8 ratchet and a 10mm socket, tighten each bolt.
-
4Reinstall male end of connector to female end. Do this by inserting and applying pressure until the clip clicks into place.
-
5Reinstall spark plug wires to each spark plug. Do this by installing the boot of each wire and applying pressure until the terminal clicks onto the spark plug.
- Repeat this procedure to install the passenger side valve cover.


Advertisement
Warnings
- To mitigate the risk of electrical shock disconnect the negative cable from the vehicles battery.⧼thumbs_response⧽
Advertisement
Things You'll Need
- 3/8 Drive Ratchet
- 3/8 Drive Torque Wrench (able to set from 8-20 ft lbs)
- 10mm socket
- 8mm socket
- 1/2in socket
- 5/8in spark plug socket
- 3 inch extension, 3/8 drive
- Valve Spring Compressor (Jegs PN: 555-805020)
- Pen Magnet
- Air Fitting
- Air Compressor and Hose
- Flat Head Screwdriver
- White Lithium Grease (1x Tube)
- Grease marker
- Valve Springs (x16)
- Valve Spring Locks (Keepers) (x32)
- Shop Rags


-Step-13.webp)


About This Article
Advertisement