This article was co-authored by Gino Colucci. Gino Colucci is a Home Improvement Specialist and the Owner of Crackerjacks Handyman Services (not a licensed contractor) in Chandler, Arizona. Crackerjacks Handyman Services offers an effective cost-saving solution for commercial and residential repair and maintenance needs, specializing in smaller projects. Crackerjacks Handyman Services carries liability insurance and all technicians go through a background check.
There are 14 references cited in this article, which can be found at the bottom of the page.
This article has been viewed 54,202 times.
Installing a Ring doorbell is a great way to monitor who comes to your door right from your smartphone. Whether you have an original Ring doorbell or a newer Ring 2, you can charge your doorbell easily with just a few tools and a USB charging cable.
Steps
Charging an Original Ring Doorbell
-
1Check to see if your Ring doorbell's battery is running low. Look at your smartphone notifications to see if Ring has alerted you that your Ring battery is running low. Ring will also send you an email to let you know that the battery needs to be charged.
- You can also check the battery anytime by opening the Ring smartphone application and checking the percentage on the battery-shaped icon.[1]
-
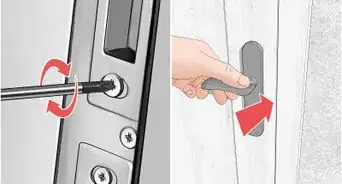
2Remove the security screws with a screwdriver. If your Ring doorbell battery is low, use the orange screwdriver provided in the Ring doorbell box to unscrew the two security screws on the bottom of the doorbell.[2]
- Remove the security set screw from the bottom of the cover turning the screw counterclockwise.
- You can also use any small star-shaped screwdriver.
Advertisement -
3Slide the doorbell up and off the mounting bracket. To remove the Ring doorbell from the wall, put your fingers on one side of the doorbell and grip with your thumb on the other. Then, pull up to slide the doorbell off the mounting bracket.[3]
-
4Plug the small end of a USB cable into the back of the doorbell. Find the USB plug on the right-hand side of the back of the device and insert the small end of the USB cable. Ring provides a small orange USB cable in the box, or you can use any USB cord that you have handy.[4]
-
5Plug the USB cable's other end into a power source. Confirm that its charging by looking at the circle on the front of your Ring doorbell device to see if it is lit up. When your Ring is charging properly, a blue light will move around the circle as it charges.[5]
-
6Unplug the USB cable if the circular light on the front is solid blue. This means that your Ring is fully charged and ready to be put back on the mounting bracket by your door. Your Ring should be charged for 6 to 12 months.
- Don't worry if your Ring smartphone app still indicates that the battery is low – it will update once the Ring is reattached and activated by motion.[8]
-
7Reattach your Ring to the mounting bracket. First, slide the Ring back onto the mounting bracket from the top down. Then, use the orange screwdriver provided to screw the security screws back into the bottom of the bracket.
-
8Test the doorbell button and motion detector. Wait about 30 seconds after attaching your Ring to the mounting bracket, then test the device by pressing the doorbell. Then, test the motion detector by moving where you have your Ring set to detect motion.[9]


Charging a Ring Doorbell 2
-
1Check to see if your Ring 2 doorbell's battery is running low. Look at your smartphone notifications to see if Ring has alerted you that your Ring 2 battery is running low. Ring will also send you an email to let you know that the battery needs to be charged.
- You can also check the battery anytime by opening the Ring smartphone application and checking the percentage on the battery-shaped icon.[10]
-
2Unscrew the security screw at the bottom of the doorbell. To detach your Ring 2 battery to charge it, use the orange screwdriver provided in the Ring 2 box to unscrew the security screw at the bottom of the device.
- You can also use any small star-shaped screwdriver.
-
3Lift the faceplate off the Ring 2 device. To remove the faceplate that covers your Ring 2's battery, first rest your fingers under the video camera lens at the top of the silver face plate. Then, place your thumb in the center of the bottom of the faceplate and pull it forward away from the wall.[11] The faceplate should come off easily.
-
4Remove the battery from the device. Once the faceplate is removed, press the black release tab in the center at the bottom of the device. This tab releases the battery so it can slide easily out of its compartment.[12]
- If you have an extra Ring 2 battery, you can insert it now to keep your Ring 2 on while the current battery is charging.[13]
-
5Plug the small end of a USB cable into the back of the doorbell. Find the USB plug on the side of the battery and insert the small end of the USB cable. Ring provides a small orange USB cable in the box, or you can use any USB cord that you have handy.[14]
-
6Plug the USB cable's other end into a power source. Confirm that its charging by looking at your Ring 2 battery to see if both the orange and blue lights are lit up. This indicates that your Ring 2 is charging properly. Once charged, only the green light will be on.[15]
-
7Unplug the battery when the orange light turns off. If only the green light remains, unplug the USB cord from the battery to detach it from the charger. This indicates that your Ring 2 battery is charged and ready to be put back into the device. Your Ring should be charged for 6 to 12 months.
- Don't worry if your Ring smartphone app still indicates that the battery is low – it will update once the Ring is reattached and activated by motion.[18]
-
8Slide the battery back into its compartment. Once unplugged from the charger, put the Ring 2 battery back into the device by holding it under the device and pushing it up into the device. You will hear a click sound when the battery is securely in place.[19]
-
9Reattach the faceplate. Once the battery is in place, you can reattach the faceplate by angling it towards the camera, just below the bottom of the camera. Then, slide the top into place and press the rest of the faceplate against the battery pack. Secure it in place by using a screwdriver to screw the security screw back into the bottom of the device.
-
10Test your Ring 2 doorbell button and motion detector. Wait about 30 seconds after re-inserting your Ring 2 battery. First, test the bell on the device by pressing the doorbell button. Then, test the motion detector by moving where you have your Ring 2 set to detect motion.[20]


Things You'll Need
- A Ring doorbell
- Small star-shaped screwdriver
- USB charging cable
- USB power source


References
- ↑ https://youtu.be/sFuKOYGw23s?t=21
- ↑ https://youtu.be/sFuKOYGw23s?t=28
- ↑ https://support.ring.com/hc/en-us/articles/206129023-Charging-the-Battery-on-Your-Ring-Video-Doorbell
- ↑ https://support.ring.com/hc/en-us/articles/206129023-Charging-the-Battery-on-Your-Ring-Video-Doorbell
- ↑ https://youtu.be/sFuKOYGw23s?t=73
- ↑ https://youtu.be/sFuKOYGw23s?t=57
- ↑ https://youtu.be/sFuKOYGw23s?t=73
- ↑ https://youtu.be/sFuKOYGw23s?t=94
- ↑ https://support.ring.com/hc/en-us/articles/206129023-Charging-the-Battery-on-Your-Ring-Video-Doorbell
- ↑ https://youtu.be/sFuKOYGw23s?t=21
- ↑ https://youtu.be/yU3DuP3TnYA?t=37
- ↑ https://youtu.be/yU3DuP3TnYA?t=43
- ↑ https://youtu.be/yU3DuP3TnYA?t=53
- ↑ https://support.ring.com/hc/en-us/articles/206129023-Charging-the-Battery-on-Your-Ring-Video-Doorbell
- ↑ https://youtu.be/yU3DuP3TnYA?t=58
- ↑ https://youtu.be/yU3DuP3TnYA?t=58
- ↑ https://youtu.be/yU3DuP3TnYA?t=73
- ↑ https://youtu.be/sFuKOYGw23s?t=94
- ↑ https://support.ring.com/hc/en-us/articles/115003012526-Charging-the-Battery-on-Your-Ring-Video-Doorbell-2
- ↑ https://support.ring.com/hc/en-us/articles/206129023-Charging-the-Battery-on-Your-Ring-Video-Doorbell
- ↑ https://youtu.be/sFuKOYGw23s?t=14
- ↑ https://youtu.be/sFuKOYGw23s?t=123
About This Article