This article was co-authored by Kanika Khurana. Kanika Khurana is an Interior Designer and the Owner of Kanika Design. With over 12 years of experience, Kanika specializes in remodeling, refurnishing, and color consulting. Kanika holds a Bachelor’s Degree in Psychology from San Francisco State University, a Redesign and Home Staging Certification, and an Associate Degree in Business Administration from Cañada College.
There are 8 references cited in this article, which can be found at the bottom of the page.
wikiHow marks an article as reader-approved once it receives enough positive feedback. In this case, 90% of readers who voted found the article helpful, earning it our reader-approved status.
This article has been viewed 165,749 times.
The condition of vinyl records has a direct impact on their sound quality. For everyday cleaning of your records, use a carbon fiber brush to remove surface dust. To get a deeper clean, apply a liquid cleaning solution to the surface of the record. Use a microfiber cloth to lightly scrub and dry the record. You can also invest in a manual cleaning machine.
Steps
Removing Minor Dust and Debris
-
1Leave your record on the turntable. Many people keep their record on the turntable platter throughout the cleaning process as it provides a secure and stable location. If you do this, make sure to move the tonearm aside, to prevent any accidental scratches. You’ll also want to use only minimal force against the record or you could damage the balance of the platter.[1]
-
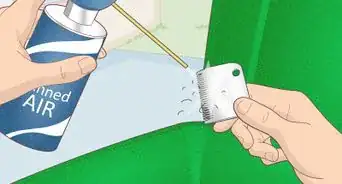
2Remove debris with canned air. You can buy a container of canned air at any office supply store. Follow the cleaning instructions on the can being careful to not get too close to the record. Gently puff air onto the record until the surface appears clean and free of dust. Repeat as necessary.
- Canned air can sometimes release condensation as well. If this happens, make sure to wipe up any liquids from your record using a clean, soft cloth.
Advertisement -
3Dust with a microfiber cloth. Invest in a medium-sized, good quality microfiber cleaning towel. Gently rub this towel in small circles over your record. You can purchase microfiber cloths at most hardware or general home stores. These cloths are good because they will not scratch your record and will pick up dust easily.[2]
-
4Use a carbon fiber brush. Look for a brush that is made specifically for cleaning records. You can find these at most audio or music stores. Place the brush gently down on top of the record. Start to spin the record slowly, guiding the brush fibers into the grooves. You can also make gentle sweeping motions from the inner to outer rings of the record.[3]
- It is a good idea to brush your record first, even if you plan to proceed to a wet cleaning method. Dry brushing will remove some of the particles that could scratch your record if paired with liquid.
- Keep an eye on your brush and get a new one if the fibers appear bent or aged. Also, keep a brush specifically reserved just for your records.[4]
-
5Use a record cleaning arm. This is an attachment that sits above the record and gently applies a small cleaning brush to the rotating record. The brush should remove dust, debris, and static from the record all at once. This type of cleaning method can also help to keep your stylus free of dust as well.[5]
- You’ll also want to clean the stylus if you notice dust accumulation on it. Stylus cleaner usually comes in a small bottle with an applicator brush or tip.[6]
-
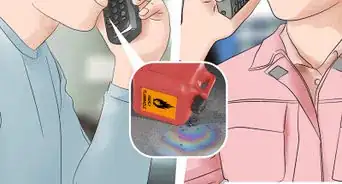
6Use a static gun. This is a small, plastic gun that cleans your record by removing static electricity from its surface. Follow the directions of the packaging and aim the gun directly at the record without touching. The gun will then neutralize the static electricity, making your record less likely to attract dust.[7]
- If your record ever makes a crinkling, crackling, or light crunching noise when being placed in, or pulled out, of its sleeve then it likely needs cleaning by an anti-static device.
-
7Use a sticky roller. You can buy a roller online, or at a music store, that is specifically designed for record cleaning. Pull the roller along the grooves of the record. It will attract dust to its surface. You can either wash the roller or remove the top layer for a future cleaning.[8]
- Just make sure that the roller does not leave any residue behind on the record. You may want to do a single test swipe just to make sure.


Doing a Deeper Clean
-
1Make your own cleaning solution. Get a medium mixing bowl and combine three parts distilled water, one part isopropyl alcohol, and a few drops of dish detergent or dishwasher fluid. Stir these together gently. It is best to use distilled water in order to avoid some of the impurities that can be found in tap water.[9]
- Be aware that there is some debate over whether or not to use alcohol as part of a cleaning solution for records. The alcohol may strip the record of its surface properties. So, be sure to use with caution and sparingly.[10]
-
2Use a prepackaged solution. Record stores and music stores often sell cleaners specifically designed for use on audio materials. Check the ingredients of any cleaner that you buy to make sure that you are comfortable with everything included. Make sure to follow the directions closely as well.[11]
- Make sure to avoid household cleaning products, such as Windex. These cleaners are far too abrasive for records and can destroy the vinyl.[12]
-
3Place the record on a cleaning mat. You can buy these mats at record stores and they are generally made out of cork or another soft material. If you are worried about using liquids on top of your turntable, then a mat is a good idea. You can place the record flat on the mat and use the attached spindle to hold the record secure.[13]
- Not all mats are designed for use with liquids. Before you clean with a solution make sure that your mat can handle it.
-
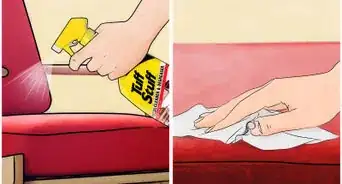
4Drizzle the liquid over the record. Once you have a solution on hand, gently drizzle a few drops over the surface of the record. Or, moisten a towel with the solution and apply this moisture to the surface of the record. You want the record to be slightly damp, definitely not drenched. Make sure you do not get the liquid on the record label as it can damage the label.[14]
-
5Wipe with a microfiber towel. Grasp your towel and wipe in a counter-clockwise motion across the record, following the grooves. Be gentle, but apply enough pressure so that the towel makes contact with the interior parts of the groove. Use a totally fresh microfiber cloth to dry the entire record when finished.[15]
-
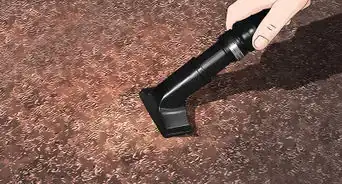
6Use a manual cleaning machine. If you are not interested in cleaning your records by hand, then you can invest in a machine to do some of the work for you. There are machines that require special fluids, ones that brush both sides of a disk at once, and ones that combine vacuuming and brushing. Do some research online to find a machine that suits your particular needs.
- Be aware that some machines can be rather costly with price tags upwards of $500. To save money, look for a machine that uses brushes to clean, instead of vacuums.[16]

Taking Care of Your Records
-
1Keep your records dry. Never play or store a wet record. It is a myth that playing a wet record will reduce static build-up. Instead, using a record with moisture on it can damage the grooves and create an even bigger mess to clean. Make sure that you fully wipe down your records with a microfiber cloth or let them air dry on a cleaning mat.[17]
-
2Touch them carefully. Try to avoid touching the interior grooves of your records whenever possible. Instead, handle them by grabbing the label or perimeter of the disk with your fingertips. The oil on your fingertips can attract dust to the grooves and make it more difficult to clean the record.[18]
-
3Place them in archival sleeves. When your records are cleaned, place them into fresh interior sleeves. Anti-static plastic sleeves are usually a good option. Look for a sleeve that is labeled as archival quality and non-scratching. This will preserve your disk as you take it in and out to play it.[19]
-
4Store them vertically. Make sure to place your records vertically next to one another. If you lay them flat, then your risk warping or bending. If your record is leaning to one side, this can also cause bending. So, keep the records placed firmly together with little room in between.[20]
- Store your vinyl records vertically on shelves to protect them from damage.


Warnings
- Keep your records away from temperature extremes and humidity.[22]⧼thumbs_response⧽
Things You’ll Need
- Canned air
- Microfiber cloth
- Carbon fiber brush
- Record cleaning arm
- Static gun
- Sticky roller
- Distilled water
- Isopropyl alcohol
- Dish detergent
- Cleaning mat


References
- ↑ https://www.discomusic.com/how-to-clean-vinyl-records
- ↑ http://thevinylfactory.com/features/8-easy-and-affordable-ways-to-clean-your-vinyl-records-by-hand/
- ↑ http://www.apartmenttherapy.com/record-remedy-how-to-clean-your-vinyl-record-collection-like-a-pro-175743
- ↑ http://www.digitaltrends.com/music/how-to-clean-vinyl-records/#ixzz4c0duSchT
- ↑ http://thevinylfactory.com/features/8-easy-and-affordable-ways-to-clean-your-vinyl-records-by-hand/
- ↑ http://www.apartmenttherapy.com/record-remedy-how-to-clean-your-vinyl-record-collection-like-a-pro-175743
- ↑ http://thevinylfactory.com/features/8-easy-and-affordable-ways-to-clean-your-vinyl-records-by-hand/
- ↑ http://thevinylfactory.com/features/8-easy-and-affordable-ways-to-clean-your-vinyl-records-by-hand/
- ↑ http://www.digitaltrends.com/music/how-to-clean-vinyl-records/#ixzz4c0JKTSq2
- ↑ http://thevinylfactory.com/features/8-easy-and-affordable-ways-to-clean-your-vinyl-records-by-hand/
- ↑ https://www.discomusic.com/how-to-clean-vinyl-records
- ↑ http://thevinylfactory.com/features/8-easy-and-affordable-ways-to-clean-your-vinyl-records-by-hand/
- ↑ http://www.digitaltrends.com/music/how-to-clean-vinyl-records/#ixzz4c0dzVC3h
- ↑ http://www.digitaltrends.com/music/how-to-clean-vinyl-records/#ixzz4c0JKTSq2
- ↑ http://www.digitaltrends.com/music/how-to-clean-vinyl-records/#ixzz4c0JKTSq2
- ↑ http://www.digitaltrends.com/music/how-to-clean-vinyl-records/#ixzz4c0J7CfWh
- ↑ https://www.discomusic.com/how-to-clean-vinyl-records
- ↑ https://www.audioadvice.com/videos-reviews/properly-clean-care-vinyl-record-collection/
- ↑ https://www.discomusic.com/how-to-clean-vinyl-records
- ↑ https://www.audioadvice.com/videos-reviews/properly-clean-care-vinyl-record-collection/
- ↑ http://thevinylfactory.com/features/8-easy-and-affordable-ways-to-clean-your-vinyl-records-by-hand/
- ↑ https://www.audioadvice.com/videos-reviews/properly-clean-care-vinyl-record-collection/
About This Article

It may be time to clean your vinyl record if the surface is visibly dirty or the needle on your record player starts skipping more than usual. To clean a record, first set it on your record player and turn the record player on without lowering the needle. Then, gently lower a dry microfiber cloth onto the vinyl as it spins. Let the record spin for about 30 seconds to remove any surface dirt and dust. Next, shut off the record player and set your record on a clean cloth. Pour a few drops of vinyl cleaner onto a clean microfiber cloth and gently wipe around the record with it 2-3 times to spread the cleaner out along the grooves. Let your record air dry for 30 minutes, then repeat on the other side. To learn how to take good care of your records and prevent dust and grime, read on!