This article was co-authored by Alessandra Mendes. Alessandra Mendes is a Cleaning Specialist and the Founder of Cleaning Glow. With ten years of experience, Alessandra and her team specialize in providing residential cleaning services in the San Francisco Bay Area. All members of the Cleaning Glow team have completed thorough background checks.
There are 9 references cited in this article, which can be found at the bottom of the page.
This article has been viewed 21,678 times.
Dyson V6 vacuums are effective but need to be cleaned out on occasion to stay functional. Dust, hair, and debris accumulates in several different parts that should be cleaned at least once a month. Always turn off and unplug the vacuum before attempting to clean it. Then, empty and wipe out the clear dustbin as it gets full. The V6s also have at least one filter and brush bar that can be cleaned under cold water. Keep moisture away from the main part of the vacuum so it continues to clean up your home when you need it.
Steps
Wiping out the Dustbin
-
1Push the red button on the dustbin to empty it. The dustbin is the clear cylinder hanging off the compartment behind the vacuum's handle. If you see any debris there, empty the bin out before completely detaching it. Hold the bin inside a trash bag before opening it.[1]
- Prepare for a bunch of debris to spill out as soon as you press the button. If you haven’t positioned the bin over a bag, you may end up with a mess in your home to vacuum up again!
- Shake the vacuum around to knock loose as much dust as you can. It will make the rest of the cleaning process much easier.
-
2Press the button a second time to remove the bin. Pushing the button twice causes the entire bin to detach from the vacuum. It won’t fall off right away. To remove it, grab the brush end of the vacuum and pull it down to snap the bin off the cyclone.[2]
- Empty out any dust still left in the bin. Turn it over inside a garbage bag and shake out as much as you can.
Advertisement -
3Wipe the bin clean with a damp cloth. You do not need to use soap or cleaners to clear out the bin. Simply pick a clean, soft rag and dampen it in lukewarm water. Make sure it isn’t dripping. Then, wipe up the debris and sweep the excess out into the trash.
- Dishwashers are too hot and rough for the bin, so don’t put it in there. Always clean it out by hand.
- If the bin isn’t very dirty, you may be able to wipe it clean with a dry cloth. A damp cloth will help you pick up stubborn debris, however.
-
4Dry the bin with a clean paper towel. Wipe out the bin to dry it right away. If you’re planning on cleaning the cyclone first, you can set the bin aside to begin drying. Remember to come back to it before you reattach it to the rest of the vacuum.
- To keep your vacuum in working order, make sure the bin is completely dry before putting it back on the cyclone. Don’t risk water damage when wiping it dry is such a simple process.
-
5Clear debris off the vacuum with a dust brush. Look through the brush attachments that came with the vacuum. Find the combination tool, which is half-brush and half-vacuum nozzle. You will probably see a lot of dust stuck to part the dustbin hangs from, but it can be swept off with the brush. Sweep it off into the trash with the rest of the debris.[3]
- If the combination brush isn’t available, try using another brush. Choose something soft to avoid scratching the plastic. Try using another vacuum brush, a nylon scrub brush, or even an old toothbrush.
- Use only a dry brush to avoid getting any moisture inside the cyclone and the motor.
-
6Click the bin back in place on the shroud. To refit the bin, look for small tab on the front of the cyclone, right near the bottom edge of the filter housing. The bin has a slot on its front edge that fits on that tab. Line it up, then raise the bin until it clicks in place over the shroud. It’s easier to do this when you tilt the bin, attaching the vacuum end first.[4]
- Make sure the bin is completely dry before reinstalling it or else moisture could get into the vacuum!


Cleaning the Filter
-
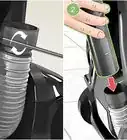
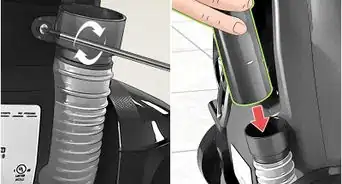
1Lift the filter out of its casing on the top of the vacuum. The filter is located in the cyclone above the transparent dustbin. Look for a plastic cap colored purple or blue on the top part of the cyclone. It will have a little tab in the center of it. Pull the tab up to slide the stick-shaped filter out of its chamber.[5]
- Before you start washing the filter, check it for damage. If it looks worn out, you’re better off replacing it. Purchase a new filter online or look for them at nearby general or hardware stores.
-
2Twist the cap off the end of the vacuum if it is present. Some versions of the V6 have a second filter that looks like a purple or blue plastic cap. It will be on the back end, right above the handle. Turn it clockwise to detach it from the cyclone.[6]
- If you’re unsure whether or not your vacuum has a second filter, check the owner’s manual. It will show you where the filters are as well as Dyson’s cleaning recommendations for them.
-
3Rinse the filter under cold water in the sink. Rinse debris off under running water only. Soap and other cleaners could damage your vacuum’s filters, so don’t bother using them. As you’re washing the stick filter, gently squeeze it to force out any hidden debris. Keep rinsing and squeezing it until you see nothing but clear water coming out of it.[7]
- If you’re cleaning a cap filter, rinse it off repeatedly under running water. Dump water out of the cap until it looks clear.
- The filters can’t be put in a dishwasher or washing machine. It’s too delicate. Wash it by hand to ensure they lasts longer.
-
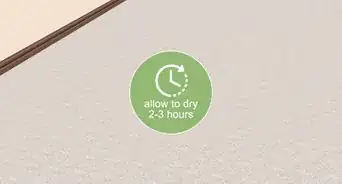
4Set the filter in a warm spot to dry for at least 24 hours. Any spot at room temperature is fine, but keep the filter away from direct sunlight and heat. Lay it on a paper towel or hand towel that can absorb some of the moisture. Then, wait for the filter to dry out completely before you attempt to put it back in the vacuum. If it still feels wet after 24 hours, give it more time.[8]
- Let the filter dry naturally in open air. If you try to speed up the process, such as by using a dryer, microwave, or flame, you will end up damaging it.
-
5Replace the filter by sliding it back into the cyclone. Once you’re sure the filter is clean and dry, lower it into the top of the cyclone. Push it down until its plastic cap is level with the top of the filter housing. As long as it’s centered in the cyclone, it will work like new again the next time you use your vacuum.[9]
- Dyson recommends cleaning the filter at least once a month. You may need to wash them more frequently if your vacuum doesn’t seem to be working as well as you like. Check the filters after vacuuming up heavy amounts of debris.


Rinsing off the Brush Bars
-
1Use a coin to unlock the floor tool on the end of the vacuum. The plastic casing covering the brush bars unlocks through a big, circular fastener. It is usually on the side of the plastic and is recognizable by the slot on it. Use the slot to give the fastener about a quarter-turn counterclockwise. As soon as it unlocks, it pops out slightly from the case.
- If you don’t have a coin handy, try using a screwdriver or a similar object. Use something blunt but sturdy to avoid problems.
-
2Pull out the brush bar to pull off noticeable debris. The brush bar is attached to the fastener you just unlocked. Hold the plastic casing steady, then pull the bar out with your other hand. Move it out slowly in case it gets stuck. Once it’s out, examine it and then use your fingers to pull off clumps of hair and other noticeable bits of large debris.[10]
- Wiggling the bar can help free it if it gets stuck. Rotate it so the bristles don’t get caught on the casing.
-
3Remove the second brush bar if your vacuum has one. Take a look inside the floor tool’s casing for a smaller brush bar. Sometimes the smaller bar is next to where the main one was and you will see it sitting there inside the casing. Lift it up to pull it out of the casing. Check it over for debris to remove by hand.[11]
- Not all models of the V6 have a second bar, so don’t worry if you can’t find one. Instead, look deeper into the floor tool for any loose debris that needs to be removed by hand.
-
4Scrape debris out of the floor tool if it looks dirty. When you look inside the plastic casing, you may see a bunch of hair accumulated there. Reach in with a screwdriver or another blunt object. Pull the hair toward you so you can get it out of the casing. Remove as much of it as you can to keep your vacuum in working order.[12]
- If the brush bars suddenly stop turning when you’re using the vacuum, hidden debris could be the cause. Most V6s have a little pocket in the back of the floor tool where hair gets trapped and eventually blocks the brush bars.
-
5Rinse the brush bars off under cold water. Move the bars into the sink and wash them off under running water. Gently rub them with your fingers to loosen any caked-on dirt. Try to remove as much of the debris as possible before you finish.[13]
- If the brush bars aren’t very dirty, you can skip washing them. Remove any noticeable debris by hand, then put them back in the vacuum.
-
6Leave the brush bars to dry in a warm spot for 24 hours. Lay out a paper towel or hand towel in an open area. Keep it away from direct sunlight or heat to prevent the brush bars from getting damaged. Then, set the bars there and wait for them to dry completely. When the bars feel dry to the touch, they are ready to be reinserted into the vacuum.[14]
- Dryers and other heat sources aren’t safe to use. Let the bars dry on their own.
-
7Refit the bars into the floor tool and lock them in place. Start with the smaller brush bar if your vacuum has one, pushing it into the slot inside the plastic casing. Add the bigger brush next, fitting it so the end cap is flush with the outside edge of the floor tool. When they are both in place, use a coin to turn the fastener on the plastic casing. Give it about a quarter-turn clockwise until you are unable to move the brush bar and the other components of the floor tool.
- Clean the brush bars about once a month to keep them turning. If you pick up a lot of hair, you may need to clean them out more often to prevent clogs from forming.


Warnings
- Most of the detachable cleaning parts are delicate and can be damaged if they are exposed to harsh cleaners, direct sunlight, or heat. Clean them by hand with a dry or damp cloth to avoid issues.⧼thumbs_response⧽
- Water is potentially damaging to the electrical components inside the vacuum. For that reason, don’t let the cyclone get wet and, when you remove a part, let it dry before reattaching it.⧼thumbs_response⧽
Things You’ll Need
Wiping out the Dustbin
- Trash bag
- Soft cloth
- Water
Cleaning the Filter
- Sink
- Cold water
- Paper towel or hand towel
Rinsing off the Brush Bars
- Coin or screwdriver
- Sink
- Cold water
- Paper towel or hand towel


References
- ↑ https://www.which.co.uk/reviews/vacuum-cleaners/article/your-top-10-dyson-vacuum-cleaner-questions-answered
- ↑ https://www.which.co.uk/reviews/vacuum-cleaners/article/your-top-10-dyson-vacuum-cleaner-questions-answered
- ↑ https://www.smartvacuums.co.uk/best-handheld-vacuum/dyson-cordless-vacuum-cleaner-reviews-best-model/clean-dyson-cordless/
- ↑ https://www.youtube.com/watch?v=Piml39mmGhg&feature=youtu.be&t=35
- ↑ https://www.dyson.com/support/journey/troubleshooting/Cleaning-Filters.html
- ↑ https://www.youtube.com/watch?v=Gxi6w7uMkF4&feature=youtu.be&t=7
- ↑ https://www.dyson.com/support/journey/troubleshooting/Cleaning-Filters.html
- ↑ https://www.dyson.com/support/journey/troubleshooting/Cleaning-Filters.html
- ↑ https://www.trustedreviews.com/news/dyson-vacuum-cleaner-keep-stopping-starting-3664237
- ↑ https://www.youtube.com/watch?v=XPqYsOD0y4k&feature=youtu.be&t=31
- ↑ https://www.smartvacuums.co.uk/best-handheld-vacuum/dyson-cordless-vacuum-cleaner-reviews-best-model/clean-dyson-cordless/
- ↑ https://www.youtube.com/watch?v=hyjXJ_MgerI&feature=youtu.be&t=89
- ↑ https://www.youtube.com/watch?v=XPqYsOD0y4k&feature=youtu.be&t=46
- ↑ https://www.smartvacuums.co.uk/best-handheld-vacuum/dyson-cordless-vacuum-cleaner-reviews-best-model/clean-dyson-cordless/
About This Article