This article was co-authored by James Sears. James Sears leads the customer happiness team at Neatly, a group of cleaning gurus based in Los Angeles and Orange County, California. James and the team have nine years of experience and offer green cleaning, interior and exterior window washing, and general apartment cleaning services. He provides transformative cleaning experiences by reducing clutter and renewing your home environment. James is a Trustee Scholar at the University of Southern California.
There are 11 references cited in this article, which can be found at the bottom of the page.
This article has been viewed 294,535 times.
Keurigs can accumulate debris on their exterior and interior parts over time. To properly clean your Keurig, start by wiping off the exterior and rinsing the removable parts on a weekly basis using a vinegar cleaning solution. Descale your machine by adding a 50-50 vinegar and water mixture directly into the reservoir and running a series of brew cycles. This deeper clean can be done a few times a year and will result in better machine performance and cleaner coffee.
Steps
Doing a Surface Clean
-
1Unplug your machine. Start by fully disconnecting your Keurig from the power supply. You don’t want to risk damaging the appliance while working with water.[1]
-
2Take off all removable parts.[2] Depending on your Keurig model, you should be able to remove the cold water reservoir, lid, drip tray and cover, the K-cup holder, and funnel. Be careful removing the K-cup holder and funnel as there is a needle nearby. Simply grasp the holder from both sides and gently wiggle until it comes free.[3]Advertisement
-
3Wash the removable parts. Place the components into a sink filled with warm, soapy water. A teaspoon of dish liquid should be sufficient. Let them sit and soak while you complete the rest of your surface clean. If you haven’t cleaned your Keurig in a while, you might also scrub out the parts with a soft, clean sponge or cloth.[4]
- If your reservoir has water sitting it it, go ahead and empty this out before placing it in the sink. Take this opportunity to discard any used pods sitting around as well.[5]
-
4Dry the removable parts. When you’ve finished soaking them, rinse off each part with water and allow them to air dry on a clean towel. If you are in a hurry, you can dry each piece with a lint-free towel. However, it is still best to only air dry the reservoir and lid to avoid lint sticking to those surfaces.[6]
-
5Clean the needle. You should now be able to see the needle that punctures your K-cups and allows for the flow of liquid. Get a large paperclip and apply pressure until the single end comes free. Slowly push this free end into the needle holes. Move the paperclip around just a bit to loosen any grime and then slowly pull it out.[7]
-
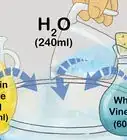
6Scrub any difficult areas with a toothbrush. Take a soft-bristled toothbrush and dip it in a 50-50 vinegar and water mixture. Lightly brush any spots where you see coffee grounds present. Pay particular attention to the areas right around the needle assembly.[8]
-
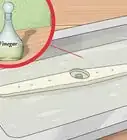
7Wipe down the exterior.[10] Get a soft cloth and dip it into the 50-50 water and vinegar mixture. Squeeze out the excess liquid until the cloth is damp and then brush it over the outside casing of your Keurig. Scrub firmly against any areas that are white, as this indicates hard water deposits.[11]
- It is a good idea to do at least a surface wipe down of your machine once a week.[12]


Descaling Your Keurig
-
1Turn on your Keurig. Plug your Keurig in and verify that the power is on. Turn off the Auto Off function as well to prevent your machine from shutting down mid-cleaning.[13]
-
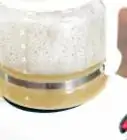
2Pour the vinegar mixture into the reservoir. Add a 50-50 vinegar and distilled water mixture into the reservoir.[14] Continue until you reach the maximum filling line. Do not add a K-cup after this stage, it is not needed as your machine will brew directly from the reservoir. You will see the water light turn on indicating that your machine is ready to brew.[15]
-
3Drain into the coffee mug. Before you start the brew cycle, set a ceramic coffee mug in the middle of the drip tray. Then, select the most substantial brew cycle and proceed. The liquid will drain into the mug and will be quite hot, so watch your hands.[18]
-
4Repeat the cycle, as needed. Continue to drain out your mug and keep the brew cycle going until the reservoir indicates that more water is needed. At this point, you can add more of the vinegar mixture or you can let the machine sit for a few hours before performing a final drain and rinse.[19] [20]
-
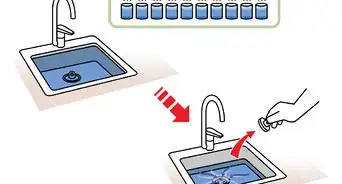
5Run a final cycle with filtered water.[21] Dump any remaining vinegar solution in the reservoir in the sink. Fill up the reservoir with fresh, distilled water. Run another cycle, using the mug once more to catch the run off. This will also help to dispel some of the vinegar odor from your machine.[22]
- If you are not sure if your Keurig is truly free of vinegar, then add a pinch of baking soda into the coffee mug you are using for draining. If there is a fizzy reaction, then perform another water brew.[23]
-
6Repeat this process every three to six months. If you descale on this schedule, then you will prevent the accumulation of hard water deposits and bacteria. This will make your machine last longer and your coffee may even taste better. Set an alarm on your phone or make a note on a paper calendar to alert you when another descaling is scheduled.EXPERT TIPJames Sears leads the customer happiness team at Neatly, a group of cleaning gurus based in Los Angeles and Orange County, California. James and the team have nine years of experience and offer green cleaning, interior and exterior window washing, and general apartment cleaning services. He provides transformative cleaning experiences by reducing clutter and renewing your home environment. James is a Trustee Scholar at the University of Southern California.House Cleaning Professional
 James Sears
House Cleaning ProfessionalOur Expert Agrees: Descale your Keurig at least every 6 months. You'll need to descale every 3-6 months or whenever you notice scale build-up, which looks like white calcified spots. The harder your water is, the more often you'll need to descale, unless you use distilled or bottled water in your coffee water reservoir.


Maintaining Your Keurig
-
1Follow the manufacturer’s instructions. When you first get your Keurig, carefully read through the instruction manual. Pay particular attention to any cleaning warnings. You can also find a digital copy of your manual on the Keurig website.[24]
-
2Clean after each use. When you finish brewing, remove the spent K-cup and throw it away. Wipe up any spilled coffee grounds with a damp paper towel. Periodically emptying the reservoir and only using a clean cup to refill it will help keep your machine smoothly.
-
3Do a deep clean on a regular basis. Most Keurigs need to be descaled at least every six months, although a three-month schedule is better. Keeping to this schedule will make your machine perform better and will keep your coffee free from contaminants.[25]
-
4Clean as needed, too. If you splash something on the base of your Keurig, grab a damp towel and wipe it up right away. Performing regular daily maintenance and watching out for spills can make cleaning the exterior of your Keurig even easier.[26]


Expert Q&A
Did you know you can get expert answers for this article?
Unlock expert answers by supporting wikiHow
-
QuestionHow can I clean my coffee maker?
 Jonathan TavarezJonathan Tavarez is the Founder of Pro Housekeepers, a premium cleaning service headquartered in Tampa, Florida catering to residential and commercial clients across the United States. Since 2015, Pro Housekeepers uses rigorous training methodologies to ensure high quality cleaning standards. Jonathan has over five years of professional cleaning experience and has over two years of experience as the Communications Director for the United Nations Association Tampa Bay. Jonathan earned a BS in Management and Marketing from the University of South Florida in 2012.
Property Hygiene Enabler -
QuestionCan I use vinegar to descale my Keurig?
 James SearsJames Sears leads the customer happiness team at Neatly, a group of cleaning gurus based in Los Angeles and Orange County, California. James and the team have nine years of experience and offer green cleaning, interior and exterior window washing, and general apartment cleaning services. He provides transformative cleaning experiences by reducing clutter and renewing your home environment. James is a Trustee Scholar at the University of Southern California.
House Cleaning ProfessionalVinegar works great for cleaning your Keurig. Just put a 50/50 mixture of white vinegar and water in the reservoir and run a few cycles to clear it out.
Support wikiHow by unlocking this expert answer.
-
QuestionAfter descaling my Keurig machine my coffee I just brewed is thick and cloggy. Any advice?
 Community AnswerDid you go through the rinsing process at least 12 times (12 large cups worth of clean water after the solution)? You may have to fill the water reservoir a couple of times. This should wash away the scales that you descaled (calcium deposits) as well as residual solution. You want to make sure to not use any pods during the rinsing process, just water. The clumps are probably the calcium and/or the descaling solution. You can also use white vinegar to clean/descale. Again, you will need to thoroughly rinse by running about 12 large cups of water through so that it doesn't taste like vinegar or get clumps. This way is cheaper too!

wikiHow Video: How to Clean a Keurig with Vinegar
Warnings
- If you have difficult mineral deposits, it may be tempting to use straight vinegar as a descaling solution. However, for some Keurigs, the acids in concentrated vinegar can damage the machine.⧼thumbs_response⧽
Things You’ll Need
- Vinegar
- Distilled water
- Dish soap
- Lint-free towel
- Toothbrush
- Coffee mug
- Paperclip
- Sponge
- Baking soda (optional)


References
- ↑ http://www.thekitchn.com/how-to-clean-a-keurig-cooking-lessons-from-the-kitchn-218103
- ↑ James Sears. House Cleaning Professional. Expert Interview. 28 August 2019.
- ↑ http://www.digitaltrends.com/home/how-to-clean-keurig/#ixzz4fOksAHB4
- ↑ http://cleanmyspace.com/clean-a-keurig-coffee-maker/
- ↑ https://www.cnet.com/how-to/how-to-clean-your-keurig/
- ↑ http://www.thehappierhomemaker.com/2013/07/how-to-clean-a-keurig/
- ↑ https://housewifehowtos.com/clean/how-to-fix-broken-keurig/
- ↑ http://cleanmyspace.com/clean-a-keurig-coffee-maker/
- ↑ http://www.digitaltrends.com/home/how-to-clean-keurig/#ixzz4fOlAtX00
- ↑ James Sears. House Cleaning Professional. Expert Interview. 28 August 2019.
- ↑ http://cleanmyspace.com/clean-a-keurig-coffee-maker/
- ↑ http://www.today.com/series/how-often-should-you/how-often-you-should-clean-your-keurig-right-way-do-t97986
- ↑ http://www.thehappierhomemaker.com/2013/07/how-to-clean-a-keurig/
- ↑ James Sears. House Cleaning Professional. Expert Interview. 28 August 2019.
- ↑ http://www.thehappierhomemaker.com/2013/07/how-to-clean-a-keurig/
- ↑ http://cleanmyspace.com/clean-a-keurig-coffee-maker/
- ↑ https://housewifehowtos.com/clean/how-to-fix-broken-keurig/
- ↑ https://www.cnet.com/how-to/how-to-clean-your-keurig/
- ↑ James Sears. House Cleaning Professional. Expert Interview. 28 August 2019.
- ↑ http://www.thehappierhomemaker.com/2013/07/how-to-clean-a-keurig/
- ↑ James Sears. House Cleaning Professional. Expert Interview. 28 August 2019.
- ↑ http://www.goodhousekeeping.com/home/cleaning/a35532/how-to-clean-a-keurig-coffee-maker/
- ↑ https://housewifehowtos.com/clean/how-to-fix-broken-keurig/
- ↑ http://www.today.com/series/how-often-should-you/how-often-you-should-clean-your-keurig-right-way-do-t97986
- ↑ https://www.cnet.com/how-to/how-to-clean-your-keurig/
- ↑ http://www.goodhousekeeping.com/home/cleaning/a35532/how-to-clean-a-keurig-coffee-maker/
- ↑ http://cleanmyspace.com/clean-a-keurig-coffee-maker/
- ↑ http://www.happy-mothering.com/06/household/how-to-clean-a-keurig-natural-ingredients/
About This Article
To get rid of scale and mineral buildup in your Keurig, turn the Keurig on and switch off the Auto Off function. Fill the water reservoir with a 50-50 mixture of distilled water and white vinegar. Don’t put a K-cup in the machine, or use an empty one if your Keurig won’t run without one. Put a mug in the base to catch the vinegar and water as it runs out, then run your Keurig on its longest brewing cycle. When the reservoir is empty, run another cycle with plain, filtered water to rinse out the vinegar. You can also clean the surface of your Keurig with vinegar. Unplug the Keurig and take off all the removable parts. Wash the parts in warm, soapy water and set them aside to dry on a lint-free towel. Gently scrub any grimy areas around the needle assembly with a soft toothbrush dipped in a 50-50 mixture of water and white vinegar. Lightly dampen a clean, soft cloth in the water and vinegar mixture and use it to wipe down the outside of the Keurig, focusing on grime and hard water deposits. Once the removable parts are dry, put your Keurig back together. If you want to learn how to clean the outside surfaces of your Keurig, keep reading the article!