This article was co-authored by wikiHow staff writer, Jennifer Mueller, JD. Jennifer Mueller is a wikiHow Content Creator. She specializes in reviewing, fact-checking, and evaluating wikiHow's content to ensure thoroughness and accuracy. Jennifer holds a JD from Indiana University Maurer School of Law in 2006.
There are 10 references cited in this article, which can be found at the bottom of the page.
This article has been viewed 18,627 times.
Learn more...
Even in a relatively clean environment, dust and debris can build up inside an amp and on the circuit board, which will eventually affect your sound quality. This is particularly important if you have a fan-cooled amplifier because, while the fan pushes air in to cool the components, it also pushes in dust and debris from outside. Because electronic components are extremely sensitive, compressed air is the best way to clean your amplifier circuit board. If it hasn't been cleaned in many years, though, you might need slightly more aggressive cleaning techniques.[1]
Steps
Clearing Out Dust and Debris
-
1Unplug the unit at least 24 hours before you clean it. The power supply and capacitors in the amp store a large amount of energy. Unplugging the unit allows those components to discharge some of that energy, lessening the risk that you'll get shocked while cleaning it.[2]
- Avoid contact with the capacitors even after you've left the amp sitting. They could still shock you.
- Watch for static electricity as well. This is not a job to do on carpet or while wearing a wool sweater, for example. Laying down newspaper on the floor where you'll be working helps control static.
-
2Move the amp outdoors if it hasn't been cleaned in a while. Dusty amps will raise a cloud of dust that can be harmful if released indoors. Even if you don't think the amp is very dusty, moving it outside means you'll have less of a mess to clean up when you're done.[3]
- If you're sensitive or allergic to dust, you might also want to wear a protective mask.
Advertisement -
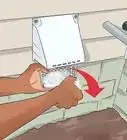
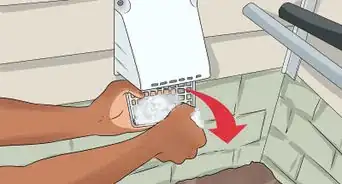
3Remove the outer casing of the amplifier with a screwdriver. Find a screwdriver that will fit the screws that hold the amplifier's case or cover on. Different amplifiers have different designs, so you may have to experiment a little to figure out which part you need to remove to get to the circuit board inside.[4]
- Set the screws to the side in a safe place so you don't lose them. You might want to put them in a zippered bag or plastic storage container.
- Set the cover to the side too. Depending on how it looks, you might want to clean it as well after you've cleaned the interior.
-
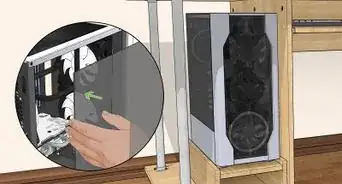
4Use a vacuum cleaner hose attachment to remove large debris. When you take off the case, if you have a large pile of debris in the amp, it's usually easier to vacuum it out. A vacuum cleaner won't clean all the nooks and crannies of the case or the surface of the circuit board, but it's good for any large mass of dust or lint that has built up in the amp case.[5]
- Be careful with the vacuum hose around small wires and connectors — you might pull them loose.
-
5Cover open pots or tube sockets with masking tape. Carefully clean off the surface of the pot (where the nobs connect to the board), then put a piece of masking tape over it to keep any dust from getting into it. This is particularly important if your amp is extremely dusty or hasn't been cleaned in a long time.[6]
- If dust gets into any of the open pots or sockets, it will make it more difficult to get a good connection and could destroy your sound quality.
-
6Blow the dust off the fans with compressed air. Put the straw in place on the nozzle of your can of compressed air and aim it first at the fans. Work from the outside in, cleaning the fans before you get to the circuit board itself.[7]
- You can stick your screwdriver between the blades of the fan so that it won't move when you blow compressed air on it. This allows you to clean all the dust off the fan more efficiently.
- Make sure to blow compressed air through the fan from both the front and the back. Just blowing compressed air through the front of the fan won't get all the dust. It doesn't really matter which side you do first.
-
7Continue blowing compressed air all the way down through the vents. Move methodically from the front to the back of the amp blowing the compressed air across vents and other dusty areas to remove the accumulation of dust and debris. Start on one side, go all the way to the back, then go back up and repeat down the middle of the amp. Keep going until you've removed the bulk of the dust and debris from the amp.[8]
- The can will get cold and freeze up as you continue to use it. If you have a particularly dusty amp, it's a good idea to have 2 cans of air so you can swap them back and forth.


Removing Stickier Substances
-
1Loosen sticky dust with a clean, dry paintbrush. After spraying compressed air on the board, you might notice spots that still have a sticky film or dust that clings to them. Brush those spots with a paintbrush to gently loosen that dust.[9]
- If the amp has been in an environment where the dust was mixed with other substances, such as hair spray or tobacco smoke, the dust will lay on the components in a sticky film that's more difficult to remove than dry dust.
- After you've loosened the dust, you may be able to remove it completely with a little more compressed air. Use a cleaner if the compressed air won't get it all.
-
2Spray electrical contact cleaner directly on stubborn spots. Once you've thoroughly dusted the amp, look at the components, transistors, and connectors on the board closely. Lightly spray the cleaner anywhere there is still lingering grime to wash it away. No scrubbing is necessary and could be dangerous.[10]
- The cleaner itself is non-conductive, so the risk of shock is minimal. However, avoid spraying it on anything metal. You can also use the spray to clean contacts and switches.[11]
-
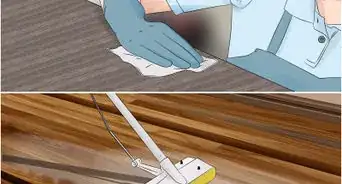
3Wipe off the internal contacts with a cloth dipped in 99% isopropyl alcohol. Dip a lint-free cloth in alcohol and use it to clean all the sockets, input/output connectors, and other electrical connections. Wear rubber gloves when you do this because 99% isopropyl alcohol can damage your skin.[12]
- Because 99% isopropyl alcohol dries relatively quickly, it's best to use on electronics. Don't use lower percentages, which have too much water in them.[13]
-
4Give the amp several hours to completely dry. You want the amp to be completely dry everywhere before you plug it in. If possible, leave it open to dry overnight just to be sure. Liquid can cling to nooks and crannies that take longer to dry out.[14]
- Once you know that the amp and all internal components are completely dry, it's safe to put the cover or outer casing back on the amp and plug it in.


Warnings
Things You'll Need
Clearing Out Dust and Debris
- Screwdriver
- Vacuum cleaner
- Lint-free dust rag or shammy
- Mask or face covering
- A can of compressed air
- Masking tape
Removing Stickier Substances
- Paintbrush
- Electrical contact cleaner
- Rubber gloves
- Lint-free dust rag or shammy
- 99% isopropyl alcohol


References
- ↑ https://www.gcaudio.com/tips-tricks/equipment-cleaning/
- ↑ https://www.gcaudio.com/tips-tricks/equipment-cleaning/
- ↑ https://www.gcaudio.com/tips-tricks/equipment-cleaning/
- ↑ https://youtu.be/kwDBWO0izQo?t=94
- ↑ https://youtu.be/0QvOepREO4k?t=82
- ↑ https://www.gcaudio.com/tips-tricks/equipment-cleaning/
- ↑ https://youtu.be/kwDBWO0izQo?t=151
- ↑ https://youtu.be/kwDBWO0izQo?t=163
- ↑ https://www.gcaudio.com/tips-tricks/equipment-cleaning/
- ↑ https://youtu.be/kwDBWO0izQo?t=282
- ↑ https://www.gcaudio.com/tips-tricks/equipment-cleaning/
- ↑ https://www.gcaudio.com/tips-tricks/equipment-cleaning/
- ↑ https://www.techspray.com/cleaning-electronics-with-isopropyl-alcohol
- ↑ https://youtu.be/kwDBWO0izQo?t=357
- ↑ https://www.gcaudio.com/tips-tricks/equipment-cleaning/
- ↑ https://youtu.be/dTuBlPBlJqE?t=124
- ↑ https://www.gcaudio.com/tips-tricks/equipment-cleaning/
- ↑ https://youtu.be/0QvOepREO4k?t=120
About This Article