This article was co-authored by wikiHow staff writer, Megaera Lorenz, PhD, and Vanna Tran, a trusted member of wikiHow's volunteer community. Vanna Tran is a home cook who started cooking with her mother at a very young age. She has catered events and hosted pop-up dinners in the San Francisco Bay Area for over 5 years.
There are 9 references cited in this article, which can be found at the bottom of the page.
This article has been viewed 227,755 times.
Learn more...
Bay scallops are smaller than regular sea scallops. Because of their small size, they cook very quickly. Typically, cooking scallops is done by either pan searing, also known as sautéing, or by deep frying. Whichever method you choose, make sure that you have the rest of your meal already prepared; the longer cooked scallops sit, the less tasty they will be.
Ingredients
- 1½ pounds (680.4 grams) of bay scallops
- 1 tablespoon (14.2 grams) of unsalted butter or 1 tablespoon (15 mL) of olive oil
- Salt and pepper, to taste
Serves 4
- 1.5 tablespoons (22 mL) of olive oil
- 1.5 pounds (680 g) of bay scallops
- Salt and pepper, to taste
- 4 cloves of garlic, minced
- .5 cups (120 mL) of white wine
- .5 cups (120 mL) of heavy cream (optional, for sauce)
- 2 tablespoons (30 mL) of lemon juice
- ¼ cup (15 grams) of fresh parsley, chopped
- 4 tablespoons (60 grams) of butter, cold and cut into cubes
- 1 pinch of cayenne pepper
Serves 4
- 1.5 pounds (680 g) of bay scallops
- 1/3 cup (40 grams) of all-purpose flour
- Salt and black pepper to taste
- 2 large eggs, whisked
- 1 cup (108 grams) of dried bread crumbs
- 3 US quarts (2.8 L) of canola oil
- Cocktail sauce (optional, to serve)
- Tartar sauce (optional, to serve)
- Lemon juice or lemon wedges (optional, to serve)
Serves 4
Steps
Cleaning and Preparing the Scallops
-
1Cook the rest of your meal first. Scallops cook quickly, and they’re best when they’re fresh out of the pan. If you’re planning to serve up anything else with your scallops (such as pasta or a salad), prepare that first and have it ready to serve the moment the scallops are done.[1]
- For example, if you’d like to serve these scallops over toast, toast and butter the bread before you begin cooking the scallops.[2]
-
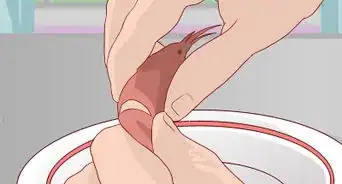
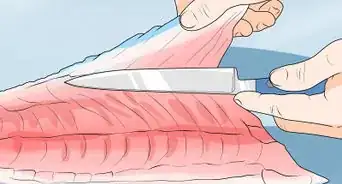
2Remove the side-muscles if necessary. If your scallops still have their fibrous muscle tags attached, pull those off with your thumb and forefinger before you start cooking them. These muscles are easy to recognize because they feel tough and firm to the touch and their fibers go against the grain of the rest of the scallop.[3]
- Leaving the muscles attached won’t do any harm, but they’re much tougher and harder to chew than the rest of the scallop.
Advertisement -
3Rinse the scallops thoroughly with cool water. Before you cook the scallops, it’s a good idea to rinse them to remove any grit, sand, or other unwanted debris. Put them in a colander before running water over them so they can drain quickly.[4]
- Draining them quickly is key, since scallops will get waterlogged and mushy if they sit in water for too long.
-
4Pat the scallops dry with a paper towel. After the scallops have drained for a few minutes, spread them out on a flat surface covered in paper towels. Use another clean paper towel to gently pat each scallop dry.
- If you don’t pat the scallops dry before searing them, you’ll end up with tougher steamed scallops instead of tender, pan-seared ones.

Making Simple Pan-Seared Scallops
-
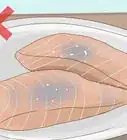
1Sprinkle the scallops on both sides with salt and pepper. How much you use is up to you. If you like things spicy, use more pepper. If you like things salty, use more salt.[5]
Tip: When seasoning your scallops, keep in mind what you’ll be serving along with them. You may want to take it easy on the salt and pepper if you plan to serve them in a salty or spicy sauce.
-
2Heat a saucepan over medium-high heat with butter or olive oil. Place 1 tablespoon (14.2 grams) of unsalted butter or 1 tablespoon (15 mL) of olive oil in the pan and turn on the heat. Gently swirl the pan to coat the bottom evenly with the butter or oil. The pan needs to be very hot in order for the scallops to cook properly.[6]
- You can tell the pan is hot enough if you drop some water on the pan and it evaporates instantly.
-
3Place the scallops on the pan about 1 inch (2.5 cm) apart. Keep them in a single layer. If you are cooking a lot of scallops, you may need to cook them in several batches. The scallops won’t cook properly if the pan is overcrowded.[7]
- The first scallop should sizzle when you place it on the pan. If it doesn't, wait a few more seconds before adding the rest.
-
4
-
5Flip the scallops and cook them for another 2 to 3 minutes. If the scallops don't peel off the pan easily, let them cook for a few more seconds. You can use a pair of tongs or a flat spatula to flip them. Again, don't jiggle the pan or move the scallops around while they’re cooking.[10]
-
6Transfer the scallops to a plate once they are done. Both side of the scallop should be opaque and golden-brown, and they should look opaque all the way through. They should be firm, but somewhat squishy, when you press down on them.[11]
- Don't overcook the scallops, of they'll end up tough and chewy.
-
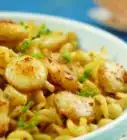
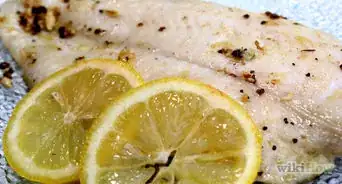
7Serve up the scallops while they’re still warm. Serve the scallops immediately with your favorite sauce, pasta, or vegetable. The longer they sit, the less fresh they will taste.[12]
- You can serve these scallops over pasta or couscous with a little lemon or olive oil, or add them to a salad!
- If you don’t eat all of your scallops, you can store them in the refrigerator in a well-sealed container for 3-4 days. You can also freeze them in an airtight container for 2-3 months.[13]


Cooking Gourmet Pan Seared Scallops
-
1Heat a skillet over high heat with some olive oil. Add about 1.5 tablespoons (22 mL) of olive oil to the pan and turn on the heat to high. The pan is ready when the oil begins to smoke.[14]
- Add the scallops as soon as you see the oil start to smoke. If you wait too long, your scallops will end up with an unpleasant smell and taste.
-
2Add the scallops into the skillet and cook them for 30 seconds. Try to spread them around so that they lay across the pan in a single layer. Don't stir the scallops during these 30 seconds.[15]
- Letting the scallops sit undisturbed will give them a chance to sear a little bit.
-
3Stir in the garlic and cook the scallops for 30 more seconds. Once the scallops have cooked undisturbed for 30 seconds, give the pan a gentle toss to move the scallops around. Then, add the minced garlic to the pan and stir it in with a spoon or spatula. Keep stirring for the next 30 seconds.[16]
- After about 30 seconds of cooking, the garlic should become fragrant. If not, give it a few more seconds.
-
4Boil the scallops in wine and lemon juice for 30 seconds. Give the scallops a stir to mix in the wine and lemon juice, then let them come to a boil. Let the scallops cook like this for 30 more seconds.[17]
Tip: To convert this recipe into a creamy pasta sauce, just add 1.5 cups (350 mL) of heavy cream at the same time that you add the wine.[18]
-
5Stir in the parsley and butter, then remove the pan from the heat. Make sure the butter is cold and hard, and cut it into cubes. Stir it in along with the chopped parsley, then take the pan off the hot burner.[19]
- Don’t wait for the butter to melt while the pan is still on the stove. The pan will be hot enough to melt the butter even after you take it off the heat.
-
6Add the rest of the spices after the butter melts. Once you take the pan off the heat, the butter should finish melting in a few seconds. When the butter is completely melted, add the salt, black pepper, and cayenne pepper.[20]
- Give the scallops a stir to distribute the spices evenly.
-
7Serve the scallops hot over toast or pasta. As soon as you’ve stirred in the spices, serve up the scallops immediately. You can spoon them over buttered toast or serve them over the pasta of your choice.[21]
- The sooner you serve the scallops, the better they’ll taste!
- You can save any leftover scallops in an airtight container in the fridge for 3-4 days, or keep them in the freezer for 2-3 months.


Making Deep-Fried Bay Scallops
-
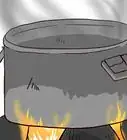
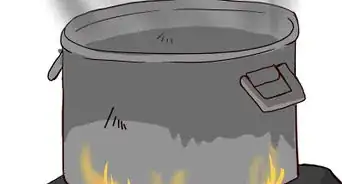
1Heat the cooking oil in a deep pot. Pour the canola oil into a large, deep pot and cook it on the stove over medium-high heat. Use a deep-fry thermometer to test the heat of the oil. It’s ready when the thermometer reads 330 °F (166 °C).[22]
- You should have time to prepare the other ingredients while the oil is heating.
-
2Season the scallops with salt and pepper. Put the scallops in a baking dish and generously sprinkle them on both sides with salt and black pepper. Set the seasoned scallops aside.[23]
-
3Whisk the eggs and place the flour and breadcrumbs in bowls. Crack the eggs into a small bowl and whisk them with a fork until they’re well-blended. Set the bowl aside on the counter near the stove. Pour the flour and breadcrumbs into 2 separate shallow bowls or dishes and put them next to the eggs.[24]
- You can use plain breadcrumbs or "flavored" ones (such as garlic) for something fancier. However, if you choose flavored breadcrumbs, you may need to adjust the amount of other seasonings you use.
-
4Lightly toss the scallops in the flour. You want them to be lightly coated with the flour. Because of how many scallops you have, consider working with only a few at a time.[25]
- Shake the excess flour off of the scallops after you remove them from the bowl.
-
5Dip the scallops in the eggs next. After taking the scallops out of the flour, drop them into the bowl with the whisked eggs. Use your clean hand (the one not coated with flour) to gently shake the bowl around and toss the scallops in the egg.[26]
- After the scallops are coated with egg, you can either remove them with your hand that’s already messy or take them out with a slotted spoon. Using a slotted spoon will help keep you from wasting any of the egg.
-
6Toss the scallops into the breadcrumbs. Once you’ve taken the scallops out of the egg, drop them into the bowl with the breadcrumbs. Use your clean hand to cover the scallops with crumbs or roll them around with a spoon. Make sure that they are evenly coated with the breadcrumbs.[27]
- As you coat the scallops, place them in a single layer on a large baking sheet. Continue until you’ve coated all the scallops.
-
7Put about half the scallops in the oil and cook them for 30 seconds. Take the coated scallops 1 at a time and gently drop them into the oil. To prevent splashing, hold the scallops low over the oil before dropping them in.[28]
- Make sure to test the temperature of the oil before you start cooking the scallops.
-
8Stir the scallops and cook them for another 2 minutes. After about 30 seconds of cooking, stir the scallops with a slotted spoon to prevent them from sticking together. Let them continue to cook for another 1 and ½ to 2 minutes. Test the temperature of the oil occasionally and adjust the heat as needed.[29]
- The scallops should be done when the breading is golden brown. You can also test them by inserting a cake tester into the middle of the scallop and holding it below your lip—it should feel warm, but not hot.
- Since bay scallops are small, they may cook relatively quickly. Start checking them at around 1 and ½ minutes of cooking time.
-
9Remove the scallops from the oil and add the next batch. Once the first batch of scallops is done cooking, place them on a plate lined with paper towels and allow them to sit while you cook the next batch. This will help soak up the excess oil.[30]
- You may wish to cover the cooked scallops lightly with foil or keep them warm in an oven heated to 300 °F (149 °C) while the other scallops are frying.[31]
-
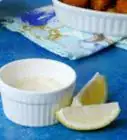
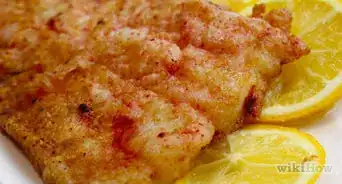
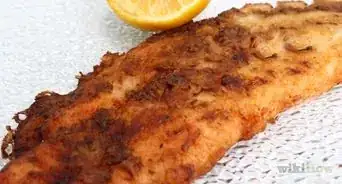
10Serve the fried scallops with cocktail or tartar sauce. Once the scallops are cooked, serve them up while they’re still hot.[32] They’ll taste great dipped in tartar or cocktail sauce!
- You can also squeeze lemon juice over them for extra zest.
- These scallops will taste best and be at their crispiest if you eat them while they’re fresh from the fryer. If you have to store them, keep them in a well-ventilated container in the fridge for no more than 1-2 days.


Expert Q&A
-
QuestionHow hot should the pan be for scallops?
 Vanna TranVanna Tran is a home cook who started cooking with her mother at a very young age. She has catered events and hosted pop-up dinners in the San Francisco Bay Area for over 5 years.
Experienced CookCheck the heat of the pan by frying a single scallop to test the temperature of the oil. "The scallop should bubble gently in the oil when thrown in. If the scallop is sizzling such that it splatters significantly, your oil is probably too hot. -
QuestionDo you rinse scallops before cooking them?
 wikiHow Staff EditorThis answer was written by one of our trained team of researchers who validated it for accuracy and comprehensiveness.
Staff AnswerwikiHow Staff EditorStaff AnswerYes. Rinse the scallops in cool water and pat them dry with a clean paper towel before you cook them. -
QuestionShould I soak scallops in milk?wikiHow Staff EditorThis answer was written by one of our trained team of researchers who validated it for accuracy and comprehensiveness.
Staff AnswerwikiHow Staff EditorStaff AnswerYou don’t have to, but some recipes recommend soaking the scallops in milk in order to tenderize them. Soaking may also help remove any fishy odor, although fresh scallops should not have a strong scent.
Warnings
- Your sea scallops should smell like the sea. If they have a strong fishy smell, get different scallops. They should also be white to faint pink when raw.⧼thumbs_response⧽
- Don't overcrowd your pan when cooking the scallops, or they will steam instead.[34]⧼thumbs_response⧽
Things You'll Need
Cleaning and Preparing the Scallops
- Fresh water
- Colander
- Paper towels
Making Simple Pan-Seared Scallops
- Skillet
- Spatula
Cooking Gourmet Pan Seared Scallops
- Skillet
- Spatula
Deep-Frying Bay Scallops
- Baking dish
- 2 small bowls
- 1 shallow bowl
- Paper towels
- Deep fryer or 2-quart (1.9 liters) saucepan
- Slotted spoon

References
- ↑ https://www.thekitchn.com/how-to-cook-scallops-on-the-stovetop-cooking-lessons-from-the-kitchn-203516
- ↑ https://www.allrecipes.com/recipe/221266/bay-scallops-with-garlic-parsley-butter-sauce/
- ↑ https://www.thekitchn.com/how-to-cook-scallops-on-the-stovetop-cooking-lessons-from-the-kitchn-203516
- ↑ https://www.bhg.com/recipes/how-to/cooking-basics/how-to-cook-scallops/
- ↑ https://www.thekitchn.com/how-to-cook-scallops-on-the-stovetop-cooking-lessons-from-the-kitchn-203516
- ↑ https://www.thekitchn.com/how-to-cook-scallops-on-the-stovetop-cooking-lessons-from-the-kitchn-203516
- ↑ https://www.thekitchn.com/how-to-cook-scallops-on-the-stovetop-cooking-lessons-from-the-kitchn-203516
- ↑ https://www.thekitchn.com/how-to-cook-scallops-on-the-stovetop-cooking-lessons-from-the-kitchn-203516
- ↑ https://www.foodnetwork.com/recipes/alton-brown/seared-scallops-recipe-1916984
- ↑ https://www.thekitchn.com/how-to-cook-scallops-on-the-stovetop-cooking-lessons-from-the-kitchn-203516
- ↑ https://www.thekitchn.com/how-to-cook-scallops-on-the-stovetop-cooking-lessons-from-the-kitchn-203516
- ↑ https://www.thekitchn.com/how-to-cook-scallops-on-the-stovetop-cooking-lessons-from-the-kitchn-203516
- ↑ https://www.stilltasty.com/Fooditems/index/18278
- ↑ https://www.allrecipes.com/recipe/221266/bay-scallops-with-garlic-parsley-butter-sauce/
- ↑ https://www.allrecipes.com/recipe/221266/bay-scallops-with-garlic-parsley-butter-sauce/
- ↑ https://www.allrecipes.com/recipe/221266/bay-scallops-with-garlic-parsley-butter-sauce/
- ↑ http://allrecipes.com/recipe/221266/bay-scallops-with-garlic-parsley-butter-sauce/
- ↑ https://www.allrecipes.com/recipe/221266/bay-scallops-with-garlic-parsley-butter-sauce/
- ↑ http://allrecipes.com/recipe/221266/bay-scallops-with-garlic-parsley-butter-sauce/
- ↑ https://www.allrecipes.com/recipe/221266/bay-scallops-with-garlic-parsley-butter-sauce/
- ↑ https://www.allrecipes.com/recipe/221266/bay-scallops-with-garlic-parsley-butter-sauce/
- ↑ https://www.foodrepublic.com/recipes/ben-pollingers-fried-sea-scallops-recipe/
- ↑ https://www.foodrepublic.com/recipes/ben-pollingers-fried-sea-scallops-recipe/
- ↑ https://www.foodrepublic.com/recipes/ben-pollingers-fried-sea-scallops-recipe/
- ↑ https://www.foodrepublic.com/recipes/ben-pollingers-fried-sea-scallops-recipe/
- ↑ https://www.foodrepublic.com/recipes/ben-pollingers-fried-sea-scallops-recipe/
- ↑ https://www.foodrepublic.com/recipes/ben-pollingers-fried-sea-scallops-recipe/
- ↑ https://www.foodrepublic.com/recipes/ben-pollingers-fried-sea-scallops-recipe/
- ↑ https://www.foodrepublic.com/recipes/ben-pollingers-fried-sea-scallops-recipe/
- ↑ https://www.foodrepublic.com/recipes/ben-pollingers-fried-sea-scallops-recipe/
- ↑ https://www.bhg.com/recipe/seafood/deep-fried-clams-or-scallops/
- ↑ https://www.foodrepublic.com/recipes/ben-pollingers-fried-sea-scallops-recipe/
- ↑ http://www.bhg.com/recipes/how-to/cooking-basics/how-to-cook-scallops/
- ↑ http://www.bhg.com/recipes/how-to/cooking-basics/how-to-cook-scallops/
About This Article
Before you cook bay scallops, use your thumb and forefinger to pinch off their side muscles, which feel tough and have tissues running horizontally instead of vertically. Then, rinse them off with cool water and pat them dry with a paper towel so they fry better. After that, season them with as much salt and pepper as you like and fry them in butter or olive oil for 2 minutes on each side. For more even cooking and a better sear, don't jiggle the scallops around as they fry. To learn more ways to cook scallops, keep reading!