This article was co-authored by wikiHow Staff. Our trained team of editors and researchers validate articles for accuracy and comprehensiveness. wikiHow's Content Management Team carefully monitors the work from our editorial staff to ensure that each article is backed by trusted research and meets our high quality standards.
There are 10 references cited in this article, which can be found at the bottom of the page.
The wikiHow Video Team also followed the article's instructions and verified that they work.
This article has been viewed 18,272 times.
Learn more...
You've probably heard that kale is a superfood—low in calories and packed full of nutritious vitamins and antioxidants. Even better? It's super quick and easy to prepare and cook by boiling or stir-frying. You can even make your own kale chips for a crunchy snack! "Curly kale" is just another name for the common kale that you see most often in the grocery store, so it should be easy to find.
Ingredients
- 1 bunch of curly kale, chopped or torn
- 1 US quart (0.95 L) of water
- 1⁄2 teaspoon (2.5 mL) of salt
- 1 bunch of curly kale, coarsely chopped
- 3 tablespoons (44 mL) of olive oil
- 2 cloves of garlic, finely sliced
- 1⁄2 cup (120 mL) of water or vegetable stock
- Salt and pepper to taste
- 2 tablespoons (30 mL) of red wine vinegar or soy sauce, if desired
- 1 bunch of curly kale, chopped or torn
- 1–2 tablespoons (15–30 mL) of olive oil
- Seasonings of your choice, if desired
Steps
Boiling Curly Kale
-
1Bring a large pot of salted water to a boil over medium-high heat. Add about 1⁄2 teaspoon (2.5 mL) of salt per 1 US quart (0.95 L) of water. Use a pot that is big enough to hold all of the kale (which can take up a lot of space since its leaves are so hearty). Fill the pot with enough water to completely submerge the leaves once they are added. Leave the pot on the stove until the water comes to a rolling boil.[1]
-
2Submerge the kale leaves in the boiling water. Use your hands to slowly and carefully drop 1 bunch of torn or chopped kale into the pot of boiling water. Use a slotted spoon to gently press the leaves down toward the bottom of the pot to make sure they are all completely covered with water.[2]
- Once all the leaves are added to the pot, turn the heat down to medium.
Advertisement -
3Cover the kale and simmer it for 5-8 minutes over medium heat. The water will stop boiling after the kale has been added. After covering the pot with the lid, bring the water back to a boil before before starting the timer.[3]
-
4Check the kale for doneness at 5 minutes. Use a fork to pierce a piece of kale. It should be soft and tender. If the kale is extra thick or tough, allow it to boil for another few minutes. Check it again each minute so you don't overcook it.[4]
- Overcooked kale can be very bitter, so pay close attention to the tenderness once you boil it past the 5 minutes.
-
5Drain the boiled kale in a colander. Hold a colander over the sink and pour the pot of water and kale into it. Shake the colander to release any water that is trapped inside the leaves. If you are adding the kale to a recipe, use your hands or a large spoon to gently press the leaves against the sides of the colander. This will help release excess moisture.[5]
- Be careful when draining the kale. Pour slowly to avoid splashing boiling water on yourself or getting a steam burn.
-
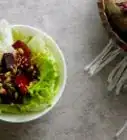
6Season the kale as desired for added flavor and serve. Typically just a few dashes of salt and pepper goes a long way for flavoring kale. Some people like to add garlic, red pepper flakes, or balsamic vinegar. Feel free to experiment here based on your taste preferences. Serve the boiled kale immediately.
- Store leftover boiled kale in an airtight container in the refrigerator for 3-5 days.[6]
Sautéeing Curly Kale
-
1Heat the olive oil in a frying pan over medium heat. Use a large frying pan for the best results. The oil is properly heated when it thins to a consistency of water and easily spreads to coat the bottom of the pan. To be extra sure the oil is ready for cooking, drop a small piece of food in the pan and if it begins to sizzle immediately, it's ready.[7]
- You can use a wok to sauté the kale instead of a frying pan if you have one.
-
2Add 2 cloves of finely-sliced garlic to the oil for flavoring. Hold a garlic clove in place with your fingers or a small fork. Use a small kitchen knife to cut the garlic into slices about 1⁄8 inch (0.32 cm) thick. Use a spatula to stir the garlic around constantly. Cook the garlic for 1 or 2 minutes or until it is soft.[8]
- Do not allow the garlic to begin to brown.
-
3Add the chopped kale and water or vegetable stock to the frying pan. Add 1 bunch of chopped or torn kale leaves first. It may look like too many leaves, but don't worry, it will cook down quite a bit. Pour 1⁄2 cup (120 mL) of water or vegetable stock over the top of the leaves and toss them to coat with the liquid. Raise the heat to high.[9]
- Using vegetable stock instead of water will add more flavor to the dish.
-
4Cover the pan and cook the kale for 5 minutes. You do not need to stir the kale during this time. After 5 minutes, remove the cover and stir the kale until all the liquid has evaporated. The kale should be tender, but still bright green.[10]
- Be careful not to overcook the kale because it can become extra bitter.
-
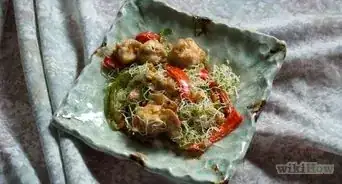
5Sprinkle the kale with salt and pepper to taste. Then, give the dish one more little toss to distribute the seasoning, and transfer the kale to a serving dish. Serve the sautéed kale immediately for the best flavor.[11]
- Add a splash of red wine vinegar or soy sauce while seasoning, if desired.
- Store leftover sautéed kale in an airtight container in the refrigerator for 3-5 days.[12]
Making Kale Chips
-
1Preheat your oven to 300 °F (149 °C). If you know that your oven cooks warmer or cooler than the appropriate temperature, adjust the heat setting as necessary based on your experiences.
-
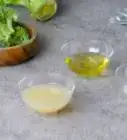
2Toss the chopped kale leaves with the olive oil in a plastic bag. Place 1 bunch of torn or chopped curly kale leaves in a large resealable plastic bag and drizzle 1–2 tablespoons (15–30 mL) of olive oil over the top. Reseal the bag and shake it to thoroughly coat all of the leaves with the oil.[13]
- To make sure the leaves are coated, try gently massaging the bag with your hands.
-
3Sprinkle the leaves with the seasonings of your choice. Open the plastic bag and sprinkle the seasonings over the top of the leaves. Kale tends to flavor very quickly, so start with just a few dashes of the seasonings and then add more to taste. Reseal the bag and shake it again to distribute the seasonings throughout the leaves.[14]
- Popular choices for seasoning include salt, fresh-ground pepper, paprika, garlic, lemon juice, or parmesan cheese. Add cayenne pepper for a spicy flavor.
-
4Spread the leaves on a baking sheet and cook them for 22-26 minutes. Use your hands to spread the leaves in a single layer across the baking sheet. Place the sheet in the oven and bake the chips for about 22-26 minutes, or until the chips are crispy.[15]
- Make sure the leaves are not piled on top of each other—this can lead to soggy chips. It is okay for some of the leaves to lightly touch.
- If you have too many leaves to spread in an even layer, you may need to use 2 baking sheets. Put one on each rack in the oven and rotate them halfway during cooking.
-
5Allow the chips to cool completely before serving and eating them. The seasoning you added typically adds enough flavor to the chips so they are good enough to eat plain. But if you like dipping your chips, feel free to dip them in your favorite sauce.[16]
- Store leftover kale chips in an airtight container for up to 1 week. If you included perishable ingredients for seasoning (like cheese), then keep them in the refrigerator.
Selecting and Preparing Curly Kale
-
1Eat curly kale between September and February to get the best quality. Kale is widely available year around, but the best kale is produced during these 6 months. Because that's when it is actually in season, you will pay the best prices during this time as well.[17]
- If it's June and you want to eat some curly kale—go ahead and do it! It will still be delicious.
-
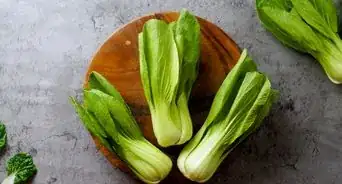
2Select kale that is firm with bright green leaves and strong stems. Gently fold the leaves in and look for them to bounce back open—this lets you know that they are firm and good for eating. The leaves should be green all over. If they are yellow or brown, skip this bunch and check another one. The stems shouldn't be mushy or wilted, so avoid bunches with this problem as well.[18]
- Kale is generally on the bitter side, but small heads tend to have softer leaves and a sweeter taste.
-
3Store kale in the refrigerator up to 7 days. If you aren't cooking it right away, put the unwashed kale in a plastic bag and keep it in the refrigerator for up to 1 week. Do not wash the kale before storing it because it can make it rot faster.[19]
- If you accidentally washed your kale and you aren't ready to use it, just be sure to check it for freshness before you use it. If it is soft, mushy, discolored, or smells, throw it away.
-
4Break the leaves off the stalk with your hands. You only want to use the leafy portion of the kale. Pull the leaves off of the hard stems and center rib with your hands and place them in a colander.[20]
- You may also carefully cut the stems and rib away from the leaves using a kitchen knife if you want a cleaner cut on your leaves.
-
5Rinse the kale thoroughly under cold running water. Move the leaves around in the colander to make sure all of them get properly rinsed. Pay special attention to the small crevices around the edges of the leaves where dirt and sand tends to get trapped.[21]
- For an extra-good cleaning, let the kale soak in a bowl of cold water for about 10 minutes. Gently swish it around until the grit and dirt is loosened. Then rinse the leaves in cold water again.
-
6Pat the kale leaves dry with clean paper towels. Lay some clean paper towels out on your countertop. Place the leaves on top of the paper towels. Use more clean, dry paper towels to gently pat the leaves dry.[22]
- If you have a salad spinner, spin the leaves to remove excess liquid.
Things You'll Need
Boiling Curly Kale
- Large pot
- Slotted Spoon
- Colander
Sautéeing Curly Kale
- Large frying pan or wok
- Spatula
Making Kale Chips
- Large resealable plastic bag
- Baking sheet
References
- ↑ https://www.saga.co.uk/magazine/food/cooking-tips/how-to-cook-kale
- ↑ https://www.saga.co.uk/magazine/food/cooking-tips/how-to-cook-kale
- ↑ http://www.geniuskitchen.com/how-to/boil-kale-30
- ↑ http://www.geniuskitchen.com/how-to/boil-kale-30
- ↑ http://www.geniuskitchen.com/how-to/boil-kale-30
- ↑ http://www.stilltasty.com/fooditems/index/17470
- ↑ https://www.thekitchn.com/quick-tip-how-to-tell-when-oil-53815
- ↑ https://www.foodnetwork.com/recipes/bobby-flay/sauteed-kale-recipe-1960155
- ↑ https://www.foodnetwork.com/recipes/bobby-flay/sauteed-kale-recipe-1960155
- ↑ https://www.foodnetwork.com/recipes/bobby-flay/sauteed-kale-recipe-1960155
- ↑ https://www.foodnetwork.com/recipes/bobby-flay/sauteed-kale-recipe-1960155
- ↑ http://www.stilltasty.com/fooditems/index/17470
- ↑ https://www.foodnetwork.com/recipes/valerie-bertinelli/kale-chips-three-ways-3075613
- ↑ https://www.foodnetwork.com/recipes/valerie-bertinelli/kale-chips-three-ways-3075613
- ↑ https://www.foodnetwork.com/recipes/valerie-bertinelli/kale-chips-three-ways-3075613
- ↑ https://www.foodnetwork.com/recipes/valerie-bertinelli/kale-chips-three-ways-3075613
- ↑ https://www.sofeminine.co.uk/cooking-food/kale-cooking-kale-kale-recipes-s1297407.html
- ↑ https://www.justataste.com/in-season-now-kale/
- ↑ http://www.stilltasty.com/fooditems/index/17471
- ↑ https://www.justataste.com/in-season-now-kale/
- ↑ https://www.eatright.org/homefoodsafety/four-steps/wash/washing-leafy-greens
- ↑ https://www.eatright.org/homefoodsafety/four-steps/wash/washing-leafy-greens
About This Article