This article was co-authored by wikiHow Staff. Our trained team of editors and researchers validate articles for accuracy and comprehensiveness. wikiHow's Content Management Team carefully monitors the work from our editorial staff to ensure that each article is backed by trusted research and meets our high quality standards.
There are 7 references cited in this article, which can be found at the bottom of the page.
The wikiHow Video Team also followed the article's instructions and verified that they work.
This article has been viewed 94,256 times.
Learn more...
Smoked gammon is different from a smoked ham in that ham comes cooked and ready to eat, while gammon still needs to be prepared. It’s a popular dish for the holidays, and there are a few different tricks to use when preparing it to ensure it’s moist, succulent, and tasty. Most gammon are cooked by first boiling them, then roasting them in the oven. Once that is done, they can be served hot or cold, used in sandwiches, or as the main component of a meal along with your favorite side dishes.[1]
Ingredients
Traditional Roast Gammon
- 4 pounds (1.8 kg) bone-in smoked gammon
- 4 onions
- 6 celery stalks
- 6 carrots
- fresh thyme
- 1 whole head of garlic
- 2 tablespoons (30 mL) of wholegrain mustard
- 2 tablespoons (30 mL) of honey
- 1 teaspoon (4.9 mL) of apple cider vinegar
- 1 teaspoon (4.9 mL) of brown sugar
- 1 tablespoon (15 mL) of cooking oil
Makes 4-6 servings
Steps
Presoaking and Boiling
-
1Soak the gammon in cold water for 24 hours before cooking it. Place the gammon into a large bowl or stockpot and cover it completely with cold water. Place a lid on the container or cover it in plastic wrap, and leave it to sit for 24 hours.[2]
- Cooking smoked gammon usually requires a little bit of planning ahead. If you know you’re making this meal for a special occasion, set a reminder on your phone for the day before so you don’t forget to soak it in time.
- Some sources say you can soak the gammon for as little as 12 hours, so use your own judgement. The soaking process is mainly used to remove excess salt.
-
2Drain the gammon and rinse it off with clean water. At the kitchen sink, carefully tip your gammon container and slowly drain off the excess water, salt, and fat that came out while it was soaking. Rinse it off with clean water. If there are slimy bits of fat and salt sticking to the gammon, use your hands to rub them off.[3]Advertisement
-
3Rinse and chop up 2 onions, 3 carrots, and 3 celery stalks. Use a clean cutting board and a sharp kitchen knife to roughly chop up half of your vegetables. Set them to the side or toss them into a large, empty stockpot.[4]
- Don’t worry about cutting the vegetables up evenly. They are going to be used to flavor the gammon.
-
4Cover the gammon and vegetables with water in a large stockpot. Combine the onions, carrots, and celery in the pot, if you haven’t already put them in there. Add the gammon, and then add enough water so that everything is fully covered.[5]
- If the water is coming up close to the top of the pan, you may want to switch it out for a larger vessel.
-
5Boil the water then reduce it to a simmer. Turn your stove burner onto high, and then leave the pot of vegetables and gammon alone until it starts to boil. Once it is boiling, reduce the heat to medium-low so that the water stays at a consistent simmer.[6]
- Depending on the strength of your burners, you may need to turn the heat to low, rather than to medium-low.
-
6Simmer the gammon until the internal temperature reaches 155 °F (68 °C). Leave the pot alone on the stove for about 1 1/2 to 2 hours. Use a meat thermometer by inserting it into the middle of the gammon to test its internal temperature to make sure it has reached 155 °F (68 °C).[7]
- If you don’t have a meat thermometer, follow this formula: simmer the gammon for 30 minutes per 1 pound (0.45 kg) of meat.[8]


Glazing and Roasting
-
1Remove the gammon from the stockpot using your tongs. Place the gammon on a clean surface or back onto the cutting board you used to chop up your vegetables. Alternately, if you don’t want to save the water and vegetables to make your own stock, you could place a colander in the sink and drain off the water that way.[9]
- Use caution when removing the gammon or draining the water!
-
2Preheat your oven to 350 °F (177 °C). It’s okay to let your gammon rest on the counter while the oven preheats and you finish preparing the rest of the meal.[10]
-
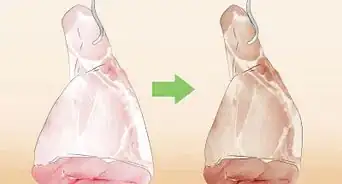
3Use a sharp knife to score the top of the gammon. Using caution because the gammon is still very hot, make shallow, diagonal cuts across the top of the gammon. Then make diagonal cuts going the opposite direction to make a diamond pattern.[11]
- Scoring the gammon helps the glaze to penetrate the skin better.
-
4Chop up the rest of your vegetables and line a baking dish with them. Use a sharp kitchen knife and a cutting board to dice up the remaining 2 onions, 3 carrots, and 3 celery stalks. Additionally, cut the head of garlic in half. Take out a large, clean, oven-safe baking dish and line the bottom of it with the chopped vegetables. Place the garlic so that the cut side is facing up in the dish.[12]
- There is no need to oil or butter the bottom of the dish.
-
5Whisk together the rest of the ingredients to make your glaze. Use 2 tablespoons (30 mL) of wholegrain mustard, 2 tablespoons (30 mL) of honey, 1 teaspoon (4.9 mL) of apple cider vinegar, 1 teaspoon (4.9 mL) of brown sugar, and 1 tablespoon (15 mL) of cooking oil. Combine these in a small bowl and whisk them together until they are fully incorporated.[13]
- You can make a lot of different glazes for your gammon depending on your preferences. Try making a honey mustard glaze by combining 1 tablespoon (15 mL) of honey, 1 tablespoon (15 mL) of brown sugar, 1 teaspoon (4.9 mL) of mustard powder, 1 teaspoon (4.9 mL) of Worcestershire sauce, 1 teaspoon (4.9 mL) of tomato puree, and 1 teaspoon (4.9 mL) of balsamic vinegar.[14]
-
6Place the gammon on the vegetables and spoon on half of the glaze. Depending on how hot the gammon is at this point, either transfer it by hand or use your tongs to put it on top of the vegetables in your baking dish. Then, use a large spoon to distribute about half of the glaze over the top.[15]
- It’s okay if the glaze drips down to the bottom of the dish. Just try to get as much of it on top of the gammon and in the scoring as possible.
-
7Bake the gammon for 1 1/2-2 hours, reglazing it every 15-20 minutes. Use oven mitts to pull out the oven shelf every 15-20 minutes and carefully spoon more of the unused glaze onto the gammon, as well as the juices from the bottom of the pan. The long cooking time gives the glaze a lot of opportunity to seep into the gammon, and it also tenderizes the vegetables and lets the gammon soak up their aroma, too.
- If you want the gammon to bake more quickly, turn your oven to 425 °F (218 °C) and only cook it for 30-40 minutes.[16]
-
8Remove the gammon from the oven and let it rest for 10 minutes. Use your oven mitts to take the hot dish out of the oven. Set it on top of the stove or on a heat-proof surface, and let it rest for about 10 minutes before cutting into it.[17]
- If you aren’t going to be eating the gammon the same day (like if you are saving it to serve cold throughout the week), then let it rest for 1-2 hours before slicing it.


Serving and Storing
-
1Cut your cooked gammon into slices. Use a long, thin, sharp knife that will let your cut across the length of the gammon. Use a large fork to hold the gammon in place as you cut slices off of it. Depending on how you’re using it, you can cut very thin or thick slices.[18]
- If your gammon has a bone in it, simply cut down until your knife hits the bone. From there you can cut around the bone or pull off the slice of meat.
-
2Serve your cooked gammon with your favorite sides. Make mashed potatoes, roast vegetables, Caesar salad, or sweet potatoes. You can also use leftover gammon to make incredible sandwiches: use your favorite bread, toppings, and condiments.
- You could even chop up some of the gammon and use it in an egg omelet.
-
3Store your leftovers in the fridge for up to 5 days. Put your sliced gammon in an airtight container or resealable bag and keep it in the fridge (never on the counter). If you want to freeze it, wrap it up in foil, put the foil in a resealable bag, and keep it frozen for up to 2 months.[19]
- Remember to label your container in the fridge or freezer so you can use the meat before it goes bad.


Things You’ll Need
- Stockpot
- Cutting board
- Knife
- Tongs
- Measuring spoons
- Large baking dish
- Small bowl
- Oven mitts
- Whisk
- Pastry brush
- Meat thermometer


References
- ↑ https://www.bbcgoodfood.com/howto/guide/how-cook-and-prepare-gammon-and-ham
- ↑ https://www.greatbritishchefs.com/how-to-cook/how-to-roast-gammon
- ↑ https://www.greatbritishchefs.com/how-to-cook/how-to-roast-gammon
- ↑ https://www.greatbritishchefs.com/how-to-cook/how-to-roast-gammon
- ↑ https://www.greatbritishchefs.com/how-to-cook/how-to-roast-gammon
- ↑ https://www.greatbritishchefs.com/how-to-cook/how-to-roast-gammon
- ↑ https://www.greatbritishchefs.com/how-to-cook/how-to-roast-gammon
- ↑ https://www.bbcgoodfood.com/howto/guide/how-cook-and-prepare-gammon-and-ham
- ↑ https://www.greatbritishchefs.com/how-to-cook/how-to-roast-gammon
- ↑ https://www.greatbritishchefs.com/how-to-cook/how-to-roast-gammon
- ↑ https://www.bhg.com/recipes/how-to/handling-meat/scoring-a-ham/
- ↑ https://www.greatbritishchefs.com/how-to-cook/how-to-roast-gammon
- ↑ https://www.greatbritishchefs.com/how-to-cook/how-to-roast-gammon
- ↑ https://thepigsite.com/news/2007/12/honey-mustard-glazed-smoked-gammon-bacon-joint
- ↑ https://www.greatbritishchefs.com/how-to-cook/how-to-roast-gammon
- ↑ https://www.bbcgoodfood.com/howto/guide/how-cook-and-prepare-gammon-and-ham
- ↑ https://www.greatbritishchefs.com/how-to-cook/how-to-roast-gammon
- ↑ https://www.recipetips.com/kitchen-tips/t--665/carve-a-ham.asp
- ↑ https://www.foodsafety.gov/keep/charts/hamstoragechart.html
- ↑ https://www.greatbritishchefs.com/how-to-cook/how-to-cook-gammon
About This Article