This article was co-authored by Dorrenda Smith. Dorrenda “Renny” Smith is a Personal Chef and the Co-Founder & CEO of The Crain Experience. With almost 15 years of experience in the food industry, she specializes in creating soul food with a healthier spin. Chef Renny and her partner provide event catering, event planning, and restaurant and food truck consultations.
There are 13 references cited in this article, which can be found at the bottom of the page.
This article has been viewed 38,524 times.
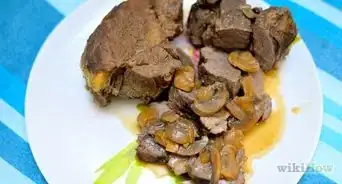
Oven roasting is a dry cooking method that requires little effort, but lots of time. Cooking times and temperatures will vary by your choice of meat and how much of it there is, but the methodology is the same. Simply place your meat on a roasting rack, stick the rack into a preheated oven, and wait!
Steps
Roasting Meat
-
1Preheat your oven.[1] For smaller and more tender cuts of meat, set your oven to 400 degrees Fahrenheit (204 Celsius) or higher to cook it through more quickly. For bigger cuts, stick to moderate temperatures (around 375 degrees F, or 191 C) or even lower to ensure that the interior cooks evenly without burning the outside.[2] If you have a lot of patience, stick to temps around 250 F (121 C) for even juicier meats.The ideal temperature may vary by oven, meat, and size, but use the following as a flexible guideline:[3]
- 325 degrees F (163 degrees C): Beef: round tip; rump; bottom round; eye round; brisket. Poultry: whole turkey. Pork: loin; crown; shoulder/butt; back ribs; spare ribs; ham; fresh leg. Veal: loin; rib. Lamb: leg; shoulder; shank.
- 350 degrees F (177 degrees C): Beef: rib eye. Poultry: whole duck; whole goose; whole pheasant; game hen; turkey breast. Pork: country-style ribs.
- 375 degrees F (191 degrees C): Poultry: whole chicken.
- 400 degrees F (204 degrees C): Poultry: chicken breast.
- 425 degrees F (218 degrees C): Beef: tenderloin; tri-tip. Pork: tenderloin.
-
2Place your meat in a roasting pan. Use a pan that is specifically designed for roasting. Cook your meat more evenly by using a pan with sides that are low enough to expose more meat to direct heat. However, make sure the sides are high enough to prevent drippings from spilling upon removal or during roasting.[4]
- You can also place a roasting rack or wire cooling rack inside the pan to hang fattier meats that drip excessively during roasting.
Advertisement -
3Roast the meat in the oven. Wait until the oven reaches the set temperature. Transfer the pan to the oven. Let it sit for the recommended cooking time. Open the oven door as seldom as possible to prevent heat from escaping, which will prolong cooking.[5] Exact cooking times may vary according to temperature and the amount of meat, but use the following as a guideline (note that 1 lb. = 0.45 kg):[6]
- Beef: Bottom round (3 to 4 lbs); medium-rare, 1.5 to 2 hours. Brisket (2.5 to 3.5 lbs) well-done, 2.5 to 3 hours. Eye round (2 to 3 lbs); medium-rare, 1.5 to 1.75 hours. Rib eye (3 to 4 lbs); medium-rare, 1.5 to 2 hours; medium, 1.75 to 2 hours. Round tip (3 to 4 lbs); medium-rare, 1.75 to 2 hours; medium, 2.25 to 2.5 hours. Rump (3 to 4 lbs); medium-rare, 1.5 to 2 hours. Tenderloin (2 to 3 lbs); medium-rare, 35 to 40 minutes; medium 45 to 50 minutes. Tri-tip (1.5 to 2 lbs); medium-rare, 30 to 40 minutes; medium, 40-45 minutes.
- Lamb: Leg (5 to 7 lbs); medium-rare, 20 to 25 minutes per pound; medium, 25 to 30 minutes per pound (plus 5 minutes for boneless cuts). Shoulder and shank leg (3 to 4 lbs); medium-rare, 30 to 35 minutes per pound; medium, 40 to 45 minutes per pound.
- Pork: Ribs: 1.25 hours covered, 0.75 hours uncovered. Tenderloin: 0.75 to 1 hour. All other cuts: roughly 20 minutes per pound.
- Poultry: Chicken breast (2 lbs); 35 to 45 minutes. Game hen (1 to 1.5 lbs); 1 to 1.5 hours. Turkey breast (2 to 4 lbs); 2.5 to 3 hours. Whole chicken (3 to 4 lbs); 1.5 to 2 hours. Whole duck (3.5 to 4 lbs); 2 hours. Whole goose: (7 to 9 lbs); 2.5 to 3 hours. Whole pheasant (2 to 3 lbs); 1 to 1.25 hours. Whole turkey (8 to 12 lbs); 2.75 to 3 hours.
- Veal: Loin (3 to 4 lbs); 1.75 to 2.25 hours. Rib (4 to 5 lbs); 1.5 to 2.25 hours.
-
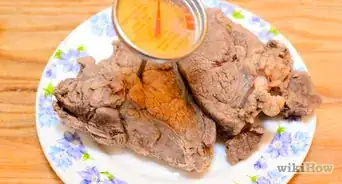
4Check the roast’s temperature.[7] Once the roast has cooked for the minimum amount of recommended time, use an oven mitt to pull the rack partially out of the oven so you don’t have to reach inside. Stick a meat thermometer into the roast to read its internal temperature. If the thermometer reads lower than the ideal temperature for your specific meat, push the rack back in, shut the door, and allow more cooking time before repeating.
- Pierce the roast with your thermometer where the meat is thickest to make sure that the densest part of your roast has cooked thoroughly. Avoid piercing fat and bone.
- With whole birds, check the meat’s temperature in fives places: the deepest part of the breast, thighs, and wings. With the thighs and wings, center your thermometer close to where they meet the body.
- For slow roast, recommended temperatures are 165 degrees Fahrenheit (74 degrees C) for poultry and 145 degrees Fahrenheit (63 degrees C) for beef, lamb, pork, and veal.[8]
-
5Take the roast out of the oven. First, make sure you have a clear path from the oven to the surface area where you plan to set the hot pan. If the stovetop is occupied by other cookware, use the nearest countertop possible to place your trivet so you have the shortest distance to cover. Put on some oven mitts, open the oven, and pull the rack out until you can safely grip the pan with both hands. Carefully transfer the pan to the stovetop or trivet. Move slowly and cautiously to avoid spilling hot juices over the sides of the pan.


Preparing and Serving Your Roast
-
1Choose which meat to roast. Decide on one of the three most common meats to roast: ham, prime rib, or turkey. Or, break away from the norm and choose either beef, lamb, poultry, pork, or veal. Available cuts of meat include:[9]
- Beef: bottom round; brisket; eye round; rib eye roast (with or without bone); round tip; rump; tenderloin; tri-tip.
- Lamb: leg (with or without bone); shank leg; shoulder.
- Pork: crown; ham; loin; ribs; shoulder/butt; tenderloin.
- Poultry: chicken breast; rock cornish game hen; turkey breast; whole chicken; whole duck; whole goose; whole pheasant; whole turkey.
- Veal: loin; rib.
-
2Check the meat’s grade. Once you have chosen which type of meat to roast, decide which grade of meat to purchase. Choose “prime” for the highest quality, which includes more fat marbling within the meat and thus more flavor. Go with “choice” for a less expensive cut that still has a fair amount of fat throughout the meat. Pick “select” to save money and/or reduce your fat intake.
-
3Season your meat. Keep it simple and rub your roast evenly with salt and pepper. Or, create a more diverse seasoning mix for more complex flavors. To season the inside as well as the outside, marinate your meat for two days before roasting. Flip the meat over at regular intervals to make sure it is evenly marinated. Choose one of the following recipes or pick one of the many, many others to be found online:
- Beef seasonings: 1 teaspoon salt, ¼ teaspoon pepper, ⅛ teaspoon garlic powder for each pound of meat.[10]
- Chicken seasonings: 1 ounce melted butter, ⅓ teaspoon minced garlic, 1 teaspoon salt, ¼ teaspoon pepper, ⅛ teaspoon garlic powder, rosemary and/or thyme to taste, for each pound of meat.[11]
- Lamb marinade: ¼ cup fresh rosemary, 2 tablespoons dijon mustard, 2 tablespoons olive oil, 1 teaspoon soy sauce, 1 cup beef broth, 1 chopped garlic head, 1 chopped onion for 6 to 10 pounds of meat.[12]
- Pork seasonings: 1 teaspoon garlic salt and ¼ teaspoon of black pepper for each pound of meat.[13]
-
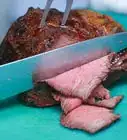
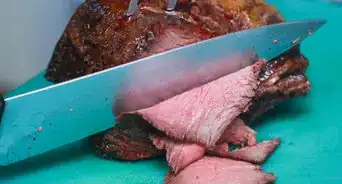
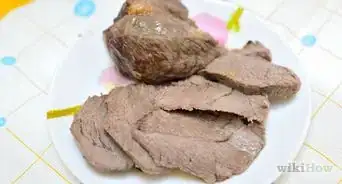
4Let the meat cool before carving. After you remove the meat from the oven, let it rest before carving. Give the meat time to reabsorb the juices inside so they don’t spill out when you carve it open. Allow thinner cuts at least 10 minutes to cool. Give thicker cuts a minimum of 20 minutes, since their core may still be hot enough to continue cooking the meat from the inside out. After that, transfer the meat to a carving board to slice it up. [14]
-
5Store meat safely. Refrigerate or freeze your leftovers no more than two hours after it has finished roasting. Halve that time to one hour if the room temperature exceeds 90 degrees Fahrenheit. If you have a lot of meat left, distribute it into multiple small, airtight containers so that the contents cool off more quickly.[15]
- Roasted meat will last three to four days in the refrigerator and two to six months in the freezer.


Trying Variations
-
1Truss your meat. If necessary, bundle your meat with twine to maintain its shape during roasting. This is most commonly needed for whole birds. Either ask your butcher to truss your meat for you, or buy butcher’s twine, which is safe to use with food products and available at grocery and cookware stores, as well as online.[16]
- Use square knots or slip knots to tie a separate length of twine into a knot every inch along the entire length of the meat.[17]
-
2Baste your roast. Prevent the outside surface of your roast from drying out while the interior finishes cooking. Collect the juices and drippings that have pooled at the bottom of the pan, using a basting brush, bulb, or spoon. Pour the liquid over the meat the top of the meat to rehydrate its exterior. Repeat every 15 to 30 minutes.[18]
-
3Sear the meat before roasting. If frozen or refrigerated, allow your meat to defrost to room temperature before beginning. Season it as desired and give its surface time to dry. Line a skillet with just enough cooking oil to cover its surface and preheat it over medium-high heat until the first signs of smoke appear. Place the meat into the skillet. Let each side of it to sear until it has browned to a crust. Avoid moving the meat repeatedly or unnecessarily.
-
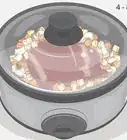
4Add vegetables. Line your roasting tray with a light amount of cooking oil to prevent your vegetables from sticking. Then add your favorite veggies to the tray. Spray them lightly with cooking oil. Place your meat on top of them. Check your veggies periodically during the roast to make sure they aren’t sticking or burning to the pan. Moisten them with the meat’s drippings or add just enough water to the pan to slick its surface.[19]
-
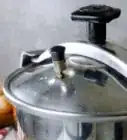
5Use an oven bag. Place your meat in an oven roasting bag to trap heat for quicker roasting times. First, pour roughly a tablespoon of flour inside, twist the opening shut, and give the bag a few shakes so the flour lines all of the inside. Insert the meat and seal the bag with a twist-tie. Poke a few holes in the bag so steam can vent as the meat roasts.[20]
- Only use bags that are specifically designed for roasting. Do not use any plastic bags that haven’t been approved by the FDA.[21]
-
6Finished.


Expert Q&A
-
QuestionDo you put water in the pan when cooking a roast?
 Dorrenda SmithDorrenda “Renny” Smith is a Personal Chef and the Co-Founder & CEO of The Crain Experience. With almost 15 years of experience in the food industry, she specializes in creating soul food with a healthier spin. Chef Renny and her partner provide event catering, event planning, and restaurant and food truck consultations.
Personal ChefIt's a good idea to have some kind of liquid source in the pan, especially if you don't want the roast to dry out.
Things You'll Need
- Oven
- Seasonings
- Roasting pan
- Food thermometer
- Trivet
- Carving knife
- Carving board
- Vegetables (optional)

References
- ↑ Dorrenda Smith. Personal Chef. Expert Interview. 26 October 2021.
- ↑ http://www.cookinglight.com/cooking-101/techniques/cooking-class-roasting
- ↑ http://www.bettycrocker.com/how-to/tipslibrary/charts-timetables-measuring/timetable-roasting-meats
- ↑ http://www.cookinglight.com/cooking-101/techniques/cooking-class-roasting
- ↑ http://www.cookinglight.com/cooking-101/techniques/cooking-class-roasting
- ↑ http://www.bettycrocker.com/how-to/tipslibrary/charts-timetables-measuring/timetable-roasting-meats
- ↑ Dorrenda Smith. Personal Chef. Expert Interview. 26 October 2021.
- ↑ Dorrenda Smith. Personal Chef. Expert Interview. 26 October 2021.
- ↑ http://www.bettycrocker.com/how-to/tipslibrary/charts-timetables-measuring/timetable-roasting-meats
- ↑ http://www.cooks.com/recipe/ry2iv1ie/roast-beef-seasoning.html
- ↑ http://www.cooks.com/recipe/fd75159v/easter-spring-chicken.html
- ↑ http://www.cooks.com/recipe/sg64o5dd/roast-lamb.html
- ↑ http://www.cooks.com/recipe/oj8di7dy/seasoned-pork-roast.html
- ↑ http://www.cookinglight.com/cooking-101/techniques/cooking-class-roasting
- ↑ https://www.foodsafety.gov/keep/charts/storagetimes.html
- ↑ http://www.cookinglight.com/cooking-101/techniques/cooking-class-roasting
- ↑ http://www.seriouseats.com/2014/12/how-to-tie-a-butchers-knot.html
- ↑ http://www.dummies.com/how-to/content/how-to-sear-or-baste-a-roast.html
- ↑ http://allrecipes.com/recipe/216678/roasted-lamb-with-root-vegetables/
- ↑ http://www.recipetips.com/kitchen-tips/t--644/roasting-a-turkey-turkey-cooking-times.asp
- ↑ http://snack-girl.com/snack/reynolds-turkey-bag-review/
About This Article

To roast beef, start by preheating your oven to 325 degrees Fahrenheit and placing your meat in a roasting pan. Once your roast is in the oven, allow it to cook, undisturbed. After 2 hours, pierce the roast with a meat thermometer where the meat is thickest. The internal temperature should be 145 degrees Fahrenheit. If the roast isn't done, place it back in the oven to continue cooking. Once done, allow the meat to cool for 10-20 minutes before carving so the juices have time to reabsorb into the meat. To learn the different cooking strategies for the various meats, keep reading!