This article was co-authored by Amy Guerrero. Amy Guerrero is an Arts and Crafts Specialist and the Owner of Sunshine Craft Co., a crafting studio based in Phoenix, Arizona. Amy specializes in macrame, DIY crafting, and teaching fiber arts. She offers monthly in-person and online workshops along with having developed a range of DIY craft kits for at-home projects. Amy holds a BS in Industrial Design from Philadelphia University. She worked as a graphic designer before starting her own business. Sunshine Craft Co. is a creative hub that offers a wide range of workshops, tools, and resources for any craft project to inspire creativity and community engagement.
There are 8 references cited in this article, which can be found at the bottom of the page.
wikiHow marks an article as reader-approved once it receives enough positive feedback. This article received 74 testimonials and 87% of readers who voted found it helpful, earning it our reader-approved status.
This article has been viewed 2,881,818 times.
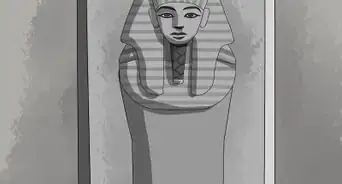
Looking to make your own paper mâché craft? Papier-mâché (pap-yay mash-ay) or paper mâché (paper mash-ay) is an easy to make, hard material that can be used to cover various surfaces. You can use it in arts and crafts to make various sculptures, fruit bowls, puppets, dolls, and much more. The surface is easy to paint, allowing you to add patterns, bright colors, and interesting designs to your finished product. We've put together a tutorial on how to make paper mâché that can be used for any project that you have in mind.
Steps
Making Papier Mâché
-
1Clear an area and gather the materials you'll need to do papier-mâché. Papier-mâché can get a bit messy (like any DIY worth your time), so to protect your grandma's beloved dining table, lay down a few newspapers or other scrap material to keep clean up at a minimum. While you are grabbing newspaper, also get a hold of:
-
2Tear the newspaper into long strips.[2] The ideal width would be around one inch (2.5 cm) thick, but each project requires different shapes and sizes. In addition, you will want to go around your project three times, so tear quite a pile. Don't opt for the scissors -- a torn edge blends better than a cut edge.
- There is no wrong size your strips could be. In fact, if you want to add volume to your structure by molding the strips, you will need different sizes. So tear away freely.
Advertisement -
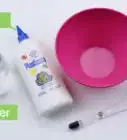
3Choose your method to make papier mâché. A few slight variations will result in the same product. Use what you have at your disposal.
- Glue mixture: Pour 2 parts white glue and one part water into a mixing bowl. These quantities can be changed to suit the size of your project. Or, if you have a stronger bonding glue, 1 part white glue and 1 part water will do the trick.[3]
-
Flour mixture: Combine 1 part flour with 1 part water. Easy as pie! (But also liable to mold. Use caution!) [4]
- For super large and intense projects, you may want to substitute white glue for the water.
- Wallpaper powder: Pour 2 parts wallpaper powder and one part water into a mixing bowl. This method is good if you're thinking seriously long-term -- it can last years.[5]
-
4Blend your choice of mixture. Do this using a paintbrush, a mixing spoon or mixing stick. Blend until it forms a smooth consistency.
- If it's too thin or thick, adjust accordingly. Add more adhesive base if it's too thin, water if it's too thick.
-
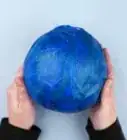
5Find a surface you want to papier-mâché. Examples include a balloon, cardboard or a molded figure.[6] In addition, you can papier-mâché two objects together to form a creation! The mixture will take to anything.
- If you're using a balloon, consider painting it with cooking oil beforehand -- that way, when it's dry, you can slide it out easily.


Creating Papier Mâché Crafts
-
1Dip a strip of newspaper into the mixture. You're going to get your fingers messy! The messier you get, the better job you're doing.[7]
-
2Remove any excess mixture. Do this by lightly sliding two fingers from the top to the bottom of the strip of paper. Hold it over the bowl so it drips back into the container.[8]
-
3Lay the strip over the surface or figure. Smooth it out, using either your fingers or a paintbrush. Be sure to get as many of the creases and bumps out as you can. You are aiming to get a very smooth surface for painting and decorating.[9]
- If you'd like to create a shape (a face, say), bunch the strip into the form you want, place it on your surface, and then layer another strip on top to smooth it out. This can create volume, texture, and detail quite easily.
-
4Repeat laying strips. Do this until the entire surface or figure is covered three times over. This is especially important if you're removing the base when it's dry -- it needs to be sturdy and hold its own.
- Put your first layer on horizontally, the second vertically, and so forth. It will help show you where you have been before and strengthen the piece.[10]
-
5
-
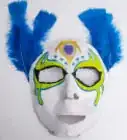
6Start coloring. Paint or decorate as desired.[12] Enjoy! (And be sure to tell everyone you did it yourself.)
- Some schools of thought say to start with a white primer. If you're using a light color on the piece, you may want to use this method (otherwise some print may stick out). Make sure not to cover to top part in order to take the balloon out.

Community Q&A
-
QuestionAfter I have the solid ball, can I add things like ears and a tail and make a cat? If so, how would I do that?
 Community AnswerYes! Wait for everything to dry first, then cut cardboard into some ear shapes, and tape it onto the "body." Cover it with more paper mache, and wait for it to dry. You can do the same with the tail, or use string instead.
 -
QuestionHow long does it take for papier mache to dry?
 Community AnswerDrying time depends on the thickness of the paper and paste, but most projects are dry within a few hours.
 -
QuestionDo we have to put salt in the flour paste?
 Community AnswerThe salt stops mold from growing, so it's a useful ingredient.
Warnings
- The glue mixture may be hard to clean off your work surface once it is set. If you are worried about getting glue on your work surface, put some newspaper down before you get started.⧼thumbs_response⧽
- If you're making a piñata using a balloon, make sure you use enough layers (at least 3 or more) or replace the newspaper with thicker paper (like normal white paper) and be sure to let it dry completely before removing the balloon. If not, the balloon may drag the paper inward and create dents when it's popped.⧼thumbs_response⧽
Things You'll Need
- Glue/flour/wallpaper powder
- Water
- Bowl
- Mixing spoon/stick
- Newspaper (for surface and structure)
- Base structure
- Paintbrush
- Cooking oil (optional)
References
- ↑ https://medium.com/prikabylove/beginners-guide-to-paper-make-84ece70b6fce
- ↑ https://www.dltk-kids.com/type/how_to_paper_mache.htm
- ↑ http://www.papiermache.co.uk/tutorials/getting-started-with-papier-mache/
- ↑ https://www.kidspot.com.au/parenting/things-to-do/make-paper-mache-glue/news-story/ceb59e78216f566a15b75932462f274c
- ↑ http://www.papiermache.co.uk/tutorials/getting-started-with-papier-mache/
- ↑ https://blog.treasurie.com/paper-mache-balloon/
- ↑ https://blog.treasurie.com/paper-mache-balloon/
- ↑ https://blog.treasurie.com/paper-mache-balloon/
- ↑ https://www.goodtoknow.co.uk/family/things-to-do/how-to-make-paper-mache-288662
About This Article

To make papier mâché, first add 2 cups (240 grams) of flour and 1 cup (240 milliliters) of water to a large bowl. Stir the flour and water together until a paste forms, then set the paste aside. Next, tear or cut enough 1-inch wide strips of newspaper to cover the object you’re papier mâchéing 3 times. When you’re done, dip the strips into the papier mâché paste, and press them onto your object. Continue dipping and pasting the strips until your object is completely covered. Then, let the first layer dry, which should take about 2 to 3 hours. Place a fan next to the object to help the papier mâché dry faster. Repeat the process 2 more times so you have 3 layers in total. Then, paint and decorate your papier mâché object. For other ways to papier mâché, including how to use a glue mixture or a wallpaper mixture as your base, read on!


-Step-1-Version-3.webp)


