wikiHow is a “wiki,” similar to Wikipedia, which means that many of our articles are co-written by multiple authors. To create this article, 11 people, some anonymous, worked to edit and improve it over time.
This article has been viewed 232,576 times.
Learn more...
Have you ever heard the expression "fits like a glove"? Have you ever tried to follow a glove or mitten pattern and ended up with something that wouldn't fit anybody you know? The size of a crocheted piece depends on a lot of things: exactly what yarn and hook you use, and how you crochet.
This article explains the basic shape and construction of these hand warmers, but it also explains how to make your own adjustments so they're the right size for the hands that will wear them, no matter what yarn and hook you use. You can use a similar approach to adjust the fit of almost any glove, mitten, hand warmer, or slipper pattern.
Click on any image to zoom in.
Steps
-
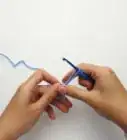
1Know how to work a single crochet (this article is written in U.S. terminology) and know how to increase, and decrease while single crocheting. If your crochet skills are rusty or still very new, you may want to do a few other simple projects (like Crochet a Granny Square) before trying hand warmers.
- It will help to understand how to crochet in the round and how to keep a piece of crocheted fabric square when crocheting back and forth in rows.
-
2Choose any yarn you think would make good hand warmers. The thicker the yarn, the thicker the hand warmers will be. That will make them warmer, but it will also restrict motion.Advertisement
-
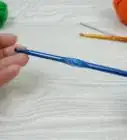
3Make a sample piece. Chain a few stitches (about two inches or 5cm should be ample) and single crochet two or three rows back across them. Measure how many stitches there are per inch or per centimeter. If you make two or three rows, you can also measure how tall a row of stitches is.
- You can make these hand warmers entirely by feel, trying them on and increasing as necessary, or you can measure, whichever you prefer.
-
4Know how to count stitches, both from the side of the fabric and along the edge. You will need to be able to match one hand to the other, and it's much easier if you can count stitches and rows just by looking at them, rather than by trying to keep count as you go.
-
5Decide about how far down the arm or wrist you want the hand warmers to go. You could start at the elbow, the wrist, or anywhere in between.
-
6Write down what you do as you go. You will size the first glove as you go, but you will need to know how many rows you made, and how much you increase in each row for the first hand. Also mark down how many rows come before and after the thumb opening. You will need this information to make the second hand the same as the first
-
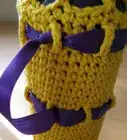
7Create the cuff. You will create the cuff by stitching straight back and forth, making a rectangular piece that will wrap around the wrist.
-
8Chain some number of stitches according to how wide you want the cuff. [1]
-
9Chain three more (as a turning chain) and single crochet back across the row, starting in the third chain from the hook. The length of this row will determine the length of the cuff, so hold it up or measure it now and add or remove stitches before proceeding.
-
10Single crochet back and forth across this initial row.
- Crochet into only the back loop. This, when combined when reversing at the end of each row, will give the rows a ribbed appearance.
- Chain one as a turning chain at the end of each row.
- Crochet the same number of stitches in each row. If you started with a chain of eight (plus three to lead into the first single crochet), make sure you put eight single crochet in each subsequent row. If your piece is not rectangular, count the stitches in each row and make sure you chain one to turn.
-
11Create enough rows of this "ribbing" to wrap around the wrist of whoever will wear the hand warmers. You can measure the wrist (or arm) and divide by the height of rows to get the number of rows, or you can just crochet until you have the needed length.
-
12Join the end of this strip to its own beginning. Slip stitch or single crochet the two ends together to form the joint.
- Try to use the short tail as the "bottom". Slip stitch from the bottom to the top. You may need to add or remove one row of single crochet to orient the strip this way.
- Measure or try on the piece once more at this stage. Remember that while the diameter must fit the wrist or arm of the person who will wear the hand warmer, the cuff must also fit over the broad part of the hand, so don't make it too tight. Try it on, if possible.
-
13Turn the piece sideways and start working into the side of the strip you just made. Single crochet around the edge. You should make as many stitches around as you had rows of the cuff. A row is either a "hill" or a "valley" of the ribbing, and your stitches will probably fall into the loops in between.
-
14Try on or measure the cuff again and increase or decrease the number of stitches if you need to. If you have a wrist or arm measurement, you can also do the math to get right the number of stitches in a round. Use inches or centimeters, but use the same unit to measure both the wrist and the stitches.
- stitches = stitches per inch or cm x wrist measurement in inches or cm
- You can also increase or decrease a little in subsequent rows if the first row is not too tight to slip the cuff on.
- Generally, if you have the same number of rows in the cuff as stitches in the first round, the fit will be about right.
-
15Single crochet around and around to produce the desired length. Go ahead and join rounds.
-
16Increase and decrease gradually as needed. Decrease evenly if you are working from the elbow toward the wrist. Increase as you work from the wrist toward the thumb.
- Increases and decreases can go by measurements or by feel.
- When increasing for the thumb, make all the increases on the side of the glove near where the thumb will be. Add one to four stitches per row, as needed. It will help to use the tail as the base of the thumb, or to insert stitch markers.
- If you want to make the hand warmers specific to the right or left hand, create increases before the thumb line or area for one hand and after the thumb line or area for the other hand. This puts the additional stitches (and thereby additional space) at the base of the thumb, right where it is needed and gives the back of the glove a clean appearance, free of the unevenness of the rows that the increases will produce.
-
17Create a division at the base of the thumb. Try on the hand warmer again and, when the stitched tube reaches the web of the thumb or a comfortable distance above it, place a piece of yarn across. Decide where you would like to attach the connecting piece to each side, and mark the stitches. (See How to Make Wire Stitch Markers.)
-
18Crochet to the first marked stitch. When you reach it, stop, and chain across the web of the thumb. Slip stitch into the marked stitch on the other side.
-
19Try the glove again and add or remove stitches from the chain if it feels much too tight or too loose.
-
20From here, continue to single crochet around just the fingers, but only into the opening that goes around the fingers. Work into the chain you just made instead of going around the whole thumb. The fingers are fairly straight, so this will probably not need much increasing or decreasing.
- You can add a tube for the thumb separately later, if you want to. Bring in a new piece of yarn and crochet around the opening.
-
21Optional for finger-less hand warmers: create an opening for the pinkie finger. This is very similar to creating an opening for the thumb. It allows the finger tube to extend higher and still leave the pinkie finger out, able to move separately. This might be desirable if you are using finger-less hand warmers to play a musical instrument, type, crochet, or do other fine work.
- Try on the glove to make a pinkie opening. The thumb is not in the same plane as the fingers, so it helps to have the thumb in the thumb opening to get the pinkie opening in the right place.
- Don't bother with this step if these will be closed mittens.
-
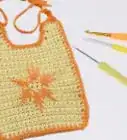
22Optional, for open-fingered hand warmers: stop crocheting around in a tube just under the knuckles. Crochet a few rows back and forth on the back of the hand only to keep this part warm while allowing the fingers to bend freely.


Community Q&A
-
QuestionHow do I make the little tubes for full finger gloves?
 Community AnswerThe most effective way is to use double-pointed needles (dpn's) in the size appropriate for the yarn and tension. Work in the round until the desired length is achieved. Don't forget the place marker at the beginning.
Things You'll Need
- Pencil and paper
- Stitch markers (paper clips will work)
- Yarn of your choice and hook of a suitable size
- Tape measure
- Scissors
References
- ↑ http://www.crochetandknitting.com/mittens.htm The cuff is based on the pattern here but should be made to size according to the hand/wrist that will wear it.