This article was co-authored by wikiHow Staff. Our trained team of editors and researchers validate articles for accuracy and comprehensiveness. wikiHow's Content Management Team carefully monitors the work from our editorial staff to ensure that each article is backed by trusted research and meets our high quality standards.
There are 16 references cited in this article, which can be found at the bottom of the page.
The wikiHow Video Team also followed the article's instructions and verified that they work.
This article has been viewed 16,979 times.
Learn more...
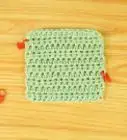
Crocheting your own halter top is a fun way to make your own clothing while getting crafty. This halter top has an open back that's tied together with crisscross straps, while the front covers your chest and comes up to your neck. To make the halter top, all you'll need is a crochet hook and some yarn in a color of your choice. Hold your halter top up to your body as you're making it to be sure it's the right size. With a couple hours of free time and some simple crochet stitches, you'll be wearing your crocheted halter top in style.
Steps
Measuring for the Halter Top
-
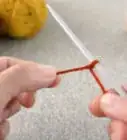
1Form a slip knot on your crochet hook. Loop the yarn around your finger so it creates a full circle. Push the loose end of the thread through the loop and pull on the loop to create the slip knot.[1]
- You can easily make this loop bigger or smaller by pulling on the yarn.
- Use a 5mm hook and yarn that’s a size 4 for the best results.
-
2Start making chain stitches to form a long chain. Use a chain stitch to make a chain long enough to wrap around your body from one side of your ribs to the other. The chain doesn’t need to wrap around your entire body because the back of the top will be open.[2]Advertisement
-
3Hold the chain up to your body to measure it every 10 chain stitches or so. Once you think you’re getting close to having the right number of chain stitches, hold the chain up against your body to see how far it wraps around. Keep adding 5-10 chain stitches at a time to be sure you add just the right amount.[3]
- It’s best to place the chain stitches against the widest part of your ribs.
- If you'd rather use a measuring tape to measure your body, hold the measuring tape so it's going from one rib to the other and create enough chain stitches to reach this length.
-
4Stop the chain when it reaches from one side of your ribs to the other. Once your chain reaches from the back of one rib to the back of another, it’s long enough. This is the base for your halter top. The number of chain stitches that you’ll need for your halter top will depend on your size.[4]
- For example, one person might need 78 chains to reach across their body while another person might need 102.

Creating the Top’s Length
-
1Make double crochet stitches along the entire chain you formed. Create double crochet stitches by yarning over, sticking your crochet hook through the stitch, yarning over again, and going back through the stitch. Yarn over, reach the hook through the 2 loops, yarn over one last time, and go through the last 2 loops to complete the double crochet stitch. Create double crochet stitches going along the entire row.[5]
- Keep making double crochet stitches until you get to the end of the row.
-
2Add 2 chain stitches when you finish the row and flip your project over. Once you get to the end of your row, add 2 chains using a regular chain stitch, just like you did at the very beginning. Flip your crochet work over so that you’re ready to start working on the next row.[6]
-
3Crochet along the new row with the same double crochet stitch. Do the same thing you did with the previous row, creating double crochet stitches along the entire row until you reach the other end. Pay close attention to your hook movements to make sure you’re going through the top chains on the row.[7]
- The last row of double crochet stitches will have left you 2 stitches on the top, so make sure your hook goes through both stitches.
-
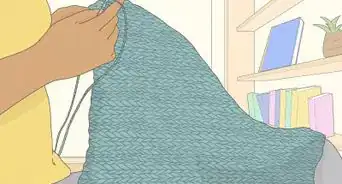
4Continue creating rows until you like the length of your halter top. The area that you’re currently crocheting is the rectangular section that will be underneath your chest. Add rows until you’re pleased with how long it is and hold the piece up to your body to see how it’s coming along.[8]
- Don’t forget to add 2 chain stitches before starting each new row.
- If you want a crop halter top, you might only make 5 rows, while a longer halter top might need 9 rows.
Forming the Halter Shape
-
1Create one chain stitch at the end of your row instead of two. While before you would add two chain stitches before you crocheted each row, now you’ll only add one. This will help create the triangle shape of the halter top.[9]
-
2Skip the second stitch on the row when you make the double crochet stitches. Put your hook through the first stitch and make a double crochet stitch, but skip the second stitch on the row. Continue making the double crochet stitch on the third stitch instead.[10]
- Skipping the second stitch when you start each row is what will shape your halter top into a triangle, slowly removing length.
-
3Keep making double crochet stitches until you get to the end. Keep creating double crochet stitches as you normally would along the entire row. You don’t need to skip any more stitches on this row.[11]
-
4Add one chain stitch and flip your project over. Once you get to the end of the row, make one chain stitch. Flip your work over so that you’re ready to start the next row.[12]
-
5Skip the second stitch again as you create double crochet stitches. Just like you did in the last row, create a double crochet stitch with the first stitch, skip the second stitch, and go into the third stitch with a double crochet stitch too. Continue with double crochet stitches along the entire row until you get to the end.[13]
-
6Keep repeating this pattern until you like the size of your halter top. Continue with this same pattern: adding a chain stitch to your new row and skipping the second stitch as you go along the row making double crochet stitches. Hold your halter top up to your body to decide when the length is right and your triangle portion is finished.[14]
- It might take several rows before you notice your halter top forming a triangle.
Making the Straps
-
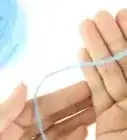
1Make a long chain with the loose yarn for the first strap. With the loose yarn that’s at the top of your halter top from where you stopped crocheting, start making regular chain stitches. Create enough chain stitches to form a chain long enough to weave through the back of the halter top and tie to form a strap.[15]
- This will likely be at least 150 chain stitches.
-
2Create slip stitches along the chain you made to add extra thickness. Make a slip stitch by putting your hook through the chain, yarning over, sliding the hook back through the chain, and then going back through the loop. Go along the chain you created for your strap and add a slip stitch to it so your straps are thicker and more durable.[16]
-
3Cut the yarn and reattach it on the other side to make an easy second strap. The easiest way to make the second strap is to tie off the end to your first strap that you just finished and cut the yarn. Retie the yarn to the other side of your halter top so it’s ready to form chain stitches.[17]
- Tie the yarn to the other side of the halter top securely to make sure the second strap doesn’t come undone.
-
4Use single crochet stitches along the edge for a detailed second strap. This method for the second strap takes much longer but will give your halter top a crisper finish. Add a single crochet stitch along the edge of your halter top, going down from your first strap along the bottom of the top and then up its other side to where the second strap will go.[18]
- This method eliminates the need for you to cut the yarn and reattach it to the other side.
- Using a single crochet stitch along the edge of your halter top gives it a nicer look.
-
5Make the second strap just like you did the first strap. Start the second halter top strap by creating a long line of chain stitches, just like you did with the first strap. Compare your second strap with the first strap as you make the chains to be sure they’re the same length. Go along the chain using a slip stitch to add the extra thickness to the strap.[19]
-
6Flip the halter top over so the back is facing you. When the halter top is flipped over, the straps should be at the top and the back of your halter top should be open. This is where you’ll attach the straps.[20]
-
7Weave the straps through the top to form a crisscross pattern. Take the strap on the left and weave it through the right side of the halter top, then the left side, and finally back to the bottom right, similar to if you were lacing shoes. Take the right strap and do the same thing, but in the opposite direction, so that you’re left with a crisscross pattern. Both of the straps should be at the bottom of the halter top where you can tie it together.[21]
- Try to lace the straps through the halter top as evenly as possible so that each side matches up.
- Put on your halter top, tie the straps, and you’re ready to go!

Community Q&A
-
QuestionHow can I do a double crochet?
 LilyCommunity AnswerStart by reading this article. Basically then, you yarn over, insert, pull through one, pull through two, pull through two.
Things You'll Need
- 5mm hook
- Yarn (size 4)
- Scissors (optional)
- Measuring tape (optional)
Warnings
- Make sure you have enough yarn for your project before you start so you don't run out before you're finished. It's best to start with a brand new ball, if possible.⧼thumbs_response⧽
References
- ↑ https://sewing.com/diy-crochet-crop-top/
- ↑ https://sewing.com/diy-crochet-crop-top/
- ↑ https://www.youtube.com/watch?v=L1XCHFvGEjE#t=2m45s
- ↑ https://sewing.com/diy-crochet-crop-top/
- ↑ https://www.madeupstyle.com/2016/04/diy-how-to-crochet-top-tutorial.html
- ↑ https://www.youtube.com/watch?v=L1XCHFvGEjE#t=5m10s
- ↑ https://www.madeupstyle.com/2016/04/diy-how-to-crochet-top-tutorial.html
- ↑ https://www.youtube.com/watch?v=L1XCHFvGEjE#t=6m55s
- ↑ https://www.youtube.com/watch?v=L1XCHFvGEjE#t=9m15s
- ↑ https://sewing.com/diy-crochet-crop-top/
- ↑ https://www.youtube.com/watch?v=L1XCHFvGEjE#t=10m19s
- ↑ https://www.youtube.com/watch?v=L1XCHFvGEjE#t=10m29s
- ↑ https://www.youtube.com/watch?v=L1XCHFvGEjE#t=11m25s
- ↑ https://www.youtube.com/watch?v=L1XCHFvGEjE#t=13m40s
- ↑ https://sewing.com/diy-crochet-crop-top/
- ↑ https://www.youtube.com/watch?v=L1XCHFvGEjE#t=15m12s
- ↑ https://www.youtube.com/watch?v=L1XCHFvGEjE#t=16m25s
- ↑ https://www.youtube.com/watch?v=L1XCHFvGEjE#t=16m16s
- ↑ https://www.youtube.com/watch?v=L1XCHFvGEjE#t=18m19s
- ↑ https://www.youtube.com/watch?v=L1XCHFvGEjE#t=19m7s
- ↑ https://www.youtube.com/watch?v=L1XCHFvGEjE#t=19m17s
About This Article