This article was co-authored by Alberto DeJesus. Alberto DeJesus is a Construction Specialist and the CEO of DeJesus Industries. With more than four years of experience, he specializes in high-end real estate development and construction. Alberto and DeJesus Industries have been featured on NBC News and have worked with numerous well-known companies, including Mazda, Amazon, and CVS. Alberto holds a Bachelor’s degree from Boston University.
This article has been viewed 63,165 times.
Hinges are small, metal plates that allow doors to open and close. To ensure hinges fit properly and don’t restrict an entryway, you have to slip them inside shallow mortises carved into the side of a door. If you want to save money on a professional woodcutting job, you can create these mortises at home using little more than a hammer and chisel.
Steps
Marking the Hinge Spot
-
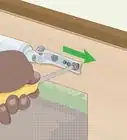
1Place your hinge flush against the door. Position your door so you can clearly see the back edge. Then, place 1 of your hinge’s wings flush against the spot where you want it to sit. Typically, middle hinges go in the exact center of the door, top hinges sit 7 in (18 cm) below the top of the door, and bottom hinges rest 11 in (28 cm) above the bottom of the door.[1]
- To make the installation process as simple as possible, use square-edged hinges that are either .25 in (0.64 cm) or .75 in (1.9 cm) thick.
- Look for door hinges at hardware and home improvement stores.
-
2Draw an outline around the hinge using a pencil. Hold your hinge down to keep it steady. Then, take a sharpened pencil and draw lines around all 3 of the hinge’s edges. You’ll be using these lines as a guide, so try to make them as straight as possible. If necessary, go over the lines multiple times until they are thick and easy to see.[2]Advertisement
-
3Score the outline with a utility knife. Once you’re happy with the outline, remove your hinge from the door. Then, grab a utility knife and extend the blade to no more than .25 in (0.64 cm). Drag the blade along each of the pencil lines, creating small grooves you’ll use later.[3]
-
4Mark the depth of the mortise with your utility knife. Place the tip of a hinge wing up to the front or back side of the door. Line the wing up so it is perpendicular with the outlined spot and, if necessary, mark this position with a pencil. Then, gently score the spot using your utility knife, creating a clear indication of how deep your mortise should be.[4]


Making the Cuts
-
1Tap a chisel into the scored outline. Place the edge of a sharp chisel into any of the mortise outline grooves. Then, gently tap the back end of the chisel with a hammer or mallet, pushing it into the door. Keep tapping until the groove is the same depth as your door hinge, then repeat the process until you’ve carved around the entire perimeter of the mortise spot.[5]
-
2Create a series of angled chisel cuts between the outlines. Angle your chisel so it sits at about 45 degrees, making sure the beveled side faces up. Then, create angled cuts across the grain of the mortise spot by tapping the back of the chisel with your hammer or mallet. The cuts should be no more than .25 inches (0.64 cm) away from each other and cover the entire space between the outlines.[6]
- To make the process as simple as possible, start at 1 end of the mortise spot and pull your chisel back after each cut.
- Just like with the outline, aim for a depth equal to the perpendicular knife mark.
-
3Pull your chisel over the grooves to remove them. Place the flat edge of your chisel between 2 of the grooves. Push down to apply a slight amount of force, then pull the tool backward, scraping the wood out of your mortise. Repeat this until you’ve removed the majority of the grooves.[7]
-
4Scrape the mortise with your chisel to remove any remaining wood. After getting rid of the grooves, you’ll be left with a few remaining slivers and rough spots. You can remove these by placing your chisel flat against the mortise, beveled side facing up, and scraping away the excess wood.[8]


Attaching the Hinge
-
1
-
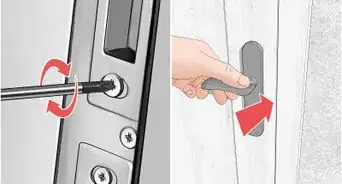
2Check that the cut is the correct depth. When cut correctly, your mortise should sit flush against the edge of the door.[11] Make sure the hinge is no more than 1 millimetre (0.039 in) off, since larger gaps could make the door too tight to open easily or too loose to close properly.[12]
- Repeat the cutting process if the mortise isn’t deep enough.
- Glue small wooden shims on top of the mortise if it is too deep.
-
3Secure the hinge with screws. If you’re happy with the mortise, fasten the door hinge to it by drilling small screws into each of the hinge wing’s bolt holes. The screws should be tight enough that, if you pull on the door hinge, they do not budge. Before fastening your door to a jamb or wall, make sure you’ve attached every hinge necessary.[13]


Expert Q&A
-
QuestionHow do you cut accurate mortises?
 Alberto DeJesusAlberto DeJesus is a Construction Specialist and the CEO of DeJesus Industries. With more than four years of experience, he specializes in high-end real estate development and construction. Alberto and DeJesus Industries have been featured on NBC News and have worked with numerous well-known companies, including Mazda, Amazon, and CVS. Alberto holds a Bachelor’s degree from Boston University.
Construction SpecialistGrab a tape measure and figure out the dimensions of the hinges on your door. Then, map those measurements onto the side frame of the door.
Warnings
- While working on the mortise, wear heavy-duty gloves, safety goggles, and long-sleeved clothing for safety.⧼thumbs_response⧽
- To avoid injury, be careful when using a chisel, hammer, and other tools.⧼thumbs_response⧽
Things You’ll Need
- Door
- Door Hinge
- Pencil
- Utility knife
- Chisel
- Mallet or hammer
- Power screwdriver
- Screws


References
- ↑ https://www.younghouselove.com/2014/09/thats-my-jamb/
- ↑ https://www.thisoldhouse.com/more/cutting-mortises-drill
- ↑ http://www.finehomebuilding.com/2003/09/01/mortising-a-hinge-with-a-chisel-2
- ↑ http://www.finehomebuilding.com/2003/09/01/mortising-a-hinge-with-a-chisel-2
- ↑ https://www.todayshomeowner.com/video/how-to-cut-mortises-for-door-hinges-with-a-chisel/2/
- ↑ https://www.todayshomeowner.com/video/how-to-cut-mortises-for-door-hinges-with-a-chisel/2/
- ↑ https://www.youtube.com/watch?v=vS4tq34drNg&feature=youtu.be&t=3m
- ↑ http://www.finehomebuilding.com/2003/09/01/mortising-a-hinge-with-a-chisel-2
- ↑ Alberto DeJesus. Construction Specialist. Expert Interview. 15 December 2021.
- ↑ https://www.todayshomeowner.com/video/how-to-cut-mortises-for-door-hinges-with-a-chisel/2/
- ↑ Alberto DeJesus. Construction Specialist. Expert Interview. 15 December 2021.
- ↑ http://www.finehomebuilding.com/2003/09/01/mortising-a-hinge-with-a-chisel-2
- ↑ https://www.younghouselove.com/2014/09/thats-my-jamb/
About This Article

Before cutting your door hinge mortise, place your hinge on top of the door and outline it with a pencil. Using a utility knife, trace along the outline to create small groves, then make a cut on the front or back side of the door indicating the mortise’s depth. To carve out the mortise, place a chisel into the outline grooves and tap the tool with a hammer. Then, use the same method to create angled grooves along the inside of the hinge spot. To finish the mortise, scrape the grooves off with your chisel. For tips on attaching your hinge to the mortise, read on!