This article was co-authored by Cindy Hofen. Cindy Hofen is a Certified Relocation Specialist and the founder of Managing Moves & More, a San Francisco Bay Area-based professional move management company specializing in start-to-finish moving solutions, home clearouts, estate sales, and home staging. Since 2009, her team has helped over 2,500 clients to simplify their transitions. Cindy has over 10 years of professional moving and organizing experience, is a member of the National Association of Senior Move Managers (NASMM), holds an A+ Accreditation, and belongs to the Diamond Society. She has a Master of Business Administration from Arizona State University and a BA in Business Economics from the University of California, Santa Barbara.
There are 12 references cited in this article, which can be found at the bottom of the page.
This article has been viewed 11,136 times.
Hanging photographs in your home or apartment is a great way to personalize the space and add visual interest to bare walls. However, it can be a bit intimidating to figure out the best way to display them. First, consider some basic principles when displaying photographs on your wall—always hang them at eye level, and consider balancing out the proportions of differently-sized images. If you’re hanging framed photographs, consider laying out a gallery wall. For unframed pictures, use binder clips and thumbtacks for an understated solution or clip them to a clothesline for a DIY look.
Steps
Following Basic Principles
-
1Hang your photos at eye level, about 5 feet (1.5 m) from the floor. People often position photographs or paintings too high on their walls, making the room look off balance. The center of your photographs should ideally be displayed at eye level, which is typically about 5 feet (1.5 m) off the floor.[1]
- If you plan to display your photos in the living room, you may want to position them slightly lower since you’ll often be seated. Try to position the bottom of the photo about 10 centimetres (3.9 in) above the back of your couch.
-
2Tie your photos together by using similar frames, mat colors, or styles. Consider selecting only black-and-white photos to hang on one of your walls, for instance, or sepia-toned ones. Or, use a range of photo styles but frame them all using gold frames.[2]
- Mat boards, heavy paper that helps frame your photograph and offers a more polished look, are another way to unify your display. Choose white mat boards for a clean, simple look, or a bright color like blue or yellow for a flashier display.
- Don’t feel the need to match all of these elements, whoever—some variation will add visual interest.
Advertisement -
3Position larger pieces to the left and smaller ones to the right. When glancing at a wall filled with photos, your eye will naturally start at the left and move towards the right. By placing larger photographs (or ones with heavier frames) on the left, it balances the arrangement and follows the natural movement of the eye.[3]
-
4Match the proportions of your photos with their display location. Your display will look even better if you match the shape of your photographs with a location that complements them. Wide, rectangular images look best positioned above a sideboard or sofa. Tall, rectangular pictures, on the other hand, look best with nothing but empty space below.[4]
- Small photographs arranged in a horizontal line look great in a hallway because they lead the eye along its length.
- Small photographs arranged vertically, however, look better in a space between two doors or windows.
-
5Select an odd number if you are only hanging a few photos. If you plan to display a limited set of images, consider grouping an odd number together on the wall. This is often more intriguing to the eye than an even number, which create symmetry but not visual interest.[5]
-
6Correctly space your pictures depending on their size. Make sure the gaps between pictures are no larger than 5 centimetres (2.0 in) if they are on the smaller side. Large pictures should have a maximum of 10 centimetres (3.9 in) between them.[6]
-
7Avoid displaying your photos near a dishwasher or radiator. Moisture produced by a running dishwasher can damage photographs, whether they’re framed or unframed. Heat from a radiator can be equally harmful to images.[7]
- Bathrooms can also be a tricky place to display photographs, especially if the room is not well-ventilated and gets steamy during hot showers.


Creating a Gallery Wall with Framed Photos
-
1Measure the wall space where you plan to display your photos. Using a measuring tape, determine the width of the space you want your gallery wall to take up. Also determine how high and low you want the photos to hang, and measure the height.[8]
- Most decorators recommend centering photographs at about eye level, which is approximately 5 feet (1.5 m) off the ground. Of course, your gallery wall will likely extend above or below this point.
-
2Mark the dimensions of your gallery wall on the floor with tape. Find a space on your floor that’s empty of furniture. Using painter’s tape, mark the height and width of your planned gallery wall on the floor.[9]
-
3Lay out your framed photos on the floor in your desired arrangement. Keep the spacing between each frame as even as possible. Balance out large and small frames to keep the arrangement from feeling off-center. It may take a bit of rearranging to get the layout exactly how you want it.[10]
- Gallery walls often fall into two categories: a grid or a salon-style hang, which is a more eclectic arrangement including various sizes and styles of frames.
- The spacing doesn’t have to be exactly right—you’ll use a measuring tape later on in the process to make sure everything is evenly spaced.
- Consider aligning the bottom edges of the bottom row of frames and allowing the top of the gallery wall to be more uneven. Or, flip it around and line up the top edges of the top row of frames and leave the bottom edge of the gallery wall less structured.[11]
-
4Trace around each frame on butcher paper and cut it out. Lay out a sheet or roll of butcher paper across your floor, then place one of your frames on top and trace around it with a pencil. Remove the frame and cut along the traced lines. Then, flip the frame over, position the paper on top, and mark the position of the hanging hooks.[12]
- Repeat this process with each frame you plan to hang up.
-
5Arrange the butcher paper on the wall and tape it in place. Based on the layout you already determined, tape the butcher paper to the wall. Use a measuring tape and spirit level to make sure that each frame is evenly spaced and hanging straight on the wall.[13]
- Shoot for about 3 inches (7.6 cm)-6 inches (15 cm) between the frames.
-
6Hammer nails into the markings and rip off the butcher paper. Once you’ve taped all the papers to the wall, hammer a nail into each place you marked a hanging hook. Once you’ve done this for each sheet, you can pull off the tape and rip the butcher paper down.[14]
- If you can, try recycling the used butcher paper rather than throwing it in the trash.
-
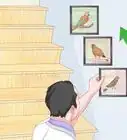
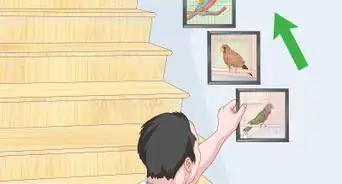
7Hang the framed photographs on the nails. Start with the largest piece first. Hang it on the nails you hammered into the wall, then use your spirit level to double-check that the art is hanging straight. Move on to the medium pieces next, and finish off with the smallest photographs.[15]
- However, don’t be too reliant on a spirit level when hanging the frames. Sometimes your molding or other architectural elements might not be quite straight themselves, and you want your frames to line up with those visible lines on the wall.


Hanging Unframed Photographs
-
1Use wooden pants hangers to hang large photographs. Select a large photographic print and clip its top edge into a wooden pants hanger for an elegant but simple hanging solution. Then, stick a clear thumbtack into the wall where you want your photo to go, and hook the hanger onto the tack.[16]
- This is an easy way to display one or more photographs.
- This display technique makes it easy to swap out images whenever you’re ready for a change. Simply unclip the current photo from the hanger and slide another one in.
- Make sure to buy the trouser hangers that are made up of two bars of wood attached to a hook, rather than those with additional metal clips.
-
2Stick your photos to the wall with washi tape for a pop of color. Washi tape, a type of decorative paper-based tape, is a great way to display photos without harming the wall or the photo itself. Outline each photograph with washi tape for a bigger statement, or cut small strips to attach to each corner for a more subtle look.[17]
- Add more visual interest by switching between tapes with different colors and patterns.
-
3Hang the photographs with binder clips and thumbtacks. Attach a binder clip to the top of the photograph (you can use two if it’s a larger print), then push a clear thumbtack into the wall where you want the top of the photo to hang. Then, slip the metal piece of the binder clip over the thumbtack to hang the photo on the wall.[18]
- You could also use just a thumb tack to attach a photo to the wall, but adding in the binder clip keeps your photograph from getting permanently damaged by a hole through the top edge.
-
4Make a picture clothesline for a DIY aesthetic. An easy way to display unframed photographs is to run a string across a wall and clip photographs across it. You can attach the string to the wall with clear tape if you’re only hanging a few photos, or with small hooks screwed into the wall or secured with indoor mounting tape.
- Clothespins are one option, but you can also use paper clips or binder clips.
- Binder clips can be purchased in several shades, including gold and silver. Choose a color that works with your room’s existing color scheme.
-
5Create a photo collage on a large bulletin board. Hang a bulletin board on the wall where you plan to create your photo collage. Then, attach each photo to the board using short straight pins in each upper corner.[19]
- You can arrange your photographs in a neat grid for a more organized, formal look.
- Overlap the photographs for a more creative, bohemian display. You could even pin up other personal mementoes like tickets or pressed flowers for added visual interest.
- You can buy a pre-finished bulletin board from an office supply store, or buy a piece of soundboard in any size you want from any home improvement store.


Expert Q&A
-
QuestionHow can I hang pictures without putting holes in the wall?
 Cindy HofenCindy Hofen is a Certified Relocation Specialist and the founder of Managing Moves & More, a San Francisco Bay Area-based professional move management company specializing in start-to-finish moving solutions, home clearouts, estate sales, and home staging. Since 2009, her team has helped over 2,500 clients to simplify their transitions. Cindy has over 10 years of professional moving and organizing experience, is a member of the National Association of Senior Move Managers (NASMM), holds an A+ Accreditation, and belongs to the Diamond Society. She has a Master of Business Administration from Arizona State University and a BA in Business Economics from the University of California, Santa Barbara.
Professional Organizer & Home Staging SpecialistThere are double-sided adhesive attachments that you can use to hang a picture on the wall. When you want to take it off, you just pull on the adhesive and it comes right off without leaving any damage behind.
Things You’ll Need
Following Basic Principles
- Measuring tape
- Pencil
- Photographs for display
- Frames
- Mat board
Creating a Gallery Wall with Framed Photos
- Framed photographs
- Measuring tape
- Pencil
- Painter’s tape
- Butcher paper
- Scissors
- Hanging nails
- Hammer
- Spirit level
Hanging Unframed Photographs
- Unframed photographs
- Wooden pants hangers
- Clear thumbtacks
- Washi tape
- Scissors
- Binder clips
- String
- Clothespins
- Clear tape
- Hooks with indoor mounting tape
- Bulletin board
- Short straight pins


References
- ↑ https://www.houseandgarden.co.uk/gallery/how-to-hang-pictures-on-walls
- ↑ https://www.realhomes.com/design/how-to-display-pictures-and-photos
- ↑ https://www.realhomes.com/design/how-to-display-pictures-and-photos
- ↑ https://www.realhomes.com/design/how-to-display-pictures-and-photos
- ↑ https://www.realhomes.com/design/how-to-display-pictures-and-photos
- ↑ https://www.realhomes.com/design/how-to-display-pictures-and-photos
- ↑ https://www.nytimes.com/2017/11/28/realestate/tips-creating-a-gallery-wall.html
- ↑ https://youtu.be/DkGakYdfh40?t=32
- ↑ https://youtu.be/DkGakYdfh40?t=114
- ↑ https://youtu.be/DkGakYdfh40?t=133
- ↑ https://youtu.be/DkGakYdfh40?t=63
- ↑ https://www.bhg.com/decorating/home-accessories/wall-art/create-a-gallery-wall/
- ↑ https://www.bhg.com/decorating/home-accessories/wall-art/create-a-gallery-wall/
- ↑ https://www.bhg.com/decorating/home-accessories/wall-art/create-a-gallery-wall/
- ↑ https://www.bhg.com/decorating/home-accessories/wall-art/create-a-gallery-wall/
- ↑ https://www.apartmenttherapy.com/10-ways-to-display-artwork-without-framing-238001
- ↑ https://www.chatelaine.com/home-decor/diy-crafts/create-modern-wall-art-frames-with-washi-tape/
- ↑ https://www.architecturaldigest.com/story/how-to-hang-unframed-art
- ↑ https://www.itsalwaysautumn.com/huge-diy-photo-wall-bulletin-board-instagram-wall.html
About This Article