This article was co-authored by Marta Nagorska. Marta Nagorska is a Nail Technician and Nail Art Blogger based in London, UK. She runs the blog, Furious Filer, where she gives tutorials on nail care and advanced nail art. She has been practicing nail art for over 5 years and graduated from Northampton College with distinction with a Nail Technician and Manicurist degree in 2017. She has been awarded the top spot in the OPI Nail Art Competition.
This article has been viewed 21,882 times.
Making 3D designs on nails requires some special nail art materials and lots of patience, but the results are worth it. 3D designs can range from simple to complex and the only limit is your imagination. Some of the most popular 3D nail art designs include bows, simple flowers, and roses. You can learn to create these designs and give yourself or a friend a professional looking 3D manicure.
Steps
Making Bows
-
1Create two oval shapes. Dip your brush into the acrylic liquid first and then into the acrylic powder to form an acrylic ball. Place the ball on the nail or on a nonstick sheet of plastic or on a piece of aluminum foil. Use the brush to shape the ball into an oval. Then, use the brush to form the rounded edges into two pointed ends.[1]
- Repeat this process so that you have two ovals with pointed ends.
-
2Bend the shapes in half. Next, you will need to turn the oval shapes into bow ends. After you have created two oval shapes with pointed ends, use the brush to fold the shapes in half so that the two pointed ends are matched up. Slide the brush under the pointed edge of one of the bows and use the brush to lift the pointed edge and bring it over to the other pointed edge.[2]
- You can create two or four bow ends for your bow. Two bow ends will form a more basic bow, while four ends will result in a more elaborate, fancy bow.
- You may want to allow the oval shapes to dry partially before you start bending them, but do not wait too long or you may not be able to bend them. Just wait a few seconds after forming the shapes.
- When you are finished bending both shapes, move the pieces closer together. Place the two bow ends so that their points are aligned and facing each other.
Advertisement -
3Make a central dot. To connect the ends of the bow, you will need to make the bow’s central dot. This dot will go on top of the points of the two bow end pieces to connect them. Dip your brush into the acrylic liquid and then into the acrylic powder. Then, place the dot between the two bow ends so that it is covering up their points.[3]
- Shape the dot as desired.
-
4Finish the bow with a central ribbon piece. To finish your bow, you will need to create a rectangular shaped central piece that looks like a small rectangle. Dip your brush into the acrylic liquid and then into the acrylic powder to form a ball. Then, place the ball on a non-stick plastic work surface and begin to shape it into a rectangle.[4]
- As you shape the rectangle, try to make an indentation in the center part of the rectangle so that the long edges are a little raised up. You can do this by pressing down in the center and pushing in the long edges with the brush.
- Place the rectangular piece over the central dot so that the indented side is facing up and the raised long edges are aligned with the bow end pieces. Tuck the short edges of the rectangular piece under the central dot.
-
5Place the bow on your nail. If you did not create the bow on a nail already, then you will need to transfer it to a nail when you are ready to apply it. Allow the bow to dry for a few seconds before you transfer it.[5]
- Dip your brush in the acrylic liquid and then the acrylic powder and just get a small amount of each on the brush. Place this acrylic dot on the nail.
- Use your fingers to pick up the bow and transfer it to the nail. Press down gently on the bow to secure it in place. Then allow the acrylic to dry for a few minutes.
- If you are worried about the bow not sticking, then you can also add a little more acrylic under the bows of the nail to make it extra secure.
-
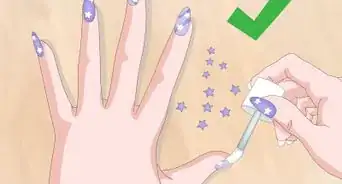
6Decorate the bow as desired. You can wear the bow as is or you can use nail polish to decorate the bow. For example, you can paint the bow with nail polish or use nail polish to add a design, such as polka dots.[6]
- Make sure that you allow the nail polish to dry completely before touching the bow.
Making Flowers
-
1Create a bead of acrylic. You will need to make a bead of acrylic to form the flower’s petals. To make a bead, dip your brush into the acrylic liquid first and then into the acrylic powder. This will create an acrylic bead on the brush. Place the acrylic bead onto the nail or onto a non-stick work surface, such as a piece of aluminum foil. [7]
- Use a thin brush to create small flowers. This will allow you to get a smaller dot of acrylic on the brush and create finer details.
- Allow the bead to dry for a few seconds before you begin to shape it. The bead should look matte and not shiny before you begin to work with it.
- You can use plain white acrylic powder or use color acrylic powder to create your flower. You can also use two different colors to form a gradient design. To do this, start by dipping your brush into acrylic liquid, then dip it into one color of acrylic powder and then another. Just try to get a small amount of the second color on the brush so that the second color will highlight the first one.
-
2Press out the drop to form a flower petal. Use the brush to press the bead into the form of a flower petal. Press the top of the bead, flatten it out, and then use the brush to push in the sides as desired until you have created a flower petal shape.[8]
- Shape one end of the petal so that it comes to a point. This will serve as the center part of the petal, which will meet up with the other petals you create.
- Make at least three petals in the same fashion. If possible, create these additional petals alongside the first one so that you do not have to move them later.
- Keep some paper towels handy to dry your brush between petals. This will help to ensure that the beads you form do not have too much liquid in them.
-
3Place a bead in the center of the petals. Dip your brush in the acrylic liquid and then into the acrylic powder to create a bead. This will form the center part of the flower. Place the bead in the center of your petals to complete the flower.[9]
- Allow the bead to dry for a few seconds and then press the bead down a little to secure it in place.
-
4Apply the flower to your nail. After you have placed the central bead, your flower is complete. You can apply it to your nail if you did not create it on the nail already. Dip your brush in acrylic liquid and then into acrylic powder. Place this dot on your nail and then place the flower you created on top of the dot and press down gently.[10]
- Make sure that the flower has dried before you transfer it. This should only take a few minutes.

Creating a 3D Rose
-
1Form a rose petal with some acrylic powder. Dip your brush into the acrylic liquid and then into the acrylic powder to create a bead. An oval brush is best for creating roses. Try using an oval size 6 Kolinsky brush if possible.[11] Place the acrylic bead on a non-stick work surface, such as on a piece of aluminum foil. Press out the bead until it forms a rose petal.[12]
- To create a rose petal shape, press and shape the bead into a half-moon shape with a bit of a curve to the center part (the inner part of the petal). As you press and shape the petal, try to make the central part of the petal a little thinner than the outer part.
- Make a second rose petal in the same fashion.
-
2Apply the first two rose petals to your nail. The first two petals will form the outer edges of the rose. After you have made two petals, you can begin to assemble them on your nail. Pick up one of the petals and place it on the nail. Make sure that you shape the petal so that it is curving at the center and the outer edge is raised slightly.[13]
- Use a little acrylic liquid and powder on the inner part of the petal to help make it stick.
- Apply the second petal in the same way, but make sure that the petals overlap slightly. You will continue to layer petals onto the nail in this way to create the rose shape.
-
3Make and add more rose petals. Keep making rose petals and layering them onto the nail until your rose is complete. As you layer more petals into the center of the rose, you will need to make the petals a little smaller so that they fit properly. Try to decrease the size of the petals a little bit with every layer until they are about half of the size of the petals you started with.[14]
- Create and add more rose petals one or two at a time. This will prevent them from drying completely and make it possible to shape them on the nail. If it takes you a while to create one petal, then only make and apply one at a time to prevent the petals from drying out.
- Use a little acrylic liquid and powder to help make the petals stick to the nail.
-
4Form the central bud. To finish your rose, you will need to create a central bud. This will be the last piece that you create and add to the design. Dip your brush into the acrylic liquid and then into the acrylic powder to create a bead. Then place the bead on your non-stick surface and flatten it into a long strip.[15]
- This piece will need to be thinner on one edge and thicker on the other edge, but it will not be in the shape of a half-moon like the other petals.
- After you have formed the strip, begin to roll it up to form the rose bud. Use the brush to lift up one of the short edges of the strip and then roll the strip inwards to create a spiral or bud shape.
- Add a little acrylic liquid and powder to the center of the rose before you apply the rose bud. Then, pick up the rose bud and place it in the center of the rose.
Expert Q&A
-
QuestionWhat kinds of materials do you need to do 3D nail art?
 Marta NagorskaMarta Nagorska is a Nail Technician and Nail Art Blogger based in London, UK. She runs the blog, Furious Filer, where she gives tutorials on nail care and advanced nail art. She has been practicing nail art for over 5 years and graduated from Northampton College with distinction with a Nail Technician and Manicurist degree in 2017. She has been awarded the top spot in the OPI Nail Art Competition.
Nail ArtistFeel free to use nail art embellishments such as rhinestones, charms, or studs. You can purchase these from most nail supply stores. -
QuestionWhat are the right materials? The acrylic dries too fast to do this.
 Cecilia FloresTop AnswererSmall 3D decor like small flat-back rhinestones (rhinestones with no point on the bottom), studs (circles, squares, diamonds, shells, and other small shapes), puffy stickers, pressed flowers, and even string can be attached with clear top coat. But putting a regular clear polish over the top of rhinestones can sometimes cloud the shine and sparkle. With larger items such as large studs, large flat-back or pointed-back rhinestones, chains, beads, pearls, charms, fimo canes, and so on can either be attached using a bead of nail sculpting gel (it's a form of thick gel and will keep it's shape without dripping or sliding. It's cured with a lamp like regular gel), acrylic or nail glue.
Things You'll Need
- Acrylic Liquid
- Acrylic Powder
- Brushes
- Aluminum Foil
- Nail Polish
References
- ↑ https://www.youtube.com/watch?v=NFgLyegqZzo
- ↑ https://www.youtube.com/watch?v=NFgLyegqZzo
- ↑ https://www.youtube.com/watch?v=NFgLyegqZzo
- ↑ https://www.youtube.com/watch?v=NFgLyegqZzo
- ↑ https://www.youtube.com/watch?v=NFgLyegqZzo
- ↑ https://www.youtube.com/watch?v=NFgLyegqZzo
- ↑ https://www.youtube.com/watch?v=F6ds90shELU
- ↑ https://www.youtube.com/watch?v=F6ds90shELU
- ↑ https://www.youtube.com/watch?v=F6ds90shELU
- ↑ https://www.youtube.com/watch?v=F6ds90shELU
- ↑ http://www.nailsmag.com/qa/94658/what-s-the-best-acrylic-powder-to-do-intricate-roses-with
- ↑ https://www.youtube.com/watch?v=0pVOXzUHFD0
- ↑ https://www.youtube.com/watch?v=0pVOXzUHFD0
- ↑ https://www.youtube.com/watch?v=0pVOXzUHFD0
- ↑ https://www.youtube.com/watch?v=0pVOXzUHFD0
- Videos provided by Naio Nails
About This Article