wikiHow is a “wiki,” similar to Wikipedia, which means that many of our articles are co-written by multiple authors. To create this article, 26 people, some anonymous, worked to edit and improve it over time.
This article has been viewed 118,547 times.
Learn more...
Have you ever bought that beautiful nail polish only to get home and find you can only paint with your dominant hand? Most women have! This can be really frustrating and quite disappointing, but with some practice and a few good tips, you'll be showing off the latest lacquers!
First of all: Don't be harsh on yourself! You are training your body after all and you will be able to do it so long as you practice frequently. Once or twice a week is frequent enough and you should notice improvement in the first few months.
The idea here is to find a comfortable way of holding the brush and begin to practice painting your nails using that form. Your hand will slowly adjust to being used in that way, meaning you will start to feel in control of the steadiness and pressure over time.
In a way this is like a painter learning to control their brush or a guitarist learning how to wrap their fingers around the neck of the guitar and press the frets. Some people are better naturally at this than others, but pretty much anyone can train themselves.
Steps
-
1To start, if you are using colour, apply a good base coat. Keep in mind that dark polishes stand out, as does red and metallic polishes show up mistakes easily. Solid colours and chunky glitter are forgiving. It is recommended that you use a clear nail strengthening varnish, for a couple of reasons:
- People aren't going to notice the mistakes you'll likely have made.
- It'll serve as a protective coat and help keep your nails strong as you practice polishing regularly.
- It's an appropriate polish for both the home and work-place.
-
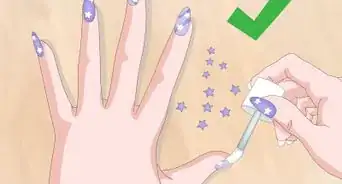
2Prepare your work area and then wash your hands thoroughly. Pat dry, then apply a small amount of water and nail polish remover to a cotton ball and swab your nails to remove any oils for better adhesion. You could also try facial toner which isn't quite as drying to the skin.Advertisement
-
3Find a position of holding the brush that is comfortable for you. Don't stress too much about this, as chances are as you get better you'll improve your form.
-
4Place the left side of your non-dominant hand on the table in a relaxed manner and either straighten your pinky out and tuck your ring finger in under your hand or vice versa.
-
5Hold the brush between your thumb pad and against the side of your index finger (try adding the finger next to it a little as well for extra support). The idea is to steady your hand whilst keeping your thumb and index fingers free to manipulate the brush you are holding.
-
6Paint your opposite nails first, so you can avoid wasting time
-
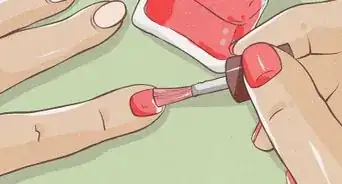
7Unscrew the lid and apply a little less polish to the brush than you think you should. Flooding the cuticle is easy to do when you're a rookie, and fixing it is obviously harder with your non-dominant hand.
-
8Lightly squeeze the handle of the brush to help prevent you from shaking or twisting the handle and start in the center of the nail, slightly further away from the cuticle than you normally would.
-
9Paint one strip down the middle, then one either side of that. Reload the brush with each stroke if you must. It is better to go thinner; you can always apply another coat.
-
10If you flooded the nail a bit, put the pointy end of an orange stick or toothpick as close as you can to the cuticle and run it along one side and along the nail groove, then repeat on the other side if necessary.
-
11Once finished polishing all of your nails on that hand, let them dry thoroughly. You avoid messing up your nail polish if you're willing to wait before you varnish the other hand.
-
12Polish your other hand like you normally would and let it dry.
-
13You don't necessarily need nail polish remover to get rid of the varnish on your skin. Wash your hands and pat them dry and apply some oil to your cuticles and any skin that has polish on it. Let it sit on the skin for a moment or so then lightly scrape with a toothpick in a down-ward motion (it should come away easily). Rub the remaining oil into your cuticles.
- If you wish to use nail polish remover, then polish the tip of an orange stick and then roll a very thin amount of cotton ball around it, twisting it between your fingers, or use a Q-tip. Dip this in nail polish remover and lightly rub the polish on your skin in a down-ward direction.
-
14Be sure to wash your hands and apply a hand cream or nail oil.
-
15Admire your newly painted nails. Keep practicing and try to improve.


Community Q&A
-
QuestionCan I use clear nail polish as a base and top coat?
 Community AnswerClear nail polish uses a different formula, so it won't protect your natural nails very well and won't last as long without chipping.
 -
QuestionHow do I make the nail polish last a long time?
 Community AnswerCoat the nail polish with clear nail polish over them and avoid doing dishes etc., especially with hot water.
 -
QuestionWhat's the difference between top and base coat nail polish?
 Community AnswerBase coat protects your nails from being stained by the polish. It also gives the polish something to grab onto. Top coat protects the nail polish from chipping and helps it last longer.