This article was co-authored by Lindsay Yoshitomi. Lindsay Yoshitomi is the nail artist behind the blog, Lacquered Lawyer. She was featured as one of Nail It! magazine’s “Bloggers You Should Know,” and has been on the cover of Nail Art Gallery Magazine. She has been practicing nail art for over 15 years.
There are 10 references cited in this article, which can be found at the bottom of the page.
wikiHow marks an article as reader-approved once it receives enough positive feedback. In this case, 91% of readers who voted found the article helpful, earning it our reader-approved status.
This article has been viewed 71,840 times.
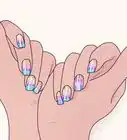
Gradient nails are similar to ombre nails, but instead of being different shades of the same color, they are different colors. Knowing which colors to use is important, however; if you use colors that don’t go together, the transition will look murky.[1] Once you know the basics of doing gradient nails, you can use a different technique to create a glitter gradient instead.
Steps
Doing a Basic Gradient
-
1Trim, file, and clean your nails. Use nail clippers to trim your nails, and a nail file to shape them. Wipe each nail with nail polish remover to get rid of any old polish, dirt, or oils. If you need to, push back your cuticles with an orange stick or a cuticle pusher.
-
2Choose 2 colors of flat nail polish that look nice when mixed together. For best results, choose 2 primary colors, or a primary color and a related secondary color. For example, you could do blue and yellow or pink and purple. Avoid using contrasting colors, such as orange and blue, otherwise the transition point where they blend together will turn out murky. A flat/crème formula will work the best.[2]
- Keep color mixing in mind. If you use blue and yellow, the transition point will be green. If you use blue and orange, however, the transition point will be brown.
- Consider testing the colors on a piece of paper first. Apply a stroke of each color, then blend them together at the seam with a toothpick.[3]
Advertisement -
3Apply a clear base coat to each nail and allow it to dry. If you have brittle nails, consider using a formula made for brittle nails. Allow the base coat to completely dry before moving on.
-
4Apply 1 coat of the lightest color to each nail and let it dry. This will serve as a base for your manicure and allow the colors to show up better. If you are working with a primary color and a secondary color, start with the primary color.[4]
- If you are working with bright or neon nail polish, apply a thin coat of white nail polish instead. This will help make your actual colors show up better.[5]
-
5Brush on liquid latex to the skin around your nails and allow it to dry. This technique can get messy, so having a barrier between your skin and the nail polish will make cleaning up easier. Liquid latex is the easiest product to use because it dries fast.[6] You can also try school glue (clear or white), or even some petroleum jelly.
- You can buy liquid latex online, from well-stocked beauty supply stores, and from costume shops that sell makeup.
-
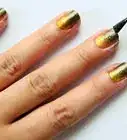
6Apply both nail polish colors to a makeup sponge. Brush on 3 rows or strokes of your first color to a makeup sponge. Brush on 3 rows or strokes of your second color right above it. Use a generous amount and make sure that the colors overlap in the middle.[7]
- If you used primary colors, you’ll get a secondary color in the middle. For example, if you used blue and yellow, you’ll get green in the middle.
- If you used a primary color and a secondary color, you’ll get a tertiary color in the middle. For example, if you used pink and purple, you’ll get a purple-pink in the middle. If you used blue and green, you’ll get blue-green.
-
7Press the sponge against your nail a few times. Use a rolling motion, where you start at one side of your nail and finish on the other.[8] Repeat this step 2 more times, once with the sponge a little higher on your nail and once with the sponge a little lower. This will help further blend the colors together.[9]
- Your second color may not show up very well. Don’t worry; the next step will fix that.
- Save time by doing the rest of your nails while the first coat dries.
-
8Allow the nail polish to dry before applying a second coat. Use a fresh sponge, if you can. If the sponge hasn't been completely soaked through, you can flip it over and use the other side.[10] Do not wait for this second coat to dry.
- Make sure that the colors are oriented the same way as on the first coat. For example, if you did pink on top and purple on the bottom the first time, make sure that you do pink on top and purple on the bottom the second time.
-
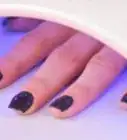
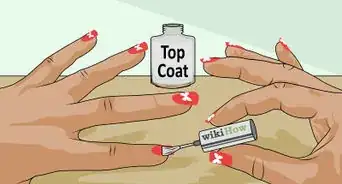
9Apply a clear top coat while the second layer is still wet. Applying the top coat while the gradient is still wet will help blend the colors together.[11] You can use a regular top coat or a matte top coat. Make sure that you extend the top coat over the top edge of your nail. This will help seal the polish further and help prevent it from peeling or chipping.[12]
- If your nail still feels rough, apply another layer of clear top coat after the first one dries.[13]
-
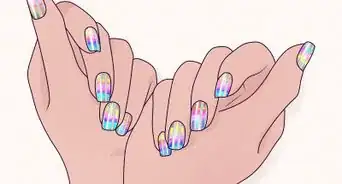
10Do the rest of your nails, then let them dry. Remember to let your first gradient layer dry before applying the second one. Brush on the top coat immediately after applying the second gradient, while the polish is still wet. Wait for the polish on all your nails to dry before continuing.
-
11Remove the liquid latex, then clean up your nails, if needed. Use a pair of tweezers to peel off the liquid latex or school glue. If you used petroleum jelly, wipe it off with a Q-tip instead. If you got any nail polish on your skin, clean it off with a small brush dipped in nail polish remover.[14]
- A small, flat brush made from sable or synthetic bristles will work the best for this. Avoid brushes made from camelhair or stiff bristles.


Doing a Glitter Gradient
-
1Prep your nails by trimming, shaping, and cleaning them. Trim your nails with a pair of nail clippers. Use a nail file to shape them as desired. Soak a cotton ball with nail polish remover, then wipe each nail clean. Push back your cuticles with a cuticle pusher or orange stick, if needed.
-
2Brush a clear base coat over each nail and let it dry. This will help the nail polish adhere better to your nails. If your nails are brittle, consider using a base coat specifically formulated for brittle nails.
-
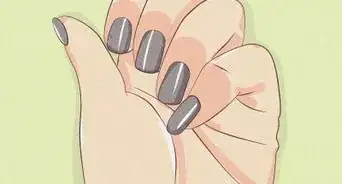
3Apply 2 coats of your base color, then let it dry. This can be a sheer neutral color that matches your nails, or it can be a bold color, such as black. Flat colors will work better than metallic or shimmery ones; they will contrast better with the glitter and help it show up more.[15]
- You can do this step for all of your nails to save time. When you finish your last nail, the first one should already be dry.
-
4Apply a clear, glitter polish over your first nail. For a true gradient effect, apply the polish almost to the cuticle. Make sure that you are using a nail polish with a clear base—not metallic. Make sure that the glitter color looks nice with your base color. Silver or gold will look great against just about anything.[16]
- If you want to use a colored glitter, such as purple, it would be best to match it to the nail polish itself.
-
5Add another coat, but only a third of the way down. Use the same color of clear, glitter nail polish as before. Extend the color from the tip of your nail down to about a third of the way down. This will build onto the nail polish that is already there and create a gradient effect.[17]
- Do not extend the nail polish down as much as you did on the previous layer.
-
6Brush on more clear, glitter polish onto the tip of your nail. The area that you cover should be about the same width as the white part of your nail. For a fancier touch, you can use a chunkier glitter, but make sure that it is the same color.[18]
- If you are using chunky glitter, extend a few pieces of glitter further down your nail at various spots.
-
7Do the rest of your nails. Remember, apply 2 coats of your base color to each nail. Follow up with 2 coats of clear, glitter polish. Finish up with a final coat of glitter polish right along the tip.
-
8Finish off with a clear top coat over each nail. Make sure that you use a regular, glossy top coat and not a matte top coat, otherwise, you will lose all that sparkle from the glitter. If your nails still feel rough because of the glitter, apply a second layer of top coat.
- Be sure to extend the top coat over the tips of your nails. This will help seal everything in.
-
9Clean your nails up with a brush dipped in nail polish remover. If you accidentally got nail polish onto your skin, you can easily wipe it off with a brush dipped into nail polish remover. Use a brush with sable or synthetic bristles; avoid brushes made out of stiff bristles or camelhair.


Community Q&A
-
QuestionCan I skip the liquid latex part, or will it mess up the nail?
 Community AnswerIt depends on whether you want nail polish all over your fingers. It's mainly a cleanliness thing, but it's optional, really.
 -
QuestionCan I do this with just regular crafting sponges?Community AnswerYes, you can do it with a regular crafting sponge. It will work fine. But the other option is better.
-
QuestionWhat looks better, light colors on the tip or dark colors on the tip?
 Community AnswerDark colors look better on the tip. It's nice to have the glitter or the darker color fading from the end of your nail towards your cuticle.
Things You'll Need
Doing a Basic Gradient
- Clear base coat
- Clear top coat
- Nail polish, 2 colors
- Liquid latex, school glue, or petroleum jelly
- Nail polish remover
- Makeup sponge
- Nail clippers
- Nail file
- Cuticle pusher
- Q-tips and small brushes, for cleanup
Doing a Glitter Gradient
- Clear base coat
- Clear top coat
- Nail polish, flat color
- Glitter nail polish
- Liquid latex, school glue, or petroleum jelly
- Nail polish remover
- Makeup sponge
- Nail clippers
- Nail file
- Cuticle pusher
- Q-tips and small brushes, for cleanup
References
- ↑ http://www.simplynailogical.com/p/gradient-g.html
- ↑ http://www.simplynailogical.com/p/gradient-g.html
- ↑ http://www.thesassylife.com/diy-ombre-gradient-nails/
- ↑ Lindsay Yoshitomi. Nail Artist. Expert Interview. 12 July 2019.
- ↑ http://www.simplynailogical.com/p/gradient-g.html
- ↑ Lindsay Yoshitomi. Nail Artist. Expert Interview. 12 July 2019.
- ↑ Lindsay Yoshitomi. Nail Artist. Expert Interview. 12 July 2019.
- ↑ Lindsay Yoshitomi. Nail Artist. Expert Interview. 12 July 2019.
- ↑ http://www.thesassylife.com/diy-ombre-gradient-nails/
- ↑ http://www.simplynailogical.com/p/gradient-g.html
- ↑ http://www.thesassylife.com/diy-ombre-gradient-nails/
- ↑ https://www.youtube.com/watch?v=iyaI0vh6TVA&feature=youtu.be&t=3m32s
- ↑ http://alldaychic.com/refined-gradient-nails-diy/
- ↑ https://www.youtube.com/watch?v=rXBRBfIwu9s&feature=youtu.be&t=1m
- ↑ https://www.youtube.com/watch?v=iyaI0vh6TVA&feature=youtu.be&t=2m42s
- ↑ https://www.youtube.com/watch?v=iyaI0vh6TVA&feature=youtu.be&t=2m48s
- ↑ https://www.youtube.com/watch?v=iyaI0vh6TVA&feature=youtu.be&t=2m55s
- ↑ https://www.youtube.com/watch?v=iyaI0vh6TVA&feature=youtu.be&t=3m3s
- ↑ http://www.simplynailogical.com/p/gradient-g.html
- ↑ http://www.simplynailogical.com/p/gradient-g.html
- ↑ http://www.simplynailogical.com/p/gradient-g.html
About This Article

Gradient nails are a beautiful way to make an ombre effect with different colors. If you want to do a basic gradient, start with a clear base coat. When it’s dry, apply 1 coat of a light color, like white, to each nail and let it dry. This will help the gradient show up better. When you’re ready, brush 3 strokes of 1 color onto a makeup sponge. Then, brush 3 strokes of a 2nd color right above it. Using a rolling motion, press the sponge onto your nails one at a time. Don’t worry if it’s not as bright as you’d like it. Once your nails dry you can do a second coat. While the 2nd coat is still wet, apply a clear topcoat, which will help the colors blend together. To learn how to apply a glitter gradient, read on!