This article was co-authored by Marta Nagorska. Marta Nagorska is a Nail Technician and Nail Art Blogger based in London, UK. She runs the blog, Furious Filer, where she gives tutorials on nail care and advanced nail art. She has been practicing nail art for over 5 years and graduated from Northampton College with distinction with a Nail Technician and Manicurist degree in 2017. She has been awarded the top spot in the OPI Nail Art Competition.
wikiHow marks an article as reader-approved once it receives enough positive feedback. In this case, 85% of readers who voted found the article helpful, earning it our reader-approved status.
This article has been viewed 197,349 times.
If you are interested in nail art, you may want to try using a nail stamper. Nail stamping kits can be obtained at a reasonable price and come with a disc that has designs etched into it, a scraper to remove excess nail polish, and a stamp that allows you to roll the design onto your nails. Using these tools, you can begin stamping fun and whimsical designs on your own nails. A nail stamper can be a great way to improve your nail art skills and impress friends and family!
Steps
Prepping Your Materials
-
1Choose a well-lit area in which to work. When painting your nails and doing nail art, you will need to work in an area that is well-lit so that you can easily see what you are doing. If you do not already have a designated area for painting nails, clear off a desk or table and add a lamp or two to light the area properly. Make sure that the area is away from excess noise and distractions so that you can focus on the precise moves that nail art requires.
-
2Choose your nail polish colors. Decide ahead of time which nail polish colors you will use so that you aren’t scrambling to decide later on. Set the colors out on your workspace so that they are readily available when you are ready to use them. Be sure to also set out a clear base and top coat.
- Your imagination is the limit! You can get creative with color combinations. You could also try using metallic or sparkly polishes to give your nails a pop of color.
EXPERT TIPMarta Nagorska is a Nail Technician and Nail Art Blogger based in London, UK. She runs the blog, Furious Filer, where she gives tutorials on nail care and advanced nail art. She has been practicing nail art for over 5 years and graduated from Northampton College with distinction with a Nail Technician and Manicurist degree in 2017. She has been awarded the top spot in the OPI Nail Art Competition.Nail Artist Marta Nagorska
Nail ArtistStamping polish is for more than just stamping. Marta Nagorska, a nail art blogger, says: “Stamping polishes are really opaque, which makes them perfect for hand painted nail art and for French manicures. You can create the white tip with one stroke of the brush without having to go over it a couple of times and risking ruining the crisp line."
Advertisement -
3Obtain nail stamping materials or a kit. Kits can be purchased online, in drugstores, or beauty supply stores. Searching “nail stamping kit” in a search engine will bring up thousands of results to choose from. You are likely to find any design you are looking for or desire.
- Stamping plates, stampers, and scrapers can be purchased separately if desired. It is likely that you will be able to find higher quality tools if you purchase them separately, rather than in a single, cheap kit.
- If you desire to use a kit, read the reviews of kits online to find one that is of a higher quality. You may also choose to use a cheaper kit when starting out to find out if you enjoy doing it without making a large investment.


Preparing Your Nails
-
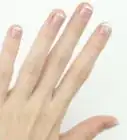
1Apply a clear base coat. A base coat will protect your nails from the harsh effects that polish can have. It will create a barrier between the nail and the polish and prevent staining and the nail from becoming too worn down and brittle from the chemicals found in nail polish. There are different types of base coats available such as quick-drying formulas, sensitive formulas, hardening formulas, and more.[1]
- Hardening formulas are formulated specifically for weak and brittle nails to protect them from breaking. They are often infused with vitamins and keratin to help you achieve stronger, healthier nails.
- Quick-drying formulas are perfect for individuals on the go and who don’t have a lot of time to wait for each coat of polish to dry thoroughly.
- Sensitive formulas are great for those with sensitive skin and do not want to risk any reactions to the polish.
-
2Apply the base color. Once the base coat has dried, applied your desired color or colors to the nails. If the color isn’t pigmented enough with the first layer, apply a second layer. Allow a bit of time between coats for the nail polish to dry.
-
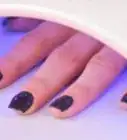
3Allow the nail polish to dry completely. Place your nails in front of a fan or use a nail drier to help speed the drying process. Cold temperatures help nails dry faster--you can try blow drying your nails with the cold setting to help them dry. Another method would be to use ice water to harden nails.[2]
- After the polish has been applied, wait at least one minute to allow the polish to set and harden a bit.
- Dip your nails in a bowl of cold or ice water for approximately two minutes to help the nails dry.


Stamping the Designs
-
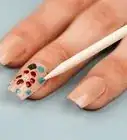
1Coat the design with polish. Select your desired pattern from one of the stamping plates. Paint over the design with polish. It is best to use a highly pigmented, thicker polish for this.
- A good rule of thumb is to use a polish that will cover the nail with one coat and will not be sheer.
- Some kits come with a special stamping polish. This polish is simply a thicker polish than ordinary formulas. You can choose whether or not you would like to use this polish, based on your preference.[3]
-
2Scrape off the excess polish. Hold the scraper at a 45 degree angle to the stamping plate. Firmly and swiftly scrape the excess polish away, until you can clearly see the design. Wipe the scraper on a paper towel to remove the nail polish. If it did not scrape away all of the excess polish the first time, scrape the stamping plate again.[4]
-
3Use the stamper to pick up the polish. Pick up your stamper and roll it over the design on the plate, starting from one side of the stamper and rolling it to the other side. You should be able to clearly see the design on the surface of the stamper. Most of the polish should have been picked up from the stamping plate.
-
4Roll the stamper over the nail. With the polish covering the surface of the stamper in the chosen design, roll the stamper over the nail, moving from one side to the other. Press down firmly but not so firmly that the design gets smudged. Lift the stamper away from the nail and ensure that the design has imprinted on the nail. If not, you may need to try again or start over by removing all of the polish with nail polish remover and a cotton ball.
-
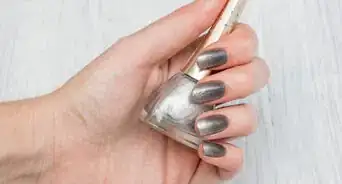
5Coat the nail with a clear topcoat. When you have finished stamping the design on your nail, wait a minute or two for the polish to set and harden a bit. Coat the polish with a clear top coat to protect the design and to make the nail polish last longer. A top coat will ensure that the nail stays somewhat protected from daily wear and tear.


Community Q&A
-
QuestionWhat is a good nail polish to use for stamping?
 Ιωάννα ΒασιλείουCommunity AnswerThere are special stamping nails polishes that do a better job - but you can use a thick or old polish. Test if a nail polish is suitable for stamping by painting your nails with one coat to see if it covers your nail tip. White polishes are the best.
 -
QuestionDo you need to use specific nail polish?
 Community AnswerEven though it is easier, you don't need to use stamping polish. Just make sure the polish you are using is quite pigmented and covers in 1-2 coats.
 -
QuestionWhat can I do if the stamper will not pick up the nail polish?
 Community AnswerIf the stamper is all shiny and smooth, try using a file or buffer to make it more matte. Then it should be able to pick up polish.
Warnings
- You may not be successful the first few times you try nail stamping. Keep practicing and experimenting with different nail polishes until you learn what works for you.⧼thumbs_response⧽
Things You'll Need
- Nail polish
- Nail polish remover
- Cotton ball and/or makeup pad
- Metal stamping pad with designs etched into it
- Scraper
- Stamper

References
About This Article
To use a nail stamper, start by purchasing a nail stamping kit either online or at a beauty supply store. Next, apply a clear base coat to your nails and coat your desired pattern on the stamping plate with nail polish. Scrape off the excess polish, then roll the stamper over the design and onto the nail, pressing down firmly. Finally, allow the design to set for 1-2 minutes before coating the nail with a clear topcoat. To learn more, like how to set and protect your designs to make them last longer, read on!