wikiHow is a “wiki,” similar to Wikipedia, which means that many of our articles are co-written by multiple authors. To create this article, 20 people, some anonymous, worked to edit and improve it over time.
The wikiHow Video Team also followed the article's instructions and verified that they work.
This article has been viewed 33,725 times.
Learn more...
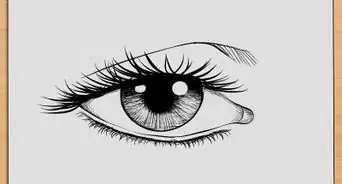
Are you that person who is struggling to find the perfect spot for eyes and who is finding it hard to draw the "perfect" eyes?
Steps
Drawing the Eyes
-
1Draw an oval. Usually, this oval is a bit taller than it is wide. You can change this; just remember that a chibi eye is large and round!
-
2Draw the eyelids. Draw a thick curve on top of the oval that curves outwards to one side. The outside edge should hang out from the oval; this leaves room for the sclera. For the bottom eyelid, just add a thin curved line on the bottom of the oval.
- Chibi eyes are exaggerated, so make the top eyelid curve outwards significantly.
Advertisement -
3Fill the oval with black. Colour and highlights will be added later; it's easier to do the black now than try to colour in crevices later.
-
4Add a colourful "C". Look at the photo; a thick coloured "C" seems to be on its side. This should be at the bottom of your oval and surrounded with black. A bright colour is best.
-
5Shade the C. Pick a slightly darker shade, and colour the bottom of the C with this. This is an easy way to add depth and light perception.
-
6Add small line details in the C. Use black or a different, darker colour, add small lines inside the coloured C. Although this step is optional, it will add the pupil to the eyes which will make it look more human.
-
7Add white highlights. Depending on where your light source is, use white to add lines and little specks of light to the whole eye. For added authenticity, the highlights should be in both the black and the coloured area.
-
8Add eyebrows and small details. Usually, chibi eyebrows are just thin curved lines. Small curved spikes on the upper eyelid can be eyelashes.
Placing the Eyes
-
1Draw two lines that looks like a cross on the face of the chibi. The cross will not only help you place the eyes, but it will also help you place other facial features in the correct spot as well.
-
2Place the eyes on the horizontal line on the spots that the circles were placed. Even though there are two lines below the cross in the image, you don't need to draw them. To place the eyes, all you need to do is to draw your eyes above the horizontal line.
-
3Enjoy drawing your chibis!


Community Q&A
-
QuestionHow to I make the eyes more feminine?
 Community AnswerSometimes adding more eyelashes and making the lines curvier can help to make the eye appear more feminine.
 -
QuestionCan you add your own details such as using regular anime eyes but bigger? Does it still count as chibi?
 LemonstersCommunity AnswerIt depends which eyes you use. Smaller anime eyes will probably not work, but big and lively anime eyes will still do the job. If you want to use anime eyes on chibis in general, it is recommended to scale them to fit the proportions of the head. It still counts as chibi, but you might get the look you were trying to achieve if you follow these steps.
Warnings
- Always be aware of how hard you press. If you press too hard and you erase it, you will leave an unwanted mark on the paper.⧼thumbs_response⧽
Things You'll Need
- Pencil
- Ruler
- Eraser
- Print paper


About This Article
To draw a chibi eye, start by drawing a large, round iris with a small black pupil in the center. Next, draw the eyelids by adding a thick line on top of the eye that curves outward and a thin curved line on the bottom. Finally, add white highlights over the iris and pupil so it looks like light is reflecting off of the eye. To learn how to place the eyes on the face, keep reading!