This article was co-authored by Renée Plevy and by wikiHow staff writer, Eric McClure. Renée Plevy is an Internationally Acclaimed Portrait Artist from New York/Palm Beach who has painted The Grand Dames of Palm Beach and various celebrities and community leaders. With over 50 years of experience, Renée specializes in painting realistically in oil and capturing the soul of the person. She has studied under internationally renowned portrait artists John Howard Sanden, David Leffel, Robert Beverly Hale, Clyde Smith, and Leonid Gervits. Renée is featured in over 68 shows and galleries including a one-woman museum show at the Paterson Museum. She has garnered numerous awards including “Artist of the Year” from The Bloomfield Art League and First Prize from the Boca Raton Museum Artist’s Guild. Renée has even painted a portrait of celebrity, Vanilla Ice. She also teaches at the Boca Raton Museum Art School - formerly at SVA in Manhattan.
There are 9 references cited in this article, which can be found at the bottom of the page.
wikiHow marks an article as reader-approved once it receives enough positive feedback. This article received 57 testimonials and 100% of readers who voted found it helpful, earning it our reader-approved status.
This article has been viewed 3,100,397 times.
There’s an old adage in art that the human face is the most interesting landscape of them all. If you want to explore your creative side and improve your drawing skills, drawing a face is great way to go! In this article, we’ll break down the mechanics when it comes to drawing faces. We’ve even provided reference images so that you can practice along as you learn.
Things You Should Know
- Draw an oval. Then, add vertical and horizontal guidelines through the center to create guidelines for the features.
- Make eyes realistic by making them almond-shaped. Place one eye’s width between each eye to keep them symmetrical.
- Focus on the shape of the base of the nose and shade under each eye to give definition to the nose’s bridge (instead of drawing a line in the middle).
- Place the mouth halfway between the nose and chin. Add 3 lines—1 for the mouth, 1 for the upper lip, and 1 for the lower lip.
Steps
Adult Woman
-
1Make a light outline of a face. Heads aren’t actually circular; they’re oval-shaped, like an egg. Sketch an oval outline that tapers down at the bottom where the chin would be.[1]
-
2Divide the oval in half vertically and horizontally. The easiest way to draw a face is to use dividing lines to map out the proportions of the features. First, draw a line down the center of the oval. Then cut the oval in half again, this time horizontally.[2]Advertisement
-
3Add another horizontal line to illustrate the nose. Divide the lower half of the oval again with another horizontal line. The point where the vertical line meets the lower horizontal line is the base of the nose. Sketch out the tip of the nose and add a nostril on each side.[3]
-
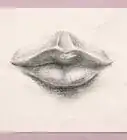
4Sketch out the mouth with a third horizontal line. Divide the bottom of the oval in half again. Put the bottom of the lips on the dividing line you have just drawn. Draw a line for where the lips meet and then draw the top and bottom lips.[4]
-
5Add two symmetrical eyes along the top line. Draw two circular balls to make out the eyes across the central horizontal line. These are the eye sockets. The top of this circle is where the eyebrows go and the bottom is where the cheekbone sits.[5]
-
6Develop the eyebrows along the top of each eye socket. The eyebrows communicate a lot of expression. Craft the eyebrows evenly along the top line of each ball for a more neutral expression, angle the eyebrows inward for a more intense vibe, or raise them up a little to communicate surprise.[6]
- Use a series of short, thin strokes to add individual hairs if you’re going for a more realistic look.
-
7Finish the eyes by adding pupils and eyelids. As a rule of thumb, the distance between the two eyes is the width of a third eye. A person’s eyes are almond-shaped, so bear this in mind as you sketch them out. Eyes come in every size and shape, so experiment with the form a bit until you’ve got the right look.[7]
-
8Color the irises and develop the pupils. Draw the pupil, which is the darkest bit of the eye. Fill most of it in black and leave a little white. With your pencil flat, use a bit of shading for the base. Shade variant from medium to light in each iris. Use tightly-spaced short lines from the edge of the pupil to the white of the eye.[8]
- Make some of the edges of each pupil lighter to give it a nice effect. Develop the eyebrows above. Then, rub out the guidelines below the eye.
-
9Draw the top of the eyelid over the top of each eye. The base of the eyelid comes down over the top of the iris and covers the top of it slightly. If you make the eyelids really big, the woman you’re drawing will look sleepy. Keep them even and thin.[9]
-
10Shade under the eyes to communicate depth. Add a little shading underneath the eye and where the eye meets the nose to define the socket. For a tired look, add shading and swooped lines at a more acute angle to the bottom eyelid.[10]
-
11Add an ear on each side of the head. The base of each ear should be drawn in line with the bottom of the nose and the top of the ear in line with the eyebrows. Remember, the ears are flat against the side of the head.[11]
-
12Give your face some hair. Start where the hair parts and develop it outwards. Put some strands in front and other strands behind to communicate dimension.[12]
- You can opt for whatever kind of hairstyle you’d like. There are no rules, so go for whatever look you want.
-
13Add the neck coming from the base of the head. Necks are thicker than you probably imagine. Draw two lines coming down from roughly where the bottom horizontal line meets the edges of the face.[13]
- You can include shoulders if you’d like, or let the neck be the end of the body.
-
14Include any details you feel you’re missing. You can add a bit of shading under the nose and accentuate the chin, or put expression lines around the mouth and shade in the corners. Outline the ridge of the nose. The more prominent you make these features, the older your face will look.[14]
-
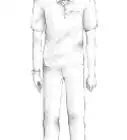
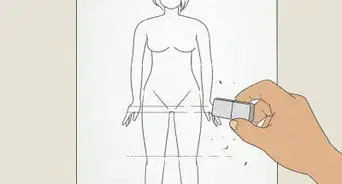
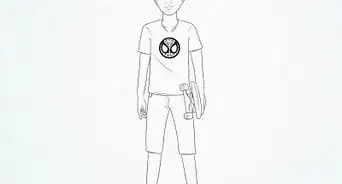
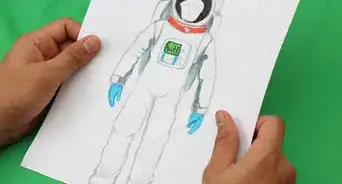
15Draw clothes if you want a fuller portrait. Throw on a blouse, shirt, or jacket if you want to add a body. This is totally optional, so if you’re only interested in drawing the face, go ahead and skip this.[15]
-
16Erase any guidelines you no longer need. Now that you’re done, get rid of any pesky lines that don’t belong anymore. Clean up any marks you didn’t mean to erase and you’re done![16]


Young Woman
-
1Draw the shape of the head using a loose oval. Craft a loose oval shape to guide the illustration. Heads aren’t perfectly circular, but younger people rarely have sharp chins so don’t make it too sharp.[17]
-
2Add guidelines to the center of the face. Put one horizontal line and one vertical line in the center of the oval. This will help you compose the features evenly.[18]
-
3Sketch lines to define the eyes, nose, mouth, and ears. Use your pencil to lightly sketch out the location of each part of the face. Add marks for almond-shaped eyes, note the location of the mouth, and lightly define the nose.[19]
- Younger women rarely have harsh, sharp noses. If you want to make your drawing appear youthful, use softer lines.
-
4Develop the eyes, nose, mouth, ears, and eyebrows. Feather out some soft and unassuming eyebrows. Fill in the eyes with pupils, and add any lines to the nose and nostrils to give them shape.[20]
-
5Sketch out the hair and neck. You can even throw a little ribbon or headband in the hairstyle if you want the girl to appear really young. Start where the hair parts and add flowing lines going away from that location.[21]
-
6Use a small-tipped drawing tool to add the finer details of the face. Grab a razor-sharp pencil, thin pen, or marker and develop all of the features you’ve added.[22]
-
7Outline your sketch with your preferred tool. Now that you’ve developed your drawing entirely, add any outlines or features that feel like they’re missing.[23]
-
8Erase any sketch marks and guidelines to produce a clean drawing. Use your eraser to carefully remove all of the lines you drew to guide your drawing and keep your features symmetrical.[24]
-
9Add color and shading to the drawing. You can keep your drawing black and white if you’d like. Use colored pencils, markers, or crayons to finish your drawing if you’re adding color. You can also shade in the darker parts of the face (like under the eyes and hair) to create more depth.[25]


Young or Adult Man
-
1Sketch a light circle. You’ll add the chin later. Don’t worry if your circle isn’t perfectly round—this is just a starting point.[26]
- You can start with an oval if you prefer, but men tend to have much more angular jawlines. This circle will represent the top portion of the head.
-
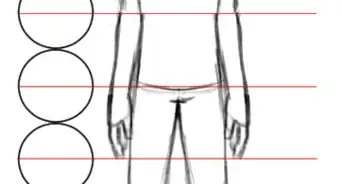
2Draw a guideline through the middle of the head. Extend the line down past the bottom of the circle until you reach the bottom of the chin. This line determines where the person is looking, so keep it straight if you want the face to be looking at the viewer.[27]
-
3Define the shape of the cheeks, jaw, and chin. Build out the bottom half of the head by adding the jaw lines. The more angular you make the cheeks and jaw, the more “rugged” the face will eventually look.[28]
- Younger men typically have softer, less developed jaws than adult men do.
-
4Sketch out the location for the eyes, nose, mouth, and ears. Build out the core locations for each of the man’s main facial features. Place the ears at the same height as the top of the eyes and put the base of the nose halfway between the bottom of the chin and the bottom of the circle.[29]
-
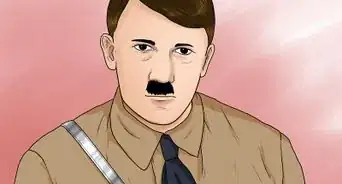
5Give some shape to all of the facial features. Build out the eyes, nose, mouth, ears, and eyebrows. Add as much detail as you’re comfortable developing right now.[30]
-
6Draw the shape of the hair and neck. You don’t have to craft everything in perfect detail, but develop a sense for the overall composition of the hair. Add a neck, as well.[31]
- A thinner neck will convey a bit more youthfulness while a wider neck will make the man look older.
-
7Use a smaller tipped drawing tool to add the finer details. Grab a fine-point pen or sharp pencil and begin to develop the finer details. Add moles, individual hairs, or shading.[32]
- Now is also a good time to add facial hair! This is one of the best ways to make a man look older.
-
8Outline the sketch. Start cleaning up the softer lines with cleaner, crisper strokes. Develop the hair, fill out the eyebrows, and continue to clean up the sketch.[33]
-
9Erase all of the guidelines you sketched out. Grab an eraser and remove all of the original guidelines and any mistakes you’ve made.[34]
-
10Color in your drawing. It’s totally fine to keep things black and white if you’d like, but now’s the time to add color if you’re going to. Use markers, colored pencils, or crayons to bring your creation to life.[35]
-
11Add shading to the drawing for a more realistic look. You can keep the drawing unshaded for a more cartoonish look, but shading and adding depth is a great way to give your drawing a little extra pop.[36]


Expert Q&A
-
QuestionWhat are some tricks to make my drawings look more realistic?
 Renée PlevyRenée Plevy is an Internationally Acclaimed Portrait Artist from New York/Palm Beach who has painted The Grand Dames of Palm Beach and various celebrities and community leaders. With over 50 years of experience, Renée specializes in painting realistically in oil and capturing the soul of the person. She has studied under internationally renowned portrait artists John Howard Sanden, David Leffel, Robert Beverly Hale, Clyde Smith, and Leonid Gervits. Renée is featured in over 68 shows and galleries including a one-woman museum show at the Paterson Museum. She has garnered numerous awards including “Artist of the Year” from The Bloomfield Art League and First Prize from the Boca Raton Museum Artist’s Guild. Renée has even painted a portrait of celebrity, Vanilla Ice. She also teaches at the Boca Raton Museum Art School - formerly at SVA in Manhattan.
Portrait Artist & EducatorWhen a person starts to do a portrait or a drawing of a face, they tend to put the person in a very unrealistic position. Instead of putting the person at eye level, looking directly at you, try a variation of that pose. Draw the person as if they have bent their head down, or moved it to the right or the left, or tilted it. -
QuestionHow can I get better at drawing faces?Renée PlevyRenée Plevy is an Internationally Acclaimed Portrait Artist from New York/Palm Beach who has painted The Grand Dames of Palm Beach and various celebrities and community leaders. With over 50 years of experience, Renée specializes in painting realistically in oil and capturing the soul of the person. She has studied under internationally renowned portrait artists John Howard Sanden, David Leffel, Robert Beverly Hale, Clyde Smith, and Leonid Gervits. Renée is featured in over 68 shows and galleries including a one-woman museum show at the Paterson Museum. She has garnered numerous awards including “Artist of the Year” from The Bloomfield Art League and First Prize from the Boca Raton Museum Artist’s Guild. Renée has even painted a portrait of celebrity, Vanilla Ice. She also teaches at the Boca Raton Museum Art School - formerly at SVA in Manhattan.
Portrait Artist & EducatorYou need to do a lot of reading, you need to do sketching, but primarily, you need to find a good teacher in your area who will help you to see what you're missing. We have a tendency not to actually see what's in front of us, and that's tough when you have to develop an artist's eye. -
QuestionHow can you get better at drawing faces?
 Claire WentzelClaire Wentzel is an award-winning Artist and Strategic Creative Consultant. Her business, Red Rose Studios, is based in Las Vegas, Nevada, where she also serves on the Clark County Public Art Committee. With over 20 years of experience, she specializes in mixed media participatory art, brand messaging, and building organizational culture. She earned her BA in Fine Art with Distinction from the University of Colorado-Boulder and completed a painting residency at the International School of Painting, Drawing, and Sculpture. Her chalk mural work has been featured in EdHat and I Madonnari Italian Street Painting Festival advertising.
Award-Winning Artist and Strategic Creative ConsultantLook at them. My favorite technique that I learned for drawing anything, but especially as a good technique to draw portraits, is blind contour drawing. This is an exercise where you look at your subject and you cannot look at your paper or lift up your pencil while you draw. You are training your eye to talk to your hand. This is a fundamental skill that really helps with drawing portraiture in particular.

References
- ↑ https://www.easydrawingtips.com/how-to-draw-female-face-step-by-step-tutorial/
- ↑ https://www.alexhays.com/loomis/Andrew%20Loomis%20-%20Drawing%20the%20Head%20and%20Hands.pdf
- ↑ https://www.alexhays.com/loomis/Andrew%20Loomis%20-%20Drawing%20the%20Head%20and%20Hands.pdf
- ↑ https://www.easydrawingtips.com/how-to-draw-female-face-step-by-step-tutorial/
- ↑ https://www.drawingforall.net/how-to-draw-a-female-face/
- ↑ https://ia804707.us.archive.org/32/items/DrawingPortraits/drawing%20portraits.pdf
- ↑ https://ia804707.us.archive.org/32/items/DrawingPortraits/drawing%20portraits.pdf
- ↑ https://www.pusd.us/cms/lib/CA01901115/Centricity/Domain/2467/Art%20in%20Focus.pdf
- ↑ https://ia804707.us.archive.org/32/items/DrawingPortraits/drawing%20portraits.pdf
- ↑ https://ia804707.us.archive.org/32/items/DrawingPortraits/drawing%20portraits.pdf
- ↑ https://www.easydrawingtips.com/how-to-draw-female-face-step-by-step-tutorial/
- ↑ https://www.drawingforall.net/how-to-draw-a-female-face/
- ↑ https://ia804707.us.archive.org/32/items/DrawingPortraits/drawing%20portraits.pdf
- ↑ https://www.drawingforall.net/how-to-draw-a-female-face/
- ↑ https://ia804707.us.archive.org/32/items/DrawingPortraits/drawing%20portraits.pdf
- ↑ https://www.alexhays.com/loomis/Andrew%20Loomis%20-%20Drawing%20the%20Head%20and%20Hands.pdf
- ↑ https://www.alexhays.com/loomis/Andrew%20Loomis%20-%20Drawing%20the%20Head%20and%20Hands.pdf
- ↑ https://www.alexhays.com/loomis/Andrew%20Loomis%20-%20Drawing%20the%20Head%20and%20Hands.pdf
- ↑ https://ia804707.us.archive.org/32/items/DrawingPortraits/drawing%20portraits.pdf
- ↑ https://youtu.be/8_rl2TYLsNE?t=115
- ↑ https://ia804707.us.archive.org/32/items/DrawingPortraits/drawing%20portraits.pdf
- ↑ https://ia804707.us.archive.org/32/items/DrawingPortraits/drawing%20portraits.pdf
- ↑ https://ia804707.us.archive.org/32/items/DrawingPortraits/drawing%20portraits.pdf
- ↑ https://www.alexhays.com/loomis/Andrew%20Loomis%20-%20Drawing%20the%20Head%20and%20Hands.pdf
- ↑ https://www.pusd.us/cms/lib/CA01901115/Centricity/Domain/2467/Art%20in%20Focus.pdf
- ↑ https://www.alexhays.com/loomis/Andrew%20Loomis%20-%20Drawing%20the%20Head%20and%20Hands.pdf
- ↑ https://www.alexhays.com/loomis/Andrew%20Loomis%20-%20Drawing%20the%20Head%20and%20Hands.pdf
- ↑ https://www.alexhays.com/loomis/Andrew%20Loomis%20-%20Drawing%20the%20Head%20and%20Hands.pdf
- ↑ https://www.easydrawingtips.com/how-to-draw-male-face-step-by-step-tutorial/
- ↑ https://www.drawingforall.net/how-to-draw-a-male-face/
- ↑ https://www.drawingforall.net/how-to-draw-a-male-face/
- ↑ https://ia804707.us.archive.org/32/items/DrawingPortraits/drawing%20portraits.pdf
- ↑ https://ia804707.us.archive.org/32/items/DrawingPortraits/drawing%20portraits.pdf
- ↑ https://www.alexhays.com/loomis/Andrew%20Loomis%20-%20Drawing%20the%20Head%20and%20Hands.pdf
- ↑ https://www.pusd.us/cms/lib/CA01901115/Centricity/Domain/2467/Art%20in%20Focus.pdf
- ↑ https://ia804707.us.archive.org/32/items/DrawingPortraits/drawing%20portraits.pdf
- ↑ Renée Plevy. Portrait Artist & Educator. Expert Interview. 7 May 2021.
About This Article

When you’re drawing a face, begin by sketching in a basic oval shape. Most faces are rounded at the top and slightly narrower at the bottom, like an upside-down egg. Next, draw a line down the center of the face vertically, and another one horizontally halfway between the top and bottom. These lines will help you figure out how to position the features on the face. Draw another horizontal line halfway between the middle line and the bottom of the face, and sketch in the base of the nose so that it rests on that line. Use the vertical guideline to help you center the nose. Divide the lower part of the face in half again with another horizontal line, and draw the mouth so the bottom lip rests on top of the new guideline. Move back up to the first horizontal line and sketch in two circles on the line, positioning them on either side of the central vertical line. These shapes will form the eye sockets. Draw in the eyebrows at the tops of the circles, and use the bottoms to indicate where the tops of the cheekbones are. Sketch the eyes in the middle of each circle, using an almond shape. As a rule of thumb, try to leave about one eye’s width in the middle, between the eyes. Draw in the eyelids and add an iris and pupil to the center of each eye. Next, add the ears. The top of each ear should line up with the outer edges of the eyebrows, while the earlobe should line up with the bottom of the nose. Finish by filling in the hair, starting from the part and working your way out to the ends. You can also add the neck and shoulders if you like. When you’re done, erase the guidelines and add in details, like the eyelashes, shading under the eyes and nose, and natural-looking lines around the eyes and mouth. To vary the look of the face, practice changing the shapes and sizes of individual features. For example, keep in mind that adult male faces tend to have wider jaws and heavier brows than the faces of women and children. To learn how to add details to your drawing, keep reading!