This article was co-authored by Beverly Ulbrich. Beverly Ulbrich is a Dog Behaviorist and Trainer and the Founder of The Pooch Coach, a private dog training business based in the San Francisco Bay Area. She is a Certified CGC (Canine Good Citizen) Evaluator by the American Kennel Club and has served on the Board of Directors for the American Humane Association and Rocket Dog Rescue. She has been voted the best private dog trainer in the San Francisco Bay Area 4 times by SF Chronicle and by Bay Woof, and she has won 4 "Top Dog Blog" awards. She has also been featured on TV as a dog behavior expert. Beverly has over 18 years of dog behavior training experience and specializes in dog aggression and anxiety training. She has a Master of Business Administration from Santa Clara University and a BS from Rutgers University.
There are 10 references cited in this article, which can be found at the bottom of the page.
This article has been viewed 90,555 times.
While claw care is an essential aspect of dog grooming, few pooches like having their nails trimmed. Many pet owners use clippers, but manual and power files are good alternatives, as they lower the risk of cutting the nail’s sensitive quick. Regardless of the tool you use, the trick is to gradually introduce your dog to trimming. Offer lots of praise and treats to teach your pup that grooming is a good thing, file 1 or 2 nails at a time, and give it a break if it gets stressed.
Steps
Filing Your Dog’s Nails Manually
-
1Hold a heavy-gauge metal nail file in your dominant hand. Invest in a metal nail file, which is sturdier than an emery board. Hold the file, and have your dog sit or lie down or stand and, if necessary, gently drape your upper body over your dog to keep it still.[1]
- You can purchase a metal nail file at a pet store or pharmacy; you don’t need to use one specifically labeled for pets. Coarse emery boards work in a pinch, but they’ll wear out quickly, especially if you have a larger breed.
- Filing a dog’s nails manually is time consuming if you’re doing it as an alternative to using clippers. If you do clip your dog’s nails, you can use a file to smooth over rough edges after clipping.
-
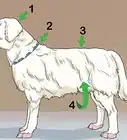
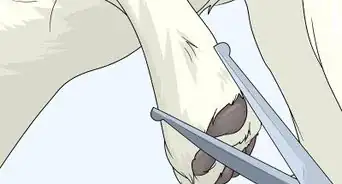
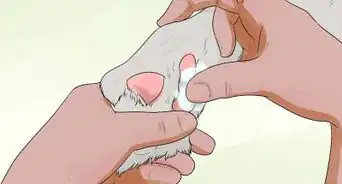
2Grasp a paw and separate the toes. Hold your dog’s paw firmly with your non-dominant hand. Spread the toes and, if it has a long coat, carefully hold back fur so you can access the nails.[2]
- While you’re at it, check the paws and paw pads for debris, ticks, and signs of injury. If necessary, remove any debris or ticks, or tend to wounds.
Advertisement -
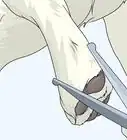
3File the tip of a nail until it's even with your dog's paw pads while it is standing. Let your dog know that it’s doing a great job as you begin to rub the tip of a nail with the file. Make about 10 to 15 passes in the same direction to file the nail bit by bit. Periodically, put down the file and give your dog a treat to help keep it calm.[3]
- Aim to file a nail until it’s even with your dog’s paw pads while your dog is standing on the ground. At a proper length, you shouldn’t be able to hear the nails tapping when your dog walks. You should also be able to slide a piece of paper between your dogs claws and the ground while your dog is standing.
- It's unlikely you'll hit the quick with a manual file, but you should still stop filing when you reach the nail's curve or see a grayish oval in the filed surface.
-
4Work on 1 or 2 nails per filing session. It’ll most likely take multiple sessions to finish 1 paw, especially if you’re using a file as an alternative to clipping. File a couple of nails at a time, and be sure to give your dog a break if it gets too stressed.
- Dogs usually tolerate filing better than clippers and grinders, so it could become part of your bonding routine. Hold your dog and file a few nails during your cuddle sessions.
- File your dog's nails regularly to keep them short; the process will take longer if you let the nails grow too long.
Tip: Sidewalks and other concrete surfaces are natural nail files, and your dog's nails won't need trimming as often if you regularly take it for long walks.


Using a Nail Grinder
-
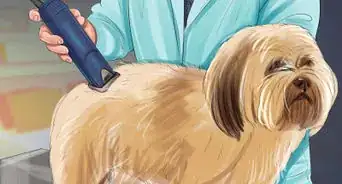
1Train your dog to be comfortable with the grinder’s sound. Offer treats as you let your dog see and sniff the grinder. Then turn it on, offer reassurance, and give your dog a steady stream of treats while the grinder buzzes. Turn off the grinder after 10 or 15 seconds, and stop giving your dog treats.[4]
- Offering treats while the grinder buzzes teaches your dog to associate the sound with rewards. As you practice, keep the grinder turned on for gradually longer periods of time.
- When your dog consistently remains calm with the grinder turned on, try holding the tool near its paw. Remember to give it treats while the grinder is buzzing.
- You can find nail grinders online and at pet stores. Small, battery-powered grinders make less noise than heavy duty tools and may be more tolerable for your dog.
-
2Hold your dog’s paws and spread its toes. After getting your dog used to the sound, hold the grinder in your dominant hand and grasp a paw with your other hand. Carefully separate its toes and, if it has a long coat, hold back its fur. If necessary, gently restrain your dog with your upper body.[5]
Tip: To prevent fur from getting caught in the grinder as it spins, try pushing a nail through a small hole cut into an old sock or pantyhose. The fabric will keep the fur out of the way so you can safely access the nail.[6]
-
3Press the grinder lightly against the nail for 2 or 3 seconds at a time. Turn on the grinder and hold the paw firmly as you lightly rub the tip of a nail. Don’t press hard, and hold the tool to the nail for just a couple of seconds. The vibration will probably spook your dog, so offer reassurance and be sure to have treats handy.[7]
- Bit by bit, pass the grinder over the nail in the same direction until it’s flush with your dog’s paw pads. They should be short enough so that you don’t hear clicking when your dog walks. Depending on the grinder's power and the nail's length, it'll take at least 2 or 3 passes.
- If possible, have a helper offer treats while you grind your pup’s nails. Gradually file layers off of the tip, and don’t grind past where the nail begins to curve.
-
4Make sure the grinder doesn’t overheat due to friction. Lightly holding the grinder to the nail for 2 to 3 seconds at a time helps prevent it from overheating. Still, you should test it periodically to make sure it’s cool to the touch. Turn it off, let tip stop spinning, then touch it quickly to the back of your hand.[8]
- If it feels hot, stop filing your dog’s nails and let the grinder cool. Check your dog’s nail, and hold a cool, damp cloth over it if it feels hot.
-
5Avoid grinding into the nail’s quick.[9] It’s harder to hit the quick with a grinder, but you still need to use caution. If your dog has light nails, stop grinding before you reach the pink, opaque area at the base of the nail. You can’t see the quick if your dog has black nails, so stop trimming when you see a grayish oval in the cut surface.[10]
- The quick is a network of blood vessels and nerves at the base of the nail. Regularly trimming your dog’s nails will cause the quick to recede and make nail care easier.
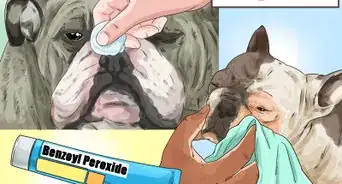
- If you do cut the quick, don’t panic. Offer your dog reassurance and hold gauze, styptic powder, or cornstarch over the wound for at least 2 minutes to stop the bleeding.[11]
-
6Try to grind your dog's paws weekly. Grinding is faster than manually filing, but it’s still more time consuming than using clippers. Additionally, your dog may only tolerate the sound and vibrations it makes in short intervals. Grind 1 or 2 nails per session, and try to finish off 1 paw per week.[12]
- Filing your dog’s nails regularly will help keep them short. If you let the nails grow out, grinding will be more tedious.


Getting Your Dog Used to Nail Trimming
-
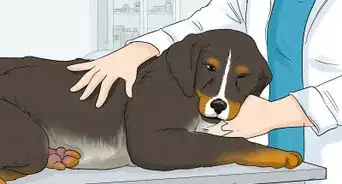
1Touch your dog’s paws and claws to get it used to being handled.[13] Grasp your dog’s paws, toes, and nails before introducing it to nail trimmers. Hold its paws, carefully separate the toes, massage its paw pads, and gently squeeze the nails. As you do so, offer treats and lots of praise so your dog learns that good things happen when you touch its paws.[14]
- Introduce your dog to nail trimming gradually and, if possible, when it’s still a puppy. It’s wise to practice when your dog is tired out after a brisk walk or playtime.[15]
- At any point in training, take a break if your pooch gets stressed. Signs that your dog needs space include yawning, heavy panting, growling, yelping, and barking. Additionally, watch out for side eye glances; if your dog is calm, you should only see a bit of the whites of its eyes.[16]
-
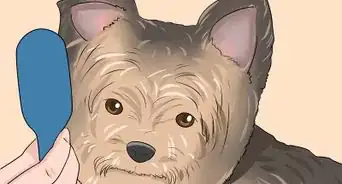
2Offer treats as you let your dog see and sniff the nail trimmer. Introduce the file, clippers, or grinder once your dog consistently tolerates having its paws handled. Don’t hold the trimmer near its paws just yet. Instead, allow it to see and smell the tool you’ll use to trim its nails.[17]
- Give your dog its favorite treats as you let it see and sniff the trimmer. The goal of this gradual training process is to use praise and treats to form a positive association with nail trimming.
- Touching your dog’s paws for a few days, introducing the trimmer, and working your way up to actually trimming its nails may seem tedious. However, rushing the process can make nail trimming frustrating for both you and your dog.
-
3Hold the trimmer gradually closer to a nail. After introducing the trimmer, hold your dog’s paw, and give it a treat. Then slowly bring the trimmer closer to its paw. Offer treats and plenty of praise until your dog lets you touch a nail with the trimmer.[18]
Types of trimmers: Clippers are inexpensive and popular, but clipping increases the risk of cutting the nail’s quick and hurting your dog. Nail grinders or power files lower the risk of cutting the quick, but they create noise and vibrations that upset some dogs. Manual files don’t bother most dogs, but hand-filing is time-consuming.
-
4Restrain your dog gently if it doesn’t sit still. If your dog has a calm disposition, you may be able to teach it to sit or lie down while you trim its nails. If you have a small breed, you might be able to hold it in your lap while you trim its nails. For a squirmy dog or large breed, drape your arms and upper body over your pet just firmly enough to prevent it from wiggling.[19]
- Hold the trimmer in your dominant hand and your dog’s paw in the other hand. Use your upper body and elbows to keep your dog still as you trim.
- While restraining your dog may be necessary, do your best to use treats and praise to create a positive association with nail trimming. Handling your dog roughly or restraining it without offering treats and praise will teach it to fear trimming.
- It’s wise to have someone who your dog knows well assist you, especially when you first begin trimming your dog’s nails.
-
5Give your dog treats and praise as you trim 1 to 2 nails per session. Once your dog reliably remains relaxed when you hold the trimmer to its paws, try to trim a nail. When you actually start trimming your dog’s nails, don’t expect to complete the job all in one go. Most likely, you’ll only be able to trim 1 or 2 nails before your dog gets too stressed.[20]
- Remember to offer treats and praise as you use the file, clipper, or grinder. Take a break if your dog starts excessively growling, yelping, or otherwise seems too anxious to proceed.


Warnings
- If your dog doesn’t tolerate nail trimming at all, take it to a vet or groomer for professional care. Don’t just let nails grow out, as overgrown nails can cause health issues.⧼thumbs_response⧽


References
- ↑ https://www.dogster.com/dog-grooming/grooming-supplies-new-dog-owners
- ↑ https://vcahospitals.com/know-your-pet/handling-exercises-for-trimming-nails-and-brushing-teeth
- ↑ https://vcahospitals.com/know-your-pet/handling-exercises-for-trimming-nails-and-brushing-teeth
- ↑ http://www.vetstreet.com/dr-marty-becker/are-nail-grinders-safe-to-use-on-dogs
- ↑ https://www.vetmed.wsu.edu/outreach/Pet-Health-Topics/categories/procedures/dogs/clipping-your-dog's-claws
- ↑ http://www.vetstreet.com/dr-marty-becker/are-nail-grinders-safe-to-use-on-dogs?page=2
- ↑ http://www.vetstreet.com/dr-marty-becker/are-nail-grinders-safe-to-use-on-dogs
- ↑ http://www.vetstreet.com/our-pet-experts/grinding-an-easier-way-to-trim-dog-nails
- ↑ Beverly Ulbrich. Dog Behaviorist & Trainer. Expert Interview. 30 January 2020.
- ↑ https://www.vetmed.wsu.edu/outreach/Pet-Health-Topics/categories/procedures/dogs/clipping-your-dog's-claws
- ↑ https://www.aspca.org/pet-care/dog-care/dog-grooming-tips
- ↑ http://www.vetstreet.com/our-pet-experts/grinding-an-easier-way-to-trim-dog-nails
- ↑ Beverly Ulbrich. Dog Behaviorist & Trainer. Expert Interview. 30 January 2020.
- ↑ https://www.aspca.org/pet-care/dog-care/dog-grooming-tips
- ↑ https://vcahospitals.com/know-your-pet/handling-exercises-for-trimming-nails-and-brushing-teeth
- ↑ https://www.dogster.com/lifestyle/how-to-safely-trim-your-dogs-nails
- ↑ https://www.akc.org/expert-advice/health/how-to-trim-dog-nails/
- ↑ https://www.akc.org/expert-advice/health/how-to-trim-dog-nails/
- ↑ https://www.vetmed.wsu.edu/outreach/Pet-Health-Topics/categories/procedures/dogs/clipping-your-dog's-claws
- ↑ https://vcahospitals.com/know-your-pet/handling-exercises-for-trimming-nails-and-brushing-teeth
- ↑ Beverly Ulbrich. Dog Behaviorist & Trainer. Expert Interview. 30 January 2020.
About This Article