This article was co-authored by wikiHow Staff. Our trained team of editors and researchers validate articles for accuracy and comprehensiveness. wikiHow's Content Management Team carefully monitors the work from our editorial staff to ensure that each article is backed by trusted research and meets our high quality standards.
There are 9 references cited in this article, which can be found at the bottom of the page.
The wikiHow Video Team also followed the article's instructions and verified that they work.
This article has been viewed 23,087 times.
Learn more...
Filleting a fish seems like a daunting task if you’ve never done it before, and if you have fresh tuna, you want to fillet it properly so you don’t waste any of the tasty meat. By quartering the tuna, removing the quarters, and storing the fish properly, you can fillet a tuna fish on your own.
Steps
Quartering the Fish
-
1Place a large cutting board and newspaper on your workstation. Lay down several sheets of old newspaper before putting your cutting board down onto your workstation, and bunch up additional newspaper to put around the edges of the board to help make cleanup easier.[1]
- If you don’t have newspaper, you can also use butcher paper. Or, if you are outdoors, you may just need to use whatever surface you have available and remember to rinse down your workstation well afterwards.
-
2Lay the fish horizontally on the cutting board with the belly facing you. Orient the fish so that the dorsal fin is facing away from you. Leave enough room between you and the fish so you can move easily and reach the entire fish without much trouble.[2]
- Work in an area that is large enough for you to easily flip the fish over when you need to.
Advertisement -
3Cut diagonally from behind the pectoral fin down toward the head. Hold the pectoral fin, which is the fin that lays along the side of the fish, in one hand. With the knife in your dominant hand, make a downward, diagonal cut from behind the fin down toward the head of the fish. Stop cutting once you hit the spine.[3]
- If your tuna is already headless, then you can skip making this initial cut.
-
4Insert your knife into the belly and cut from the head to the tail. Cut deep enough that you feel resistance from the ribs. Then, make a horizontal cut (position your knife parallel to the cutting board) across the belly of the tuna to separate the right from the left side.[4]
- Be careful to not hurt your hand on any of the spiny fins.
-
5Flip the fish over and cut horizontally along the top fins. How deep you cut will depend on the size of the tuna, so insert your knife until you feel resistance from the spine, and then proceed to cut along the bones. Situate the tuna so that the dorsal fin is closest to your body and the belly is facing away from you. Cut the tuna from the head all the way to the tail.[5]
- Use a strong, sharp filleting knife so you can cut the fish as easily as possible. Avoid making a sawing motion with your knife, as that could tear up the meat of the fish.
-
6Make a deep cut in front of the tail on both sides of the fish. Cut downward as deep as you can until your knife hits bone. Repeat this on both sides of the fish. You could leave the tail fully intact without making this cut, but including it helps guide your future cuts.[6]
- You could cut off the entire tail of the fish, though you don’t have to. Leaving it intact gives you an additional place to hold the fish while you’re cutting and flipping it.
-
7Slice across the lateral line of the tuna, from head to tail, on each side. The size of your tuna will determine how deeply you cut, but it will most likely be several inches before your knife hits bone. Insert your knife behind the pectoral fin and cut steadily down the main lateral line (essentially separating the tuna’s side in half), heading toward the cut you made in front of the tail.[7]
- As you are cutting the fish, keep in mind that you will be separating its body into 4 nearly equal quarters—2 from the belly and 2 from the top.

Removing the Tuna Fillets
-
1Cut off the bottom quarter of the tuna fish. Insert your knife into the cut you already made along the bottom spine, until your knife hits the tuna’s ribs, then cut from the head to the tail, separating the meat of the fish from the rest of its body.[8]
- You may need to also cut from the middle of the fish to fully detach the quarter from the tuna, depending on its size.
-
2Remove the top loin from the tuna fish by cutting along its top line. Take your knife and slice deeper into the cut you already made along the top fins, and separate the top quarter of meat from the rest of the body. If you feel your knife hitting against the spine or ribs of the fish, you are probably cutting too far down and need to reinsert your knife a little higher up.[9]
- You may also need to cut from the belly to fully detach the top loin, depending on how large your fish is.
-
3Repeat this process on the other side of the fish. Once you’ve detached the 2 quartered sections on the side up the fish that’s facing up, flip it over and detach the bottom and top quarters from the opposite side.
- When you’re done, you will have 4 quarters of tuna and a carcass, consisting of the head, spine, and tail.
Finishing and Storing the Fish
-
1Discard of the fish carcass or set it aside to use as fish bait. You can cut chunks off of the fish carcass to use as fish bait, though make sure you use it within 1-2 days. Otherwise, discard of the carcass in the trash as soon as possible.
- If you’re out on a boat, have a bucket to put your fish carcass into and discard of it once you’re docked again. Don’t throw it back into the water, as it can attract birds or other wildlife.
-
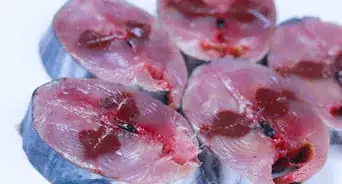
2Remove the belly fat and the bloodline from the fish. Use your knife to cut away the opaque, fatty sections from the 2 belly quarters. Cut away the bloodline, which is a very dark, red, sinewy line that goes along the length of the fish. Take your knife and carve around these areas to separate them from the rest of the meat.[10]
- The bloodline of a tuna has a very strong flavor and will change the taste of the meat in an unpleasant way, so you want to remove it. If you don’t do it right away when you are filleting the tuna, remember to remove it later before you cook it.
- Discard both the belly fat and the bloodline.
-
3Skin the fillets by slicing lightly between the skin and the meat. Keep the fish quarter on your cutting board, skin side up, and make a small cut into the flesh right underneath the skin. Slice off the skin carefully, kind of mimicking how you would peel a potato. Be careful when skinning the fish to not accidentally slice up and cut your hand.[11]
- If you prefer, you can actually skin the top 2 quarters of the fish by simply pulling it off with your hands. Grab a corner of the skin and pull it backwards, peeling it off. This technique won’t work for the bottom belly quarters, though, as the meat there is more delicate and will rip more easily.
-
4Rinse the quarters off in cold water. Get rid of any visible dirt, scales, or chipped bones before you move on to packaging the tuna. If you don’t have access to fresh water, remember to rinse them off thoroughly before you cook them.[12]
- Be sure to pick up the fish quarters and rinse both sides of them.
-
5Wrap up your fish quarters and store them in a cold container. Wrap your fish quarters in butcher paper and tie them off with twine or tape. Place them immediately in the fridge, if you are at home, or into a cooler with ice if you’re out camping or fishing.[13]
- If your tuna quarters are too big, you can cut them in half or into quarters before storing them.
- If you don’t have butcher paper, you can wrap them in plastic wrap, or even put them into resealable bags.
-
6Disinfect your workstation with soap and hot water. Either use dish detergent or a disinfectant spray on your workstation, and wipe it down thoroughly with hot water or paper towels. If you are using a cutting board, wipe down all the sides and the bottom of it, too.
- If any fish liquids got into crevices on your counter, use a toothbrush, soap, and hot water to scrub those areas.
-
7Use fresh tuna within 2 days, or store it in the freezer for 3 months. Put your tuna into the fridge or freezer as soon as possible after filleting it. Raw tuna left out at room temperature should be discarded if it’s left out for longer than 2 hours.[14]
- If you are out camping or fishing, bring along an ice-box filled with ice to store your fish in.
- Label your fish with the date it was filleted so you remember how long it will be good for.


Things You’ll Need
- Cutting board
- Sharp filleting knife
- Newspaper or butcher paper
- Tray or container for cut fish
- Soap or disinfectant spray


References
- ↑ https://www.reserveamerica.com/outdoors/how-to-clean-a-fish.htm#
- ↑ https://www.chefsteps.com/activities/butchery-tuna
- ↑ https://www.chefsteps.com/activities/butchery-tuna
- ↑ https://youtu.be/Kj91laNLNi8?t=34
- ↑ https://youtu.be/Kj91laNLNi8?t=34
- ↑ https://youtu.be/Kj91laNLNi8?t=4
- ↑ https://www.chefsteps.com/activities/butchery-tuna
- ↑ https://youtu.be/Kj91laNLNi8?t=46
- ↑ https://youtu.be/Kj91laNLNi8?t=60
About This Article