This article was co-authored by JoAnna Minneci. JoAnna Minneci is a Professional Chef based in the Nashville, Tennessee area. With more than 18 years of experience, Chef JoAnna specializes in teaching others how to cook through private cooking lessons, team-building events, and wellness and nutrition classes. She has also appeared in numerous television shows on networks such as Bravo and Food Network. Chef JoAnna received Culinary Arts training from the Art Institute of California at Los Angeles. She is also certified in sanitation, nutrition, kitchen management, and cost control.
There are 9 references cited in this article, which can be found at the bottom of the page.
This article has been viewed 53,577 times.
Making whipped cream seems easy enough, but if you beat cream too long, luscious, soft peaks can quickly turn into a grainy mess. If you catch it fast enough, you can simply fold in more un-whipped cream to fix an over-whipped nightmare. However, if the cream starts to turn a pale yellow, and if solid globules start to separate from liquid, the cream can’t be rescued. You’ll have to start the whipped cream from scratch, but you can still make butter with the over-whipped batch.
Steps
Adding More Cream
-
1Stop beating the cream as soon as possible. If you’re beating the cream by hand, stop whipping it as soon as you notice it’s started to deflate and form a grainy texture. If you’ve walked away from your standing mixer, turn it off as soon as you remember you left it running.[1]
- Any further agitation will separate the cream and turn it into butter. Your over-whipped cream will not be salvageable if it’s on the way to becoming butter.
-
2Check the cream to see how over-whipped it is. You should be able to fix the cream if it’s deflated, sticks to the sides of the bowl, but only somewhat grainy. If it’s very grainy, has turned a pale yellow, or if it’s started to separate into butterfat and buttermilk, you’ll have to start from scratch.[2]Advertisement
-
3Add un-whipped heavy cream one tablespoon at a time. If your cream looks salvageable, pour in a tablespoon of cold unwhipped cream.[3] [4] You’ll probably have to add one fourth to one third of the amount of cream you started with, but adding a little bit at a time will help you control the consistency.[5]
-
4Refrigerate your cream if you need to leave the house. If you need to run to the store for more cream, put your over-whipped cream in the fridge. If you leave it out at room temperature, the fat will continue to break down and make it more difficult to salvage.[6]
-
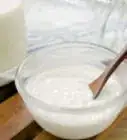
5Fold in the unwhipped cream gently. A rubber spatula is a great tool for gently folding in the unwhipped cream. Carefully incorporate the unwhipped cream, and add more one tablespoon at a time until the mixture is smooth and forms soft peaks.[7]
- You can use a whisk if you don’t have a rubber spatula. Just whisk gently: don’t beat or whip the mixture.[8]
-
6Stop folding when you've reached a smooth consistency. Stop mixing as soon as you've folded in enough cream to make your topping presentable. You won't want to end up with another over-whipped mess! Serve a spoonful on your favorite dessert or refrigerate it until you're ready to use it.


Making Butter and Buttermilk
-
1Keep beating until the cream separates into butter and buttermilk. You should see the cream separate into pale yellow butter and thin buttermilk within ten to fifteen minutes.[9] The amount of time will depend on how long you whipped the cream before you noticed you over did it.
-
2Strain the butter and buttermilk mixture through a colander. Once the butter and buttermilk have separated, you’ll have to strain the solids from the liquid. Pour the mixture through a colander into a large bowl. Press the solids you catch in the colander to strain as much liquid as possible.[10]
- Don’t throw away the liquid buttermilk that you’ve drained. You can use it in a variety of recipes.
-
3Rinse the butter in an ice bath until the water runs clear. Roll the solids you’ve strained into a ball. Place the ball in a bowl of ice water, and knead the ball to squeeze out even more buttermilk. Change the water and repeat the ice bath process until the water doesn’t become cloudy with buttermilk.[11]
-
4Knead the butter to squeeze out as much liquid as possible. After giving it ice baths, continue to knead the butter until you can’t squeeze out any more liquid. Moisture can harbor bacteria, so squeezing out as much liquid as possible will extend the butter’s shelf life.[12]
-
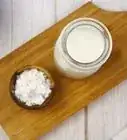
5Flavor your butter with salt, herbs, citrus zest, or honey. Homemade unsalted butter tastes wonderful on its own, but you can also add your choice of flavors. Salt and herbs, such as dill, thyme, or rosemary, are great savory choices. If you added sugar or vanilla when you were making whipped cream, add a sweeter flavor, like lemon zest or honey.[13]
- Amounts will vary based on how much butter you’ve made. A little bit of flavor will go a long way, and you can always add more if necessary, so just start by adding a dash. A quarter to a half teaspoon of any added flavoring agent should be a good start.
- If you have lots of over-whipped cream to turn into butter, you could split it into batches and add a different flavor to each.
-
6Strain the buttermilk through a fine sieve. Pour the buttermilk that you separated from the butter solids through a fine-mesh sieve, cheesecloth, or a coffee filter. Giving it one last strain will remove any traces of solids.[14]
- It will then be perfect for making pancakes, dressings, fried chicken, and lots of other recipes.
-
7Store your butter and buttermilk in the fridge for a week. Be sure not to let your scratch-made butter and buttermilk go to waste! They will each last up to a week in the fridge. You could also freeze them for up to a month.[15]


References
- ↑ http://www.gettystewart.com/how-to-recover-from-over-whipped-whipped-cream/
- ↑ http://www.seriouseats.com/2014/10/the-science-of-whipped-cream-butter-creme-fraiche.html
- ↑ JoAnna Minneci. Professional Chef. Expert Interview. 23 December 2021.
- ↑ https://www.youtube.com/watch?v=AHH3gwNwSKs&feature=youtu.be&t=29
- ↑ http://pastrieslikeapro.com/2013/08/fixing-over-whipped-cream/#.WZeLciiGPb1
- ↑ http://www.seriouseats.com/2014/10/the-science-of-whipped-cream-butter-creme-fraiche.html
- ↑ https://www.youtube.com/watch?v=AHH3gwNwSKs&feature=youtu.be&t=31
- ↑ http://www.epicurious.com/expert-advice/how-to-save-over-whipped-cream-article
- ↑ http://www.epicurious.com/recipes/food/views/homemade-butter-and-buttermilk-242047
- ↑ http://www.epicurious.com/recipes/food/views/homemade-butter-and-buttermilk-242047
- ↑ http://www.seriouseats.com/2014/10/the-science-of-whipped-cream-butter-creme-fraiche.html
- ↑ http://www.seriouseats.com/2014/10/the-science-of-whipped-cream-butter-creme-fraiche.html
- ↑ http://living.thebump.com/things-overwhipped-whipped-cream-15140.html
- ↑ http://www.epicurious.com/recipes/food/views/homemade-butter-and-buttermilk-242047
- ↑ http://www.epicurious.com/recipes/food/views/homemade-butter-and-buttermilk-242047
About This Article

To fix a batch of over-whipped cream, start by checking to see if it can still be fixed. If it’s only somewhat grainy and sticks to the sides of the bowl, the cream can still be saved. In that case, add 1 tablespoon of cold unwhipped cream, then use a rubber spatula to fold it into the over-whipped cream. Keep adding and folding in the unwhipped cream, 1 tablespoon at a time, until the mixture is smooth and forms soft peaks. For advice on what to do with over-whipped cream that can no longer be saved, keep reading.