wikiHow is a “wiki,” similar to Wikipedia, which means that many of our articles are co-written by multiple authors. To create this article, 10 people, some anonymous, worked to edit and improve it over time.
There are 10 references cited in this article, which can be found at the bottom of the page.
This article has been viewed 103,950 times.
Learn more...
Chickpeas are possibly the tastiest complete protein out there, with easy growing and lots of health benefits. They contain lots of fiber, and are known to balance your appetite. They fuel the cells that line your intestinal wall. They contain large amounts of Vitamin B3, potassium, Omega 6, and many other good things.
These tasty beans have a long growing season, requiring up to 100 days to reach their harvest season from the date of sowing. The plants themselves are fairly easy to take care of, though, as long as you protect the shallow root system and avoid over-watering them.
Steps
Planting the Seeds
-
1Sow the seeds indoors, putting them 1-2 inches into the soil. Start the seeds roughly four weeks before the date of your last expected frost. Since chickpea seeds are somewhat fragile, you should sow them indoors instead of planting them in the cold ground.
- If you do intend to plant chickpea seeds outdoors, wait one to two weeks before your last expected frost and cover the area at night with a light mulch or old sheets to help insulate the seeds.
- Chickpeas have a long growing season and may take 90 to 100 days until they are ready to harvest. Because of this, you will need to plant them as early as possible.
-
2Use biodegradable pots. Chickpea seedlings do not transplant well, so you should use paper or peat seedling pots that can be planted directly into the ground instead of using plastic or ceramic containers.[1]
- Seedling pots can be purchased online and at most gardening centers.
Advertisement -
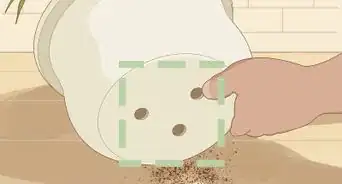
3Plant one to two seeds per pot. Fill the seedling pots with a little potting soil, then plant one seed in each pot, positioning it 1 to 2 inches (2.5 to 5 cm) deep.[2]
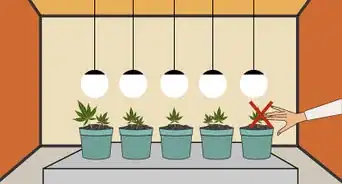
- Planting one seed per pot is recommended, but you can plant up to two. When the seedlings sprout, though, you will need to thin them down to one per pot. If you do need to thin out the seedlings, cut the weaker seedling away at soil level using sharp scissors. Do not dig it out since doing so could disturb the roots.
- Sprouting usually takes about two weeks.
-
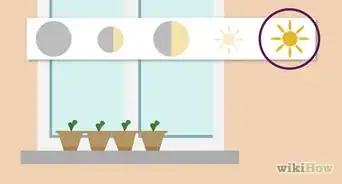
4Provide the seeds with sun and water. Water the soil gently every day. If it gets hot, water them twice a day. Place the seedling pots near a window that receives plenty of direct sunlight and keep the surface of the soil evenly moist until the seedlings sprout.
- Do not soak the seed before sowing it. You should also avoid heavy waterings after sowing the seeds since they can cause the seeds to crack. The surface of the soil should be slightly moist, but do not drench the soil beyond that.


Transplanting Seedlings
-
1Choose the right location. Chickpeas thrive in "full sun" conditions, so you should choose an area that receives at least six hours of direct sunlight.[3] Ideally, the soil bed should also have loose, well-drained soil already packed with organic material.
- You can grow chickpeas in partial shade, but doing so will dramatically decrease the eventual yield.
- Do not plant chickpeas in areas where green manures have grown or in soils that have a high nitrogen content. Nitrogen will cause the leaves to get large and bushy, but the overall yield of the plant will end up decreasing if nitrogen levels are too high.
- Avoid heavy clay soils or areas that are especially shady.
-
2Prepare the soil. To improve the condition of the soil and ready it for your plants, chop in a few handfuls of aged compost a day to a week before transplanting.[4]
- Also consider mixing in a fertilizer rich in potassium and phosphorus to encourage a higher yield.
- If the soil is too heavy, mix in agricultural sand, fine gravel, or a soil perfecter to make it less dense and to improve drainage. Avoid mixing in mosses, since these tend to trap too much water.
-
3Transplant after the frost passes. Chickpea seedlings are considered “frost tolerant,” but they still thrive best when transplanted outdoors after the threat of frost passes. The seedlings should also be about 4 to 5 inches (10 to 12.7 cm) tall at the time of transplant.
- The plants will grow best when daytime temperatures range between 70 and 80 degrees Fahrenheit (21 and 27 degrees Celsius) and when night temperature stay above 65 degrees Fahrenheit (18 degrees Celsius).
-
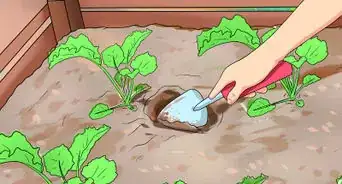
4Keep the seedlings close. Space the seedlings 5 to 6 inches (12.7 to 15.25 cm) apart. The holes you dig should be as deep as the seedling pots.[5]
- As they grow, the plants will start crowding into each other. A little crowding can actually be a good thing, though, since the plants help support each other as they cross into each other.
- If planting the chickpeas in rows, space the rows 18 to 24 inches (46 to 61 cm) apart.[6]
-
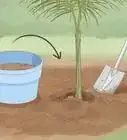
5Bury the entire seedling pot. As noted, each hole you dig should be big enough to fit the entire seedling pot. Place the seedling pot in the hole and lightly cover the edges with additional soil.
- Do not attempt to remove the seedlings from their pots. Doing so can shock the delicate root system and cause the plants to die.


General Care
-
1Water regularly. Regular rainfall is usually sufficient, but if the season is a dry one, water the chickpeas twice a week during the flowering and pod formation stages.
- Avoid "overhead" watering. Water can get on the flowers and pods, causing them to break off prematurely. Pouring water over the plant can also invite mildew to develop. When you water the chickpeas, water them directly at the soil level.
- Once the pods mature and the plant begins to die back on its own, cut back on watering the plant. Once every one to two weeks should suffice. Doing so encourages the drying process, which you'll want to the plant to go through before the harvest.
-
2Mulch as needed. Once the weather warms up, you should add a light coat of mulch around the stems. Doing so can retain an adequate amount of soil moisture, which is especially important if your plants are receiving full sun.[7]
- Mulch can also help prevent weeds from invading the plant bed.
-
3Fertilize with caution. You can add a little aged compost or similar organic material to the soil around the chickpeas mid-season. As before, though, you should avoid adding nitrogen-rich fertilizers.[8]
- Chickpeas work with microorganisms in the soil to produce their own nitrogen, so they receive all the nitrogen they really need. Any excess nitrogen will cause the leaves to grow bushier and may dampen the eventual yield.
-
4Handle the chickpeas carefully. When removing weeds or adding anything to the soil, you need to work carefully to avoid disturbing the plant's root system. The root system of a chickpea plant is quite shallow, so working too close to the base of the plant can cause damage to its roots.
- You should also avoid handling the plants when they are wet since doing so can cause fungus spores to spread quickly.
-
5Manage pests as you see them. Chickpeas are vulnerable to attacks by a range of different pests. You should avoid pre-treating the plant for pests, though, and instead wait until you spot pests before taking action against them.
- Adult aphids, leafhoppers, and mites can be controlled with a blast of water from the hose or insecticidal soap.
- After noticing adult pests, look for eggs and crush them between your fingers. Alternatively, simply cut away any leaves with egg cases on them.
- For notably bad infestations, try a natural and food-safe pesticide containing pyrethrins.
- You should also keep the garden free of debris to reduce the number of pests.
-
6Keep an eye out for signs of disease. These plants are also vulnerable to a few different diseases, including blight, mosaic, and anthracnose. Plant disease-resistant varieties when possible.[9]
- To avoid the spread of disease, keep the planting bed free of debris and avoid handling the plants when they are wet.
- Remove diseased plants and discard them to prevent the disease from spreading. Burn them or put them in the trash, but do not use them for compost.


Harvesting
-
1Harvest fresh. If you want to eat the chickpeas fresh, you can pluck off the pods while they are still green and immature.[10] Eat fresh chickpeas like snap beans.
- The pods only reach a length between 1 and 2 inches (2.5 and 5 cm), and each pod only contains one or three beans.
-
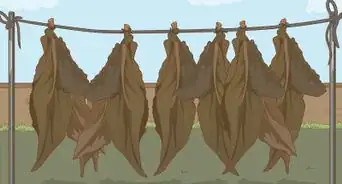
2Harvest dried. The more popular way to harvest chickpeas is to harvest them once they've matured, as dried chickpeas. To do so, you will need to harvest the entire plant once the leaves wither and turn brown. Place the plant on a flat, warm surface and let the pods air dry naturally in a warm, well-ventilated location. Collect the seeds as the pods split open.[11]
- Mature seeds will be very hard. When bitten into, they should barely dent.
- If the weather is getting damp, bring the harvested plant or pods indoors to finish drying them. Otherwise, mold could develop on the pods and ruin the chickpeas inside.
- Also note that mice and other rodents may threaten your yield if you allow the plants to dry outdoors.
-
3Store the chickpeas properly. Fresh, unshelled chickpeas can be kept in the refrigerator for one week. Dried, shelled chickpeas should be kept in a cool, dry location and can remain there for up to one year.[12]
- Keep dried chickpeas in an airtight container if you intend to store them for more than a few days.
- Chickpeas can also be frozen, canned, or sprouted.


Community Q&A
-
QuestionCan they grow fully in a pot if I don't want to transplant?
 Community AnswerYou could, but you would need a large pot to manage the growth of such a large plant.
 -
QuestionCan I grow chickpeas by burying a chickpea?
 Community AnswerYes you can, but don't bury it too deep.
 -
QuestionWhen should I plant them outside? When they are sprouts or when they are a plant?Community AnswerWhen they are a plant because the sprouts are very tender and delicate. The plants are stronger.
Things You'll Need
- Chickpea seeds
- Biodegradable seedling pots
- Planting soil
- Trowel or small shovel
- Spray bottle of water
- Garden hose
- Aged compost
- Mulch
- Natural pesticides (as needed)


References
- ↑ https://balconygardenweb.com/growing-garbanzo-beans/
- ↑ http://www.gardeningblog.net/how-to-grow/chickpeas/
- ↑ http://www.harvesttotable.com/2009/04/how_to_grow_chickpeas_garbanzo/
- ↑ https://hort.purdue.edu/newcrop/afcm/chickpea.html
- ↑ https://www.gardenorganic.org.uk/sites/www.gardenorganic.org.uk/files/sns/factsheets/FactsheetChickpes.pdf
- ↑ http://www.growthis.com/how-to-grow-chickpeas/
- ↑ https://harvesttotable.com/how_to_grow_chickpeas_garbanzo/
- ↑ https://www.saskatchewan.ca/business/agriculture-natural-resources-and-industry/agribusiness-farmers-and-ranchers/crops-and-irrigation/field-crops/pulse-crop-bean-chickpea-faba-bean-lentils/chickpea/fertilizer-considerations
- ↑ https://www.northernpulse.com/resources/research/PulseDiseases/CommonDiseasesinChickpeas/
- ↑ https://www.saskatchewan.ca/business/agriculture-natural-resources-and-industry/agribusiness-farmers-and-ranchers/crops-and-irrigation/field-crops/pulse-crop-bean-chickpea-faba-bean-lentils/chickpea/harvesting
- ↑ https://harvesttotable.com/how_to_grow_chickpeas_garbanzo/
- ↑ https://harvesttotable.com/how_to_grow_chickpeas_garbanzo/
About This Article
To grow chickpeas, start by sowing your seeds indoors 4 weeks before your last expected frost. Plant 2 seeds in each pot and water them 1-2 times a day. After your last frost, transplant the seeds, which will now be seedlings, to an outdoor location that gets 6 hours of sunlight per day. If the weather is dry, water the seedlings twice a week as they grow and apply a coating of mulch to retain soil moisture. To get rid of aphids or mites, which often attack chickpeas, spray them with a blast of water from the hose. For tips on how to protect your chickpeas from pests or how to spot common diseases, read on!