This article was co-authored by Maggie Moran and by wikiHow staff writer, Danielle Blinka, MA, MPA. Maggie Moran is a Professional Gardener in Pennsylvania.
There are 8 references cited in this article, which can be found at the bottom of the page.
This article has been viewed 45,534 times.
Indigo is a lovely flowering plant which produces purple or pink buds. It's well-known for its use in creating a beautiful deep blue dye. You might decide to grow indigo as an ornamental plant or to create your own natural dyes. To grow indigo, you'll need to first prepare a plot. Then, you can sow your seeds by either starting them indoors or planting them directly outdoors. Once it's planted, care for your indigo to help it thrive. Finally, you can harvest your indigo, if you’d like.
Steps
Preparing Your Plot
-
1Plant Isatis tinctoria seeds if you live in a non-tropical climate. This type of indigo tolerates cold weather best, though it may not thrive if your area has long winters, meaning longer than 4 months. It's a subshrub, which means it's thinner than a shrub, and will grow to about 3–6 feet (0.91–1.83 m).[1]
- Keep in mind that Isatis tinctoria has only 1/4 of the dye pigment contained in other varieties of indigo, so it may need additional plants if you want to create your own dye.
- Although indigo plants are perennials, they behave as an annual in non-tropical climates. However, varieties other than Isatis tinctoria may not grow into full-sized plants in non-tropical regions.
- You should choose seeds that are less than 2 years old, as older seeds are unlikely to germinate.[2]
-
2Grow either type of indigo if you live in a tropical area. There are 2 types of indigo whose seeds you can find for planting, Isatis suffruticosa and Isatis tinctoria. Both are sub~shrubs that grow to an estimated height of 3–6 feet (0.91–1.83 m). Since they look relatively the same, it's best to choose whichever is more readily available.[3]
- Make sure your seeds are fresh, as seeds that are over 2 years old are unlikely to germinate.[4]
Advertisement -
3Choose a plot that gets 6 hours of sun a day. Indigo thrives in hot, sunny weather, so make sure your plot is in the sun most of the day. Check that the plot does not get shade from fences, houses, or other structures.[5]
- The 6 hours of sun doesn't have to be continuous sun. For example, your plot could get 3 hours of sun in the morning and 3 hours of sun in the afternoon, with part shade in the middle of the day.
- It’s a good idea to check the spot at different times of the day to see if it’s sunny at that time.
-
4Make sure your soil drains well. Indigo require a lot of water, but it should drain away quickly.[6] You can also mix sand into the top layer of your soil to keep the soil loose, which improves the drainage.[7] You can mix the soil by hand with a shovel or trowel, or you can use a tiller.
- Mix the sand into the top 1–2 inches (2.5–5.1 cm) of soil.
- You can test the soil by checking it after a storm. If there are a lot of puddles, the soil doesn’t drain well. If the water flows away quickly, then the soil drains well. If you don’t want to wait for a storm, you can water the plot to see how well it drains.
- If your plot doesn’t drain well, don’t despair! You could try growing your indigo in a raised bed with well-draining soil that you’ve purchased from a gardening store.
-
5Add composted manure and organic fertilizer to your soil. Indigo grows best in fertile, nutrient-rich soil, so you'll want to treat the soil in your plot. For best results, add the nutrients to the soil in the weeks before your planting.[8]
- Mix the manure and fertilizer into the top 6 inches (15 cm) of soil.
- It’s best to till the manure and fertilizer into the soil, if you have a tiller.
- You can also buy pre-mixed soil from your local gardening center. Look for 1 that contains fertilizer and is meant to be used in a plot rather than pots.


Sowing Your Indigo
-
1Soak your seeds in hot filtered water overnight before planting. The seeds have a hard coating around them, so it's hard to get them to germinate. Soaking them softens that shell so that the seeds can sprout.
- They should soak for at least 6 hours.[9]
- Use filtered or distilled water, as tap water is treated with chemicals.
-
2Start your seeds indoors if you don’t live in a tropical area. Pour seed starter into individual seed-starting cups. Place the seeds under the soil about 0.5 in (1.3 cm) deep.[10]
- You may also decide to start your seeds indoors if you’d prefer to plant seedlings instead of seeds directly into the soil.
- The best time to start your seeds is 5-6 weeks before the last frost.[11] You can find your first and last frost dates by visiting the Almanac's website here: https://www.almanac.com/gardening/frostdates.
-
3Plant outdoors when temperatures stay above 50 °F (10 °C). This is the minimum temperature for placing the plants outdoors. Keep in mind that cooler temperatures can cause your seeds or seedlings to fail to thrive.[12]
- If you started your seeds indoors, harden them off before you move them outdoors. To do this, place them outside for a few hours each day, gradually increasing how long they’re out there. Start with 2-3 hours, adding an additional hour each day for a week. Make sure that they are protected from the wind while they’re outside by placing them near a wall, fence, or other protective structure.
-
4Plant the indigo at least 1 foot (0.30 m) apart. This ensures that each plant has enough room to grow, and that the root systems are able to absorb the nutrients they need.[13]
- You can plant your seeds closer together and thin them after they sprout. This may be a great option if you’re worried your seeds won’t sprout.
-
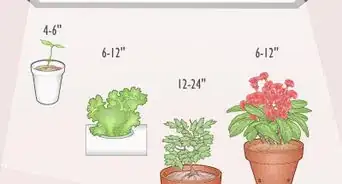
5Consider potting indigo if your area isn’t tropical. You may be able to grow indigo in a pot, though its growth will be limited. Your pot should be at least 6 inches (15 cm) deep, but a larger pot will give you better results. However, you should choose a pot that you can bring indoors during cold weather.
- You likely won't be able to harvest your potted indigo for dye.
- Some people grow small indigo plants in their windowsill.
- Use well-draining potting soil.[14]


Caring for Indigo
-
1Water your plants daily. Indigo requires a lot of water to thrive, so keep them well-watered. It’s best to water them in the morning so that any excess water is able to evaporate over the day.[15]
- You can adjust your watering schedule if it rains, providing less water. Touch the soil to feel if it's moist. If it's dry, go ahead and water the indigo.
- Remember that indigo is a tropical plant, so it requires a lot of moisture.
-
2Install protective measures like a fence if your area has rabbits and deer. Both of these animals will enjoy munching on your indigo, if they get the chance. Luckily, you can protect your harvest with these protective measures:
- If you can, install an 8–10 foot (2.4–3.0 m) tall fence, which will be tall enough to keep them out. Alternatively, you can use an electric fence.
- If a fence is not an option, wrap the plants in fine-mesh chicken wire, making a double layer. This makes it harder for the animals to get to the plant. This is most critical in winter and spring, when the animals have fewer food options.
- Apply a repellent. You can find deer and rabbit repellents at gardening stores or online. They change the taste of the indigo so that the animals won’t want it.[16]
-
3Weed your plot on a regular basis. Weeds will steal nutrients from your indigo plants, so pull them as soon as they pop up. Grab the weed with your hand and pull it up, making sure that you remove the root system. Check the plot for weeds every time you water the plants, as the best way to prevent them is to stop them from sprouting in the first place.[17]
- It's easiest to weed when the ground is wet, so do it after a watering.
- If you don't see a root system at the bottom of a weed you just pulled, you can dig it out of the soil using a small shovel or trowel.
- Keep in mind that allowing a single weed to sprout and grow can lead to a plot full of weeds, as they seed and spread quickly.


Harvesting Your Indigo
-
1Harvest indigo just after the plant blooms. Your indigo will spout bright, pink or purple flowers. If you want to harvest the leaves to create your own dye, the blossoms are your sign that it’s time to pluck.
-
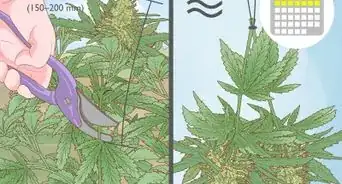
2Pick the leaves from the plant, starting at the bottom. Use your fingers to pluck them, or, if you prefer, cut them with a pair of scissors or small pruning shears. You can remove them all at once or in batches.
- Alternatively, you can use a sickle or garden shears to cut down the entire plant.[20]
- Your plant will likely sprout more leaves.
-
3Harvest your indigo again just before the first frost. You can pull the leaves or cut down the entire plant. After this harvest, your plants will enter a dormant period over winter.[21]
- You do not need to cover your indigo during winter.
- In most cases, you’ll be able to harvest the leaves 2-3 times each season. If your area isn’t tropical, then this usually means 2-3 times for each plant, after which they die.[22]


Expert Q&A
-
QuestionWhere does indigo grow?
 Maggie MoranMaggie Moran is a Professional Gardener in Pennsylvania.
Home & Garden SpecialistIndigo is originally from India but was cultivated by the European colonists in the Caribbean. In the U.S., it was introduced to South Carolina and areas of Georgia during the mid-1700s. -
QuestionHow is indigo made?Maggie MoranMaggie Moran is a Professional Gardener in Pennsylvania.
Home & Garden SpecialistIt used to be extracted from the indigo plant, but the dye used now is synthetic and doesn't come from indigo flowers. -
QuestionWhat is the crop of Indigo?Maggie MoranMaggie Moran is a Professional Gardener in Pennsylvania.
Home & Garden SpecialistIndigo is called the Indigofera tinctoria and is from the bean family. It's a flowering plant that can be used to make dye.
Things You'll Need
- Indigo seeds
- Shovel
- Trowel
- Tiller (optional)
- Well-draining soil
- Composted manure
- Organic fertilizer
- Water
- Seed starter (optional)
- Seed starting cups (optional)
- Planter (optional)
- Fence (optional)
- Fine-mesh chicken wire (optional)
- Deer repellent (optional)
- Rabbit repellent (optional)


References
- ↑ https://www.youtube.com/watch?v=g8EOTa94ie8&feature=youtu.be&t=194
- ↑ https://www.youtube.com/watch?v=g8EOTa94ie8&feature=youtu.be&t=163
- ↑ https://www.youtube.com/watch?v=g8EOTa94ie8&feature=youtu.be&t=194
- ↑ https://www.youtube.com/watch?v=g8EOTa94ie8&feature=youtu.be&t=163
- ↑ https://www.youtube.com/watch?v=g8EOTa94ie8&feature=youtu.be&t=138
- ↑ https://www.youtube.com/watch?v=g8EOTa94ie8&feature=youtu.be&t=138
- ↑ http://www.fibershed.com/wp-content/uploads/2018/01/indigo-planting-harvesting-nov2017.pdf
- ↑ http://www.fibershed.com/wp-content/uploads/2018/01/indigo-planting-harvesting-nov2017.pdf
- ↑ https://www.youtube.com/watch?v=g8EOTa94ie8&feature=youtu.be&t=138
- ↑ https://www.youtube.com/watch?v=g8EOTa94ie8&feature=youtu.be&t=138
- ↑ http://www.fibershed.com/wp-content/uploads/2018/01/indigo-planting-harvesting-nov2017.pdf
- ↑ http://www.fibershed.com/wp-content/uploads/2018/01/indigo-planting-harvesting-nov2017.pdf
- ↑ http://www.fibershed.com/wp-content/uploads/2018/01/indigo-planting-harvesting-nov2017.pdf
- ↑ https://www.youtube.com/watch?v=g8EOTa94ie8&feature=youtu.be&t=138
- ↑ http://www.fibershed.com/wp-content/uploads/2018/01/indigo-planting-harvesting-nov2017.pdf
- ↑ http://msue.anr.msu.edu/news/how_to_protect_your_yard_and_garden_from_deer_and_rabbits
- ↑ http://www.fibershed.com/wp-content/uploads/2018/01/indigo-planting-harvesting-nov2017.pdf
- ↑ https://www.youtube.com/watch?v=g8EOTa94ie8&feature=youtu.be&t=252
- ↑ http://www.ecotonethreads.com/wp-content/uploads/2015/08/IndigoDyeRecipeSmall-File.pdf
- ↑ https://www.youtube.com/watch?v=g8EOTa94ie8&feature=youtu.be&t=252
- ↑ https://www.youtube.com/watch?v=g8EOTa94ie8&feature=youtu.be&t=252
- ↑ http://www.fibershed.com/wp-content/uploads/2018/01/indigo-planting-harvesting-nov2017.pdf
- ↑ https://www.almanac.com/content/plants-attract-butterflies
About This Article