This article was co-authored by Ryan Owsiany. Ryan Owsiany is a Drywall and Painting Specialist and the Owner of Patch and Paint Pros in Conshohocken, Pennsylvania. With over two decades of experience, Ryan specializes in interior and exterior house painting as well as drywall, plaster, and water damage repair. Ryan holds a BS in Industrial Engineering from Penn State University. Patch and Paint Pros only employ experienced, friendly painters that understand proper preparation is required to ensure client satisfaction on every painting project.
There are 7 references cited in this article, which can be found at the bottom of the page.
This article has been viewed 300,003 times.
Hanging sheetrock might seem like a job for the pros, but you might be surprised to find you can actually do it yourself! Just grab a couple of friends or rent a machine to help you lift the pieces, and we'll guide you through the rest.
Steps
Getting Your Supplies
-
1Purchase the drywall. Visit your local home improvement warehouse. Drywall is sold in multiple sizes: 4 x 8 feet (1.2 x 2.4 m), 4 x 10 feet (1.2 x 3 m) and 4 x 12 feet (1.2 x 3.6 m) are the most common. The 4’ x 8’ is the easiest to handle and works well for most jobs. 4.5’ width sheets are also available at commercial supply houses.[1]
- Sheetrock will cost just a few dollars per sheet for the 1/2-inch (1.27 cm) thickness. This is the average thickness, which works well for most uses.
- Haul the sheetrock home flat, for example in the bed of a pickup truck, so it doesn’t break or bend while transporting. If you must store the sheets for more than a few days, store them flat and on top of each other so they do not warp or get their corners broken.
-
2Assemble your tools and supplies. Few tools are needed to hang drywall. You will need a utility knife and spare blades, a hammer (or drywall drill if you screw the sheets to the wall), a straight edge for cutting and measuring (they make drywall T-squares just for this), and plenty of special drywall nails or screws.[2]
- Drywall can be installed using nails or screws. With nails you end making larger “divots” because the hammer face is large. These are easily filled later, but require just a little more patience when taping. Screws are the “instrument-of-choice” for professionals these days. No professional drywall installer leaves home without a screw gun.
- You might also consider getting a drywall foot-lift. Your drywall is usually installed 1/2-inch (1.27 cm) above the ground. A lift, or a drywall hammer in a pinch, will help you prop up the drywall as you nail it to the studs.


Prepping the Site
-
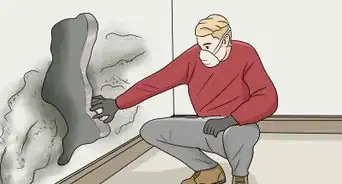
1Remove the old drywall. Unless you are starting fresh and there is no old drywall, you should remove the old drywall instead of trying to patch up the drywall in pieces. The old drywall will need to be pried from the studs and ceiling joists with a crowbar or other instrument (often the hands once you get started), being careful not to connect with any electrical or other wiring under the drywall.[3]
-
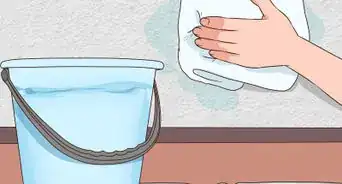
2Make a thorough job of clearing up the mess. When it comes time to install the new drywall, little pieces left over from the old walls and ceiling will get in your way and make the job more difficult. This would be a good time to pull out the shop vac and run it along the bottom edge of the walls. A broom works well too.
-
3Remove all nails and/or screws from the exposed studs and ceiling joists. They can either be removed or hammered into the wood studs. (It's best to remove them so you don’t hit them with the new nails or screws you will put in later.) Then run a hammer down each stud to make sure you pulled every screw and nail. Every one you miss will produce an ugly blowout.[4]


Hanging the Sheetrock
-
1Measure out your sheetrock before hanging. This goes for both ceilings and walls. Measure and cut the sheetrock so each end lands on the center of a stud or joist.[5] Sheetrock joints that are unsupported by a stud or joist will definitely crack. Sand every cut with a Surform plane or rasp or the sheets will not fit. (NEVER use red chalk to snap lines; it will bleed through the finish paint.)
-
2Consider gluing each stud and joist before it receives the drywall. Run a bead of glue down each stud that will be covered by the drywall. Do this immediately before hanging. You don't need to run glue down each stud, but it's recommended, and common practice among professionals.
-
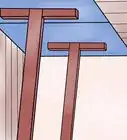
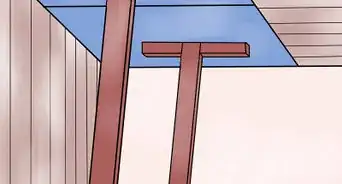
3Hang the toughest part first — the ceiling. The order of hanging the drywall matters. This is a two or three person job if you haven’t rented a drywall “lifter” which lifts the pieces straight up by hydraulics and all you do is nail or screw the pieces to the joists. If you don’t have this machine, build two “T-shaped” supports ("deadmen") to help with this job. Just nail together two 1x3's into a “T” shape, one for each end of the drywall you will be supporting. Make them a little bit more than exact height so you can wedge the sheets to hold them solidly in place. Once the drywall is lifted by hand, the deadmen are slid in under the drywall to wedge it against the ceiling joists while you nail or screw it up. Give up any idea you might have of forcing the sheets into place. They will break or blow out and make a mess.
- Mark the ceiling joist centers on the top plate (to save much cursing). Always start from a corner when hanging. Never start from the center and hang outwards. Start from one corner and move in a straight perpendicular line. Once you have one row finished, move on to the next row.
-
4Mark the stud centers on the ceiling drywall. Make sure to screw or nail the drywall to each stud that it covers. Use a stud finder to locate the stud's position — they should be 16 inches (~40 cm) apart — and then screw or nail four or five evenly-spaced screws into the drywall along the studs.
- Be sure to install the drywall perpendicular to its framing, whether you're working the ceiling or walls. Because of how drywall is constructed, its strength (dimensional strength bias) runs along the length. This means that it is best to hang it perpendicular, not vertically, for a stronger final product.
-
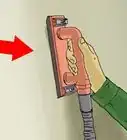
5Cut the drywall using a utility knife and a t-square. You don't need to cut hard to get drywall the shape you want. When cutting, score a line through the face-paper (the front side of the drywall). Next, break the drywall by snapping away from the cut.
- You may need to cut the drywall into a less regular shape, to fit it around an air vent, for example. Use the same process as you regularly would, taking care to cut off little by little instead of making one big cut. Remember, you can always cut off more later, but you can't put more back on after cutting too much off.
-
6Start on the walls once the ceiling is completed.[6] Again, the drywall should be hung horizontally, which might sound more difficult than vertically, but is not. Hang the top piece first. Butt it up to the piece on the ceiling and nail or screw. Again, this will probably take more than one person to do, but if you've got muscle is relatively easy to do alone if no helpers are available.
- Remember to start from one (top) corner and work on only one row before moving on to the next row.
- Butt the bottom sheets up to the top pieces on the walls that you have just hung. They should be close to one another, but a little space is okay: You are going to tape and mud the joints later, so you do not have to worry about getting a perfect specimen right away.
-
7Continue around the room until complete. Work slowly and steadily, minimizing mistakes and making sure to plan. While hanging sheetrock, remember to:
- Glue studs before hoisting the sheetrock into place
- Gun in four or five screws on a stud, hitting each stud that's behind the sheetrock. (To drive screws with the gun running, don't be gentle — punch them in.)
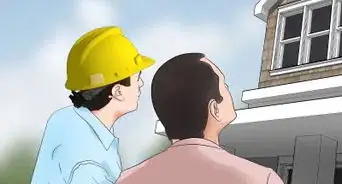
- Cut around windows, doors, fixtures, and other obstacles. If you have an obstacle that you don't know how to work around, consult a contractor.
- Check all the screws or nails with a drywall knife to make sure none are sticking out. (Every one you miss will have to be driven in or removed when you're taping, which will make you very grouchy.)


Finishing the Sheetrock Process
-
1Read up on how to tape and mud drywall once it's hung. The seams between the pieces of drywall, including the inside and outside corners need to be covered. This assists in both insulation and achieving an aesthetically pleasing final product.
-
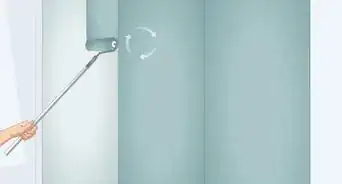
2Read up on how to finish drywall. Finishing drywall involves covering the entire sheetrock with a thin layer of joint compound, and then scraping it away, to give the sheetrock an even effect. This process is essential for a professional-looking job.
- Remember—it's always easier to add more compound than to remove it if you put on too much.[7]
-
3Find out how to texture drywall, if desired. Maybe you want a little pizzaz added to your walls. Read up on this handy little guide for several different techniques.
-
4Read up on priming and painting drywall. Your finished wall is almost complete. Prime and paint it and you have a beautiful new room, equipped with sturdy sheetrock and an appropriate color.


Expert Q&A
-
QuestionHow do you make drywall even?
 Ryan OwsianyRyan Owsiany is a Drywall and Painting Specialist and the Owner of Patch and Paint Pros in Conshohocken, Pennsylvania. With over two decades of experience, Ryan specializes in interior and exterior house painting as well as drywall, plaster, and water damage repair. Ryan holds a BS in Industrial Engineering from Penn State University. Patch and Paint Pros only employ experienced, friendly painters that understand proper preparation is required to ensure client satisfaction on every painting project.
Drywall & Painting SpecialistUse thin strips of wood or shims so your framing is exactly the thickness you need it to be. For instance, if you check all the framing and there's one piece that's not perfectly straight, you can pack it out with a 1/8" or 1/4" strip of plywood before you install the drywall. -
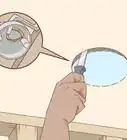
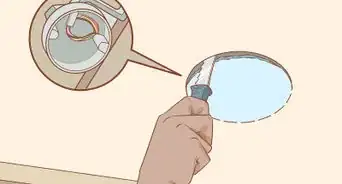
QuestionHow do you cut around electrical?
 Community AnswerThe old school method is to take 2 old screws from an outlet box and slightly screw them into the existing outlet box. The take a pair of snips and cut off the heads of the screws. Align your new piece of drywall where it will be installed. Firmly press panel in place, and your cutoff screws will punch through the sheetrock. Take a matching electrical box and place it over the screws. Draw around the outline. Use a rotozip or an oscillating tool and cut out the drawing. It's really that simple.
 -
QuestionWhat size for ceiling thickness?
 Community Answer5/8" is the standard for ceilings. 1/2" is for walls. Thinner sizes are weaker and tend to sag over time, so use thicker sizes on the ceiling. Drywall is inexpensive, so the extra expense for 5/8" is marginal.
Warnings
- It is a good idea to shut off the main power supply when removing drywall as it is difficult, if not impossible, to tell where the wiring runs behind existing walls.⧼thumbs_response⧽
- Be sure to wear a face-mask which can be purchased from any home improvement or hardware store. The removal of old drywall is a dusty and dirty job and could put particles into the air that is bad for the lungs.⧼thumbs_response⧽
Things You'll Need
- Utility knife and spare blades
- Hammer (or drywall drill if you screw the sheets to the wall)
- Straight edge for cutting and measuring (they make drywall T-squares just for this)
- Plenty of special drywall nails or screws. Drywall can be installed using nails or screws. Screws are the “instrument-of-choice” for professionals.


References
- ↑ https://www.youtube.com/watch?v=uKJb7ykSbmc
- ↑ http://www.hometime.com/Howto/projects/drywall/drwl_1.htm
- ↑ https://www.thisoldhouse.com/how-to/how-to-hang-drywall
- ↑ https://www.youtube.com/watch?v=RohKjE1D_ZE
- ↑ http://www.thisoldhouse.com/toh/how-to/step/0,,217215,00.html
- ↑ http://www.popularmechanics.com/home/improvement/interior/4225166
- ↑ Ryan Owsiany. Drywall & Painting Specialist. Expert Interview. 20 May 2021.
About This Article

To hang sheetrock, start by removing any old drywall, nails, and screws attached to the studs or ceiling joists. Then, run a bead of glue along each stud or joist, and press the sheetrock into position so you can nail or screw it into place. If you're hanging sheetrock, on both the ceiling and walls, do the ceiling first, and have someone hold the sheetrock in place while you secure it. If you encounter any windows, doors, or fixtures while you're working, cut around them so the sheetrock fits. To learn how to tape and mud drywall after you hang it up, scroll down!