This article was co-authored by Emily Fazio. Emily Fazio is a Home Improvement and DIY Specialist and the author behind Merrypad, a home improvement and DIY lifestyle blog. Emily develops content for Discovery including HGTV.com and DIYNetwork.com, among other influential interior design and homesteading websites. Her partnerships include companies such as Legrand, Sherwin-Williams, Stihl, and Kohler. Emily studied at St. Bonaventure University.
This article has been viewed 70,118 times.
Window boxes are a beautiful way to add color and style to your home’s exterior. They are very versatile, as you can choose any color and plant that you prefer. They can even be a convenient addition to a kitchen if you use them to plant herbs or vegetables. To hang a window box on your home, you can use mounting brackets or vinyl siding hooks. Once you learn how to install your window boxes, they’ll stay secure on your house all year round.
Steps
Installing a Window Box with Mounting Brackets
-
1Use a pencil and measuring tape to mark 1 inch (2.5 cm) from the bottom of the window. Make your pencil mark directly in line with the window frame. Do this on both sides of the window. This mark is where the top of the bracket will go.[1]
- If you have the type of window that swings out, measure and mark down 6 inches (15 cm) to 8 inches (20 cm) instead.
-
2Fasten the mounting bracket onto the side of the house with a drill and screw. On your mounting bracket you will see 2-3 holes that your screws go in. Place the bracket under the window, right under your pencil mark. If there are 3 holes, use a drill to insert the screw into the middle hole on your bracket. (The top hole will be used later on to secure the box to the brackets.) If there are just 2 holes on your brackets, insert the screw into the top hole.[2]
- You should use a 3-inch (7.6 cm) galvanized decking screw.
- Be sure to attach the mounting bracket to the solid wood window frame—not the window trim.[3]
Advertisement -
3Use a level to check that the bracket is straight. Before you enter your second screw, place a 2-foot (0.61 m) level next to your bracket to make sure that it is perfectly aligned and straight. This step is very important so that your window box doesn’t end up crooked on your window.[4]
- You’ll know your bracket is straight when the bubble on the level is centered between the lines on the tube.
-
4Drill the second screw. Once you are certain that the box is level, drill your second nail into the bottom hole. This hole should be directly above where the window box will sit.[5]
- These screws will be hidden by the window box once you complete your install.
-
5Install the second mounting bracket level with the first one. Place the second bracket under the window, right at the pencil mark you made on the other side of the window. This time, use a 4-foot (1.2 m) level to ensure that the two brackets are even. Then, repeat steps 2-3 to drill the holes in your bracket and fasten it in place.[6]
- When using the level, take note of where the bubble is located inside the tube. If the bubble is to the right of the lines, your window box will lean downward to the left. If the bubble is on the left of the lines, your window box will slope down to right. Make sure the bubble is directly in the center before you drill the nails.
-
6Set the window box on the installed brackets. Now that your mounting brackets are attached and secure to the side of your house, you can place your window box on top of them! Make sure that the box is centered on the brackets. You can do this by using a measuring tape to measure the overhang of the brackets. For example, each side of the window box may hang 3 inches (7.6 cm) over the brackets.[7]
- If your window box has an angled side, make sure that is facing outward. It should be the front of your box.
-
7Secure the window box to the brackets with a drill and 2.5 inch (6.4 cm) screws. You will need to fasten the box to the brackets, or it will easily fall off. Use the drill to insert galvanized decking screws that are 2.5 inches (6.4 cm) into the upper back of the box and the top of the mounting brackets.[8]
- Now you have completed the secure install and can fill and decorate your window box.


Mounting a Window Box on Vinyl Siding
-
1Purchase vinyl siding hooks. You should never drill holes or nail through vinyl siding. Your best option for hanging window boxes if your house exterior is made of vinyl siding is to buy hooks made especially for vinyl siding. This will prevent any damage to your house. You can buy these hooks at any home improvement or gardening store.[9]
- Each vinyl siding hook will hold up to 12 pounds (5.4 kg) of weight, so keep that in mind when purchasing and filling your window boxes.
-
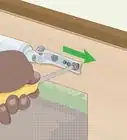
2Install two vinyl siding hooks under your window. The great thing about vinyl siding hooks is that they do not require any tools to install. They work by placing the hook in between the siding panels. To do this, take the end of the hook that has a rounded shape and put it between the sidings just under the window. Gently wiggle it until you feel it snap into place.[10]
- Keep in mind that these hooks will only work if your house has vinyl siding. It will not work on brick or stone house siding.
- Install at least two hooks per window box to ensure that the box is secure on the side of your house.
- Once you install your hooks, you will be able to easily move them around to adjust for the length of your window boxes. Just be careful that you do not scratch the surface of the siding.
-
3Hang a metal window box on the vinyl siding hooks. Metal window boxes work best with vinyl siding hooks, because they typically have holes that will slide right onto the hooks. Make sure you distance the hooks so that they are on each end of the box. This will ensure that the weight is evenly distributed and the box is level.[11]
- If you want to use a wooden window box, you can cut two slits in the back of the box where your hooks will fit.


Choosing a Window Box
-
1Measure the width and height of your windows. You want to make sure your window box fits your window appropriately. Before you get started, measure your windows with a yardstick or tape measure. Choose a window box that spans the entire width of your window.[12]
- A window box that is too short will look off-balance, while one that is too long might make your house look too crowded.
- You should also consider the height of your window box. The height should be about 20-25 percent of the height of the window that you’re hanging it from.
-
2Choose a window box that is at least 8 inches (20 cm) in depth and length. Your window box needs to be large enough to accommodate the plants you’ll be putting in them. Flowers and other plants need enough room to grow.[13]
- Larger window boxes, 1 foot (0.30 m) in depth and width, would be best if you want to include a lot of plants to fill out the box.
-
3Find a window box with drainage holes. Plants grown in pots need drainage holes so that they don’t sit in wet soil. If the window boxes you purchase do not have holes, you will need to drill holes in the bottom before installing.[14]
-
4Get a railing planter to further decorate your house exterior. Maybe you have some beautiful railings in front of your home, or a deck that you want to decorate with plants. You can always purchase a railing planter box. They come with hooks attached to the box, so you can easily hang them over a railing without any tools required.[15]
- Try to find planters with rubber or plastic coating. Metal brackets will scrape your railing and cause damage.


References
- ↑ https://www.thisoldhouse.com/how-to/how-to-hang-window-box
- ↑ https://www.thisoldhouse.com/how-to/how-to-hang-window-box
- ↑ Emily Fazio. Home Improvement & DIY Specialist. Expert Interview. 27 July 2021.
- ↑ https://www.thisoldhouse.com/how-to/how-to-hang-window-box
- ↑ https://www.thisoldhouse.com/how-to/how-to-hang-window-box
- ↑ https://www.thisoldhouse.com/how-to/how-to-hang-window-box
- ↑ https://www.thisoldhouse.com/how-to/how-to-hang-window-box
- ↑ https://www.thisoldhouse.com/how-to/how-to-hang-window-box
- ↑ https://www.improvementscatalog.com/RoomForImprovements/how-to-hang-outdoor-wall-art/
- ↑ https://www.improvementscatalog.com/RoomForImprovements/how-to-hang-outdoor-wall-art/
- ↑ https://www.improvementscatalog.com/RoomForImprovements/how-to-hang-outdoor-wall-art/
- ↑ https://www.gardenista.com/posts/hardscaping-101-window-boxes/
- ↑ https://www.gardenista.com/posts/hardscaping-101-window-boxes/
- ↑ https://www.gardenista.com/posts/hardscaping-101-window-boxes/
- ↑ https://plantcaretoday.com/railing-planters.html
About This Article