wikiHow is a “wiki,” similar to Wikipedia, which means that many of our articles are co-written by multiple authors. To create this article, volunteer authors worked to edit and improve it over time.
This article has been viewed 38,325 times.
Learn more...
Although many comic book and comic strip artists do most of their inking work with a pen, artists such as Bill Waterston ("Calvin and Hobbes"), Walt Kelly ("Pogo"), Will Eisner ("The Spirit"), and Jack Kirby (co-creator of Captain America) have turned to brushes to create effects not readily made with a metal point or nib. Although harder to work with than a pen, a brush can produce a variety of line thicknesses, making a character stand out more or blend into the shadows better than if inked with a pen or marker. A brush also holds more ink than a pen nib, meaning less time dipping and more time inking. The following steps cover how to select an inking brush and how to ink comics with a brush.
Steps
Choosing an Inking Brush
-
1Choose a brush made for inking. Artist's brushes intended for inking comics have short handles, similar to those used for painting watercolors. Brushes used for painting with oils or acrylics typically have longer handles and are not recommended for inking. As inkers typically get close to their work in order to follow sketch lines made by a penciller, longer handles get in the way.
-
2Know the appropriate brush sizes to use. Artist's brushes range in size from as small as 20/0 to as large as 30. The most common sizes of inking brushes, however, are 1, 2, 3, 4, and 5, with 3 being the recommended size for first-time inkers, although some artists go down to size 0 for inking finer lines.
- Brush sizes are not necessarily universal among brush manufacturers; one company's size 0 may be another company's size 1. Check with your local artist supply store for guidance.
Advertisement -
3Choose a brush with good quality bristles. Many artists favor natural bristles made from the hair of the Kolinsky sable, a species of weasel. Other artists find synthetic bristles a cheaper alternative, provided the brush is made by a manufacturer with a good reputation. To evaluate the quality of a brush you're considering, ask to dip the brush in water until it's good and wet, then strike the middle of the brush against your wrist. If the brush hairs come to a point without any "split ends," you can expect the brush to perform well as an inking brush.
- Good quality natural hair brushes include the Winsor Newton Series 7 and the Raphael.
- Good quality brushes with synthetic hair include the Winsor Newton Specter Gold II.
- Some artists prefer to work with a brush pen, which has a fibrous tip like a brush but uses ink cartridges like a fountain pen. Kuretake and Pentel each make quality brush pens. You may prefer to use different cartridges than those the pen comes with, however.
-
4Choose a quality ink to complement your brush. The standard ink used for inking comics is India ink. Quality brands of ink include Higgins Black Magic, Pelican, and Speedball Super Black. Different brands of ink may have different properties, however, despite being of equal quality; some tend to be thicker than others. Some artists prefer to use a thicker ink when inking with a brush than with a pen and to thin the brush ink with a tiny bit of ammonia when necessary.


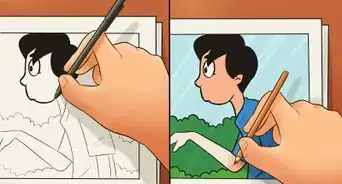
Inking With a Brush
-
1Dip your brush straight down into the ink bottle. Dip only the bottom 2/3 of the bristles into the ink. This will keep the ink away from the glue holding the bristles onto the metal ferrule. Hold the brush in the ink long enough to saturate the bristles.
-
2Wipe the excess ink off on the rim of the ink bottle. You may have to do this 2 or 3 times.
-
3Roll the bristles to get a fine point. Use a scrap of paper for this.
-
4Grasp the brush between your thumb and forefinger.
-
5Hold the brush perpendicular to the paper as you apply ink. This will keep the brush tip pointed and your inked lines at the proper thickness.
- To help hold your brush in this position, place the side of your wrist on the paper and rest your middle finger on the paper ahead of the brush.
-
6Follow the penciled lines you want to highlight using smooth strokes. Keep your thumb and forefinger locked, while bending your wrist from left to right if you're using your right hand and right to left if you're using your left hand.
- Don't try to highlight all the penciled lines, only those that in your judgment bring out the scene you're inking. You may want to discuss beforehand with your penciler which lines are the important ones.
-
7Apply more pressure to make a thicker line, less for a thinner line. Thicker lines are more important for outlines and showing shadows, while thinner lines are more important when doing detail work where the light source strikes. If you're doing mostly detail work, don't load as much ink into your brush.
-
8Rotate the paper when following the curve of a penciler's line. This will allow you to keep your brushstrokes straight, either horizontal or vertical, while keeping your ink lines flowing smoothly.
- Be aware that some non-repro-blue pencils (very light blue pencils designed not to show up in photocopies) can be very waxy, which may cause the ink to run when crossing these lines.


Warnings
- Do not clean your inking brush with hot water. Doing so will cause its ferrule to expand and dissolve the glue holding the hairs to it, causing them to fall out.⧼thumbs_response⧽
- Do not expect to master inking with a brush overnight. Good brush inking technique may take professional inkers as long as 3 years to master.⧼thumbs_response⧽