This article was co-authored by wikiHow Staff. Our trained team of editors and researchers validate articles for accuracy and comprehensiveness. wikiHow's Content Management Team carefully monitors the work from our editorial staff to ensure that each article is backed by trusted research and meets our high quality standards.
There are 8 references cited in this article, which can be found at the bottom of the page.
This article has been viewed 28,409 times.
Learn more...
NuCore waterproof flooring combines the appearance of hardwood with a simple, streamlined installation process. These products install over almost all existing floors, making them flexible and affordable flooring choices. If you want to give your home a fresh look without the labor-intensive installation that comes with standard flooring products, consider installing NuCore planks.
Steps
Cleaning and Measuring Your Area
-
1Peel any carpeting back from the walls using pliers or your hands. Grab the carpet by an edge against the wall and peel it back as much as possible. Afterwards, use a utility or carpet knife to slice it into manageable strips. Continue pulling the carpet back, cutting it up into smaller strips and rolling it up.
- Remove any carpet padding in the same manner and cut it up into strips that can easily be transported.
- Although NuCore can't be installed over carpet, it can be installed over even concrete, wood, vinyl, linoleum, and ceramic tile floors.
- Remove any remaining carpet tack strips and staples from the carpet pad when you're done. Slide a pry bar under the nails that secure the strips and lift them up. For staples, pull them up with pliers and use a flat-bladed screwdriver to pull them out.
-
2Keep boards in room temperature for at least 12 hours for acclimation. If your boxes of NuCore were exposed to more than 2 hours of temperatures below 50 °F (10 °C) or over 100 °F (38 °C) in the 12 hours prior to installation, they must be acclimated. Store them at room temperature for at least 12 hours.
- Don't remove your boards from their packaging during acclimation.
- Maintain your installation room's temperature between a steady 60 to 80 °F (16 to 27 °C) both before and during installation.
Advertisement -
3Clean the subfloor of any dirt and moisture. Although NuCore is waterproof, the subfloor must still be moisture-free for a proper installation. Sweep the floor with a broom to gather any dust or dirt particles. For wet areas, use a dry mop to collect water and moisture.[1]
- Use a digital contact moisture meter to check the floor's moisture. Tap the device's 2 points to the floor and ensure that the moisture level is not about 2.5%.[2]
- Check that your subfloor is level to 3⁄16 inch (0.48 cm) within a span of 10 feet (3.0 m). If it's not, you need to level it by using an electric sander followed by a leveling compound.
-
4Divide your floor's width by your plank width to determine available space. Measure the width of your floor space using a measuring tape. You should have enough space so that your final row is 2 inches (5.1 cm) or more in width.
- For example, if your floor is 55 inches (140 cm) and your planks are 6 inches (15 cm), you are left with 9.16, meaning 9 full planks will fit and leave just 1 inch (2.5 cm) of width remaining. This means you need to cut 1 inch (2.5 cm) from the width of each first row plank to accommodate it.
- On average, planks are between 6 to 7 inches (15 to 18 cm) wide and 48 inches (120 cm) long.
-
5Draw a line along your first row planks to accommodate your final row. Mark amount to be cut on the left and right side of the planks with a utility knife. Using a measuring tape as a guide, drag your knife horizontally to connect both points. Afterwards, cut along the same line, this time applying pressure so that you cut deep enough to pull the plank apart.
- After cutting your plank, you should be able to fold it in half and pull off the extra piece.
- Cut down each plank in the first row in this manner. For example, if you need to cut 1 inch (2.5 cm) from your 6 inch (15 cm) first row planks, they should all be 5 inches (13 cm) in width after cutting.


Laying down Your First Row
-
1Lay down the first plank flush into the leftmost corner of the room. Place a 1⁄4 inch (0.64 cm) plastic spacer against the left wall. Spacers are essential for helping you align your tiles as you go, and provide room for trim molding installation.[3]
- Plastic spacers can be purchased from home hardware stores.
- Leave the front wall without spacers for now—you will only need them later.
-
2Lay down the second plank at a 45-degree angle to the front wall. Gently place it to the ground and snap the short edges of your flooring together for the first row. Each piece should lock into the other easily. Afterwards, use a rubber mallet to gently hammer the end joints into place.[4]
- Always ensure that both planks are properly aligned and at the same height.
- If the planks aren't locking together properly, disassemble them and check for debris inside the locking region.
-
3Measure the length of the space for the last plank. Use your measuring tape to determine the distance from the right side of the last plank to the wall. Leave a 1⁄4 inch (0.64 cm) gap for spacers.[5]
- For example, if there is 18 inches (46 cm) left, your final number to take to the next step is 17.75 inches (45.1 cm).
-
4Draw a line along the last plank to mark its new length. For example, if there is 18 inches (46 cm) left to the wall, draw a line 17.75 inches (45.1 cm) from the left or right side of the plank to accommodate 1⁄4 inch (0.64 cm) for spacers.
- Use a piece of measuring tape and a pencil to mark the plank.
-
5Slash multiple heavy cuts along the line of the new plank. With the top side facing up, use a ruler and utility knife to make multiple deep cuts into the new plank. Place your left hand onto the left of the cut, and use your right hand to lift the plank to the left. The piece should snap off naturally.[6]
- Place your left hand very close to the cut to ensure natural splitting.
- The cuts won't go through the surface—just be sure to cut deep enough that the board easily comes apart.
- You can also use a miter saw and 80-tooth finish saw blade to cut your planks to size.[7]


Completing the Installation
-
1Start the second row with the leftover plank from the first row. This plank acts as the first piece of your second row. The small plank should be at least 12 inches (30 cm) long. If the leftover piece is too short, cut a new plank into 2 pieces to create a piece that's an appropriate size.
- Always make sure that your planks are at least 12 inches (30 cm) long.
- The end joints (vertical crack between each attached plank) of every row should be 8 inches (20 cm) or more horizontally apart from adjoining rows.
-
2Attach the long side of second row planks into the first row. Make sure that they are tight into the short end of each previous plank at an angle of 30 degrees. Drop each plank down from this angle and gently tap the tows together with your mallet to eliminate any gaps between long sides.
- Always make sure your planks are perfectly aligned. If they're not, disassemble them and check for dirt or particles lodged in the locking regions.
-
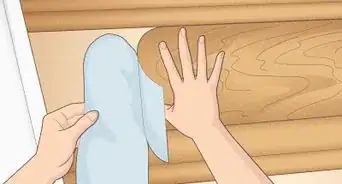
3Tap scrap planks gently into previous rows using a vertical hammering motion. After placing your rows down, place a scrap plank against the bottom side of the row and use a mallet to hammer them upward using a vertical motion. This procedure helps you ensure that each row is tightly attached and there are no gaps between any of the planks.
- Be sure to do this after each row is complete—gaps can compromise the entire installation.
-
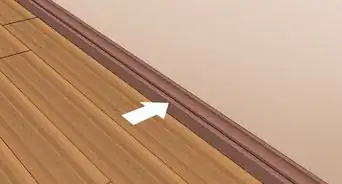
4Place 1⁄4 inch (0.64 cm) spacers on the front wall after 2 to 3 rows. You should now have 1⁄4 inch (0.64 cm) spacers between your planks and the left, right, and front walls. These gaps are important to give yourself enough space to properly install molding following installation.
- Use this time to make sure that all of your end joints are at least 8 inches (20 cm) apart.[8]
-
5Position a loose plank on top of the previous row when laying the final row. Afterwards, place another board on top, making sure that the tongue side faces the wall.
- If you're unsure which is the tongue side, look for the side that has a piece extending outward from the middle of the board that fits into the groove of the next piece.
-
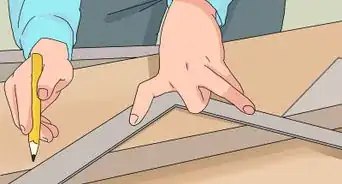
6Draw a line along the edge of the loose plank on top of the previous row. Afterwards, cut along the line to mark the first plank. Then, go over the line again with your knife, this time cutting deep enough that you can pull the bottom off. The plank should now be the proper size for the final row.
- Continue cutting boards in this manner to create planks for the final row.
-
7Place your pre-cut planks into the final row. Always make sure they are at least 2 inches (5.1 cm) wide. If you measured your room properly, this shouldn't be a problem. If you find that your planks must be less than 2 inches (5.1 cm) wide, cut down the planks in your first row to accommodate them.
- Remove the spacers before you place each plank into the final row.


Things You'll Need
- NuCore flooring
- Pry bar
- Pliers
- Digital moisture detector
- Spacers
- Rubber mallet
- Ruler
- Pencil
- Tape measure
- Utility knife
- Miter saw
- 80-tooth finish saw blade
Warnings
- Installing NuCore flooring over carpet or foam voids the warranty.⧼thumbs_response⧽
- Do not use bleach or wax to clean your NuCore flooring.⧼thumbs_response⧽


-Step-19.webp)
References
- ↑ https://youtu.be/pA3NK5sH40k?t=1m20s
- ↑ https://youtu.be/01EYuMPrRmY?t=1m12s
- ↑ https://youtu.be/pA3NK5sH40k?t=1m31s
- ↑ https://youtu.be/pA3NK5sH40k?t=1m36s
- ↑ https://youtu.be/pA3NK5sH40k?t=1m44s
- ↑ https://youtu.be/pA3NK5sH40k?t=1m45s
- ↑ https://youtu.be/0GpZesJsB0E?t=1m31s
- ↑ https://youtu.be/pA3NK5sH40k?t=2m4s
About This Article