wikiHow is a “wiki,” similar to Wikipedia, which means that many of our articles are co-written by multiple authors. To create this article, volunteer authors worked to edit and improve it over time.
This article has been viewed 15,855 times.
Learn more...
Toto Washlets are the popular bidets from Japan that have heated toilet seats, a massage, and hot sterilizing water to clean the toilet bowl. While it may seem ubiquitous in Japan, they are not super popular in the United States or elsewhere in the world. Because of this lack of popularity, you will need to install an additional electrical outlet to connect the one-meter 110V/220V power cable with GFCI/RCD protection. If you are ever unsure, you should contact a professional electrician and a plumber to help you.[1] [2]
Steps
Before You Start
-
1Install an additional power outlet first. Per national and international electric codes, your power outlet must be connected to a GFCI/RCD breaker to minimize injury caused by electric shock. If your toilet has a GFCI outlet conveniently nearby, you can chain another outlet to it; just attach the additional outlet to the "load" contacts on the breaker. If your toilet does not have a GFCI or RCD nearby, you should contact an electrician to have one installed.
- This outlet needs to be positioned at the same height as other ground-level outlets so that the 1-meter cable can plug into the wall.
-
2Consider replacing your toilet with a Toto Washlet+ compatible toilet. If you use a Toto Washlet with a Toto toilet, you may be able to use additional controls, including flushing the toilet from the remote.


Connecting the Junction Valve
-
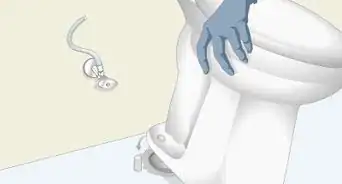
1Turn off and disconnect the toilet from the water supply. Because you will be installing a bidet, you will need to turn off the water supply to the toilet using the valve feeding from the wall. After doing so, you will need to empty the toilet tank by flushing the toilet to minimize backflow. Then, with a bucket to catch the water, remove the tubing from the water inlet to disconnect the water supply.
-
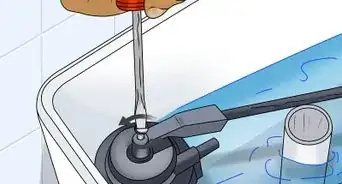
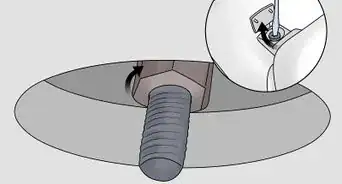
2Install the junction valve. To do so, start by inserting the rubber fittings and washers into the valve to prevent leakage. After all the fittings are in, screw the nuts of the junction valve to the underside of the toilet or to the water supply. The nuts should be snug, but not too tight.


Attaching the Washlet
-
1Install the base plate. Start by assembling the paper template included with the Washlet to provide a guide to where you need to place your marks.
- If you have a toilet with a curved back, move the inserts to the back holes before mounting.
-
2Verify the size of the bowl. Measure the distance from the holes to the edge of the toilet. If the distance is 47 centimetres (19 in), then you have an elongated toilet. If the distance is 42 centimetres (17 in), then you have a round toilet.
-
3Position the base plate. If your toilet is elongated, then line the bolts up with the position "elongated" on the paper template. Otherwise, line the bolts up with the position "round" on the paper template.
-
4Temporarily tighten the bolt. Insert the rubber bushings into the toilet's mounting holes, then tighten the bolts to secure it in place. Do not tighten the bolt fully as you will need to position the Washlet.
-
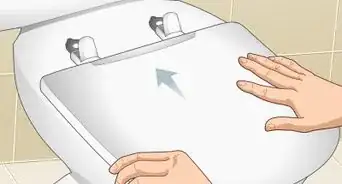
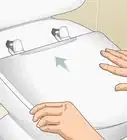
5Attach the Washlet. At this point, you do not need the paper template any more, and you should remove it. Pull it out from underneath the base plate. Then slide the Washlet in until you hear an audible click.
-
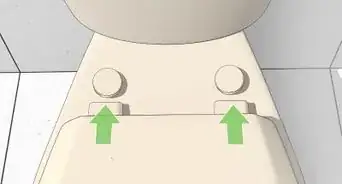
6Slide the Washlet to position it over the toilet bowl. The seat needs to be as perfectly aligned with the toilet bowl as possible, without it hanging over the edge. After it is correctly positioned, use the release button on the side to remove the Washlet.
-
7Fully tighten all the bolts. Screw the base plate in until it is flush with the toilet. Then, slide the Washlet onto the baseplate until you hear an audible click.
- If installed correctly, the Washlet should not easily move from use. The Toto Washlet may still wiggle slightly because of the attachment mechanism, which is completely normal.


Connecting the Washlet
-
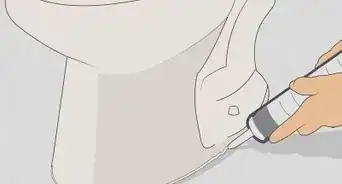
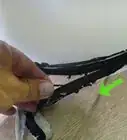
1Screw the Washlet hose to the right of the Washlet. Use a wrench to turn the hex lock into the water inlet on the Washlet. Do not overtighten.
-
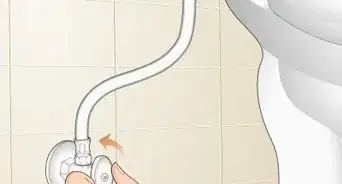
2Connect the plug end of the hose into the junction valve. First check that the ring of the water supply coupler is correctly positioned on the edge of the hose. Then plug the Washlet pipe into the coupler until you hear an audible click.
-
3Verify the length of the connection hose. The hose should be long enough that you can remove and reattach the Washlet while it is still connected. This will be necessary for periodic cleaning and maintenance.
-
4Check for leaks. Temporarily turn the water supply back on. If there are leaks, then you may have a loose connection somewhere. Turn the water supply off, then remove and reconnect the water hose and check again.


Installing the Remote
-
1Insert the AA batteries. This will allow you to use the remote. These batteries will need to be replaced when they run out.
-
2Attach the remote control hanger to the wall. Common positions for such a remote include to the side or on the same wall as the toilet.
-
3Insert the remote control into the wall hanger. This is where your remote will be stored when you are not actively using the toilet.


Testing the Washlet
-
1Check for leaks. Ensure that all the fittings are securely attached then turn the water back on to make sure that there are no leaks. If there are leaks, you may have a loose connection somewhere. Reinstall the fittings until the leakage stops.
-
2Plug the Washlet into power. Make sure that you use the appropriate rating for your outlet. A North American or Japanese Washlet can only be used with 100-120V 50-60 Hz AC, depending on where you bought the Washlet and the frequency used in your country. A European or Asian Washlet can only be used with 220V 50 Hz AC power.
-
3Approach the Washlet. When you do so, if equipped, the toilet seat should rise. When you leave, the Washlet lid should close, and, if installed, the toilet should automatically flush.
-
4Verify that the wash functions work properly. Heating the water takes some time. After the water is heated, push on the toilet seat or cover the seat sensor. Use the remote to make sure that all the equipped functions are working, including the flush, the air dryer, the sterilizing mist, and the bidet itself. Use a cup to catch the bidet spray.


Community Q&A
-
QuestionWhat temperature should the seat be?
 AasimTop AnswererThe seat by default will start out at room temperature, however you can heat the seat up from the remote control panel of the Washlet. This is very useful in cities with cold winters like New York or Toronto.
 -
QuestionWhere do I turn the Washlet water back on?AasimTop AnswererYour Washlet should be connected to the same water supply as your toilet. If your Washlet is not receiving water, then try turning the water for your toilet back on. This is usually located somewhere near the toilet. If it is not, then it is possible that your Washlet was not installed correctly.
Warnings
- Get a plumber and electrician to check your connections. The last thing you want is for your water to leak or for your toilet to catch on fire because you failed to install the Washlet properly.⧼thumbs_response⧽
Things You'll Need
- Wrench
- Flathead screwdriver
- Philips screwdriver
- GFCI/RCD protected outlet