This article was co-authored by Kevin Schlosser. Kevin Schlosser is a Home Improvement Specialist and the Owner of Home Tech Handyman Ltd. With over 20 years of experience, Kevin specializes in age-in-place installations, flooring, roofing, and general remodeling handyman services. Kevin holds a blend of construction and in-home technology-related certifications including NAHB Certified Age-in-Place Specialist, CEDIA membership and certifications, and a Certification from the Association of Certified Handyman Professionals. Also, he is in training to receive certifications in Construction, Project Management, and other CEDIA qualified system integrator certifications. He is fully-insured in the state of Colorado.
This article has been viewed 33,117 times.
Attic insulation is one of the most cost-effective ways to reduce your energy consumption without sacrificing a warm house. Read this guide to learn the basics of doing it yourself.
Steps
Materials and Preparation
-
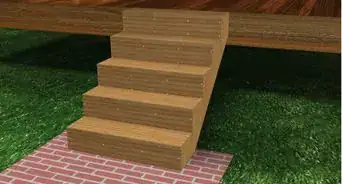
1Determine your desired R-rating. The R-rating of insulation shows how effective it is; a higher R-rating is more effective. There are two R-rating scales, one US customary and one metric; the US scale is 5.68 times the metric scale so it should be obvious which one is being used. It's usually recommended that existing homes have their attics insulated to a rating of R-38 (US), which will typically require a layer of insulation 10–14 inches (25.4–35.6 cm) thick, depending on what type of insulation you use.
- If you're adding on to existing insulation, use this rule of thumb to guide your work: Once joists are level with, or slightly below, your level of insulation, the total should be adequate for an R-38 rating. Less than that, and you'll probably need to add more.
- Past a certain thickness, it may not be cost-effective to add more insulation even if you aren't sure your attic is at the R-38 level. If your existing insulation is more than about 10 inches (25.4 cm) thick, it might not be worth the extra money.
- If you're adding on to existing insulation, use this rule of thumb to guide your work: Once joists are level with, or slightly below, your level of insulation, the total should be adequate for an R-38 rating. Less than that, and you'll probably need to add more.
-
2Choose your insulation material. There are a few different kinds of insulation available for your attic project. Choose whichever option works best for you in terms of cost, ease of installation, and effectiveness.
- Batting insulation comes in low, medium, and high-density batts. The higher a bat's density, the less is required to reach your target R-rating. Batting is convenient and can be rolled out easily into rectangular spaces.
- Most batting is made of mineral wool or fiberglass, which requires protective gear to work with safely. Safer batting made from recycled foam is also available, though.
- Loose fill insulation comes in bags and is used to insulate odd corners or angles where batting insulation won't fit as well. It can be hand-packed, but blowing it into place with a special machine makes it more even and complete.
Advertisement - Batting insulation comes in low, medium, and high-density batts. The higher a bat's density, the less is required to reach your target R-rating. Batting is convenient and can be rolled out easily into rectangular spaces.
-
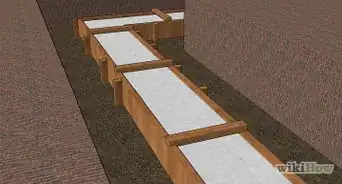
3Prepare your attic. Attic insulation is installed in the floor of the attic, so you'll need to do a few things to make the process straightforward. Start by installing temporary lighting, such as clip lights, and laying a few sturdy boards along the joists to create a walkway.
- If you're installing new insulation and there's no old insulation, check the drywall of the ceiling below the joists for a silver backing, called a vapor barrier. If it doesn't have one, you'll need to purchase material for one yourself. Polyethylene vapor barrier rolls are available at any home improvement store.
- If you need to work during very hot weather, be sure to have water close at hand, and stay hydrated to avoid overheating. Heat collects in attics; the temperature inside can be many degrees hotter than the temperature outside, in some cases. Try to work in the early morning if you can.
-
4Collect your equipment. You'll need standard safety equipment, plus materials, and all the tools required to install those materials. At the very least, be sure you have the following:
- Safety goggles and gloves
- A dust mask
- A flashlight
- A tape measure
- A staple gun
-
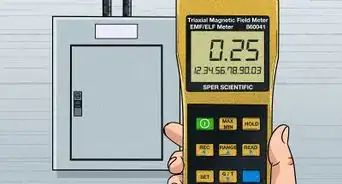
5Be aware of irregularities. Be sure you know where chimneys, recessed lighting elements, and any other possible heat sources are ahead of time. If you suspect your attic has air leaks, try to find and seal them with caulk, spray foam, or weather stripping before you begin.
-
6Install the vapor barrier. If you need to, now is the time to install your polyethylene vapor barrier. Cut it into sections that fit snugly into the spaces between the joists, and staple it to the drywall below with your staple gun.
- Leave a few inches around every heat source. Polyethylene can melt and burn. Be sure to cut away a 3-inch space around any chimneys or other heat sources.


Installing Batting Insulation
-
1Open the batting. Be sure you're wearing your safety equipment, as the itchy fibers of the batting can cause respiratory problems and eye irritation without a barrier in place. Only unroll your batting once you're in the attic, to avoid letting fibers contaminate the rest of your house.
-
2Lay the first layer. Unroll the batting blanket into the space between two joists. If the blanket isn't wide enough to match the width of the space between joists, unroll it from joist to joist instead, and lay more short lengths next to each other until the full length between the two joists is packed.
- Press and tuck the edges of each part of the blanket, to make sure they fit snugly and that there are no gaps between them.
- Cut a hole in the insulation wherever there is electrical wiring. Pull the wiring up through the hole and rest it on top of the insulation, so that the heat it generates will dissipate upward rather than being trapped under the insulation.
-
3Check depth and repeat if necessary. If you're fairly sure that one layer of insulation isn't enough to reach an R-38 rating, you can add another layer. Lay this layer at right angles to the first layer, to reduce leaks and gaps.
- Be sure to cut holes for electrical wiring and pull it through the second layer, as well.
- Remember, the rule of thumb is that if your insulation is at about the same level as the tops of your joists, the insulation should be adequate. However, if you want to be sure, you can compare the R-ratings per level of insulation to the R-rating you're trying to achieve, and make a more educated guess based on that.


Installing Loose Fill Insulation
-
1Estimate the amount of fill you'll need. Generally speaking, without any preexisting insulation in place, it takes 10–12 inches (25.4–30.5 cm) of loose fill to achieve an R-rating of about 38-40. Find the rough surface area of the base of your attic and ask the seller how many pounds of fill will be required to fill that area to 11 inches (27.9 cm) deep.
-
2Rent a blowing machine. Many home improvement stores offer blowing machine rentals for the DIY-minded. Remember, machine-blown fill insulation will be more effective than hand-filled, so unless you want inferior insulation from your material, rent a blowing machine when you buy your insulation.
-
3Baffle your vents. Soffit vents will need to be baffled (protected from getting clogged with fill insulation) before you work. Add one rafter vent baffle to each soffit vent.
-
4Set up and use the blowing machine. Carefully follow the instructions that come with your machine to set it up and begin blowing insulation with it. Blow your insulation in evenly and smoothly. Stop every few minutes to check the depth of the insulation and be sure it's more or less even. Keep going until the proper depth of insulation has been reached.
- It is necessary to have a tight building envelope. When air leaks inside through various openings, you do not have a tight envelope.
- It is the number one contributor to problems related to heat transfer in the home.
- Consider increasing the R-rating in colder climates. But if not, any insulation will do.


Community Q&A
-
QuestionDo I need to prep attic before adding blown-in insulation?
 Community AnswerYes. See Step 3 of Method 1 of the article. Several things must be addressed so your insulation can work.
Things You'll Need
- Safety goggles and gloves
- A dust mask
- A flashlight
- A tape measure
- A staple gun
- Caulk, spray foam, or weather stripping, if air leaks are present
- Polyethylene vapor barrier sheeting
- Insulation (loose or batt)
- A blowing machine (if using loose insulation)
- Boards to make walkways
- Clip lights or other temporary lighting
- Rafter vents or baffles (if using loose insulation)
- A cutting tool


References
About This Article

To insulate an attic, get some batting made out of mineral wool, fiberglass, or recycled foam. You'll want to buy enough batting to lay at least 10 to 14 inches over the entire space. Additionally, purchase some loose fill insulation to insulate corners and angles where the batting won't fit. Typically, you'll want to make sure to cover these small spaces with 10 to 12 inches of loose fill insulation. To learn how to install more than 1 layer of insulation, keep reading!