This article was co-authored by Adarsh Vijay Mudgil, MD. Dr. Adarsh Vijay Mudgil is a board certified Dermatologist, Dermatopathologist, and the Owner of Mudgil Dermatology, a state-of-the-art dermatology practice based in New York, New York. As one of the few dermatologists in the area to achieve board certification in both dermatology and dermatopathology, Dr. Mudgil specializes in all aspects of medical, surgical, and cosmetic dermatology. He received his Bachelor's degree with Phi Beta Kappa honors from Emory University and earned his Doctor of Medicine (MD) with Alpha Omega Alpha honors from the Stony Brook University School of Medicine. In medical school, Dr. Mudgil was among a handful of students nationwide to receive a coveted Howard Hughes Medical Institute Fellowship and Scholarship. He then completed his residency in dermatology at the Mount Sinai Medical Center in Manhattan, where he served as chief resident. Additionally, Dr. Mudgil went on to complete a fellowship at the prestigious Ackerman Academy of Dermatopathology. He is a fellow of the American Academy of Dermatology, the American Society for Dermatologic Surgery, and the American Society of Dermatopathology. Dr. Mudgil is also a member of the Mount Sinai School of Medicine teaching faculty.
There are 7 references cited in this article, which can be found at the bottom of the page.
This article has been viewed 154,795 times.
In some cultures, women consider armpit hair undesirable. Because of that, many women try to keep their underarms smooth and hair free. While some methods of hair removal like shaving and waxing are well-known and used widely, other options like depilatory creams and laser hair removal might be unknown to some women who want hairless underarms.
Steps
Shaving Your Underarms
-
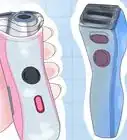
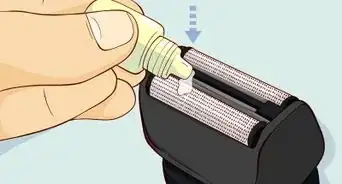
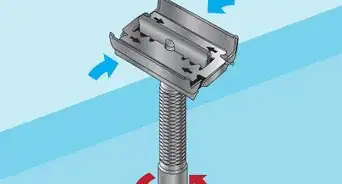
1Use a sharp razor. Dull razors can cause nicks or cuts while shaving, due to the extra pressure you’ll have to put on them to be effective. They can drag harder against skin and become irritating. Use a sharp, fresh, high-quality razor. Disposables with one blade might not be the best option. Instead, try a razor with at least 3 blades.[1]
- There are online services that will send you blade cartridge refills for much cheaper than normal drugstore prices. These services are great options for those who want to use a sharp, fresh blade each week.
-
2Apply a layer of shaving cream or soap. You will want to lubricate the razor as it moves over your skin to prevent it from causing nicks or cuts, so using a layer of shaving cream or soap can help with this. Because the soap or cream will gather on the razor, you’ll want to rinse the razor after each pass to keep it from clogging and becoming less effective.
- You can also try using a little bit of hair conditioner instead of shaving cream or soap. This works just as well.
- The less hair you have on your underarms already, the more cream, soap, or conditioner you’ll want to apply to protect your skin. Generally, though, an even, thin layer will do well enough.
Advertisement -
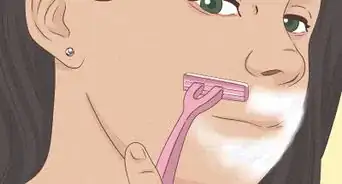
3Shave at any angle. Unlike shaving other parts of the body, shaving the underarms can require shaving in all directions instead of just one. Shave up, down, and side to side to remove all unwanted hair. Your shaving cream or soap will help you see better where you’ve already shaved and help you avoid missing any areas.[2]
- Be careful not to press too hard when shaving. Keep your touch gentle to avoid nicks and cuts.
-
4Apply a moisturizer afterward. Some antiperspirants and deodorants contain moisturizers that can help soothe the skin after shaving, so you can try one of those. Alternatively, you can apply a thin layer of a gentle moisturizing cream or lotion. Try something made specifically for sensitive skin, as this might be better for your underarms.[3]
- You may have to try a few different after-shave routines until you find the one that best suits you. For example, if deodorant or antiperspirants alone aren’t soothing enough, try applying moisturizer. Or, if moisturizer becomes too irritating, try sticking with your antiperspirant or deodorant.
-
5Consider only shaving your underarms in the shower. Some people shave their underarms at the sink rather than in the shower, while others shave in the shower. It comes down to personal preference and convenience. However, shaving in the shower has its advantages. Letting the hair under your arms soak in the warm shower water for a few minutes before soaking can help soften the hair and make it easier to shave without irritation.[4]
- If you want to shave at the sink instead of in the shower, try wetting the hair under your arms with warm water a few moments prior to applying the shaving cream or soap, rather than wetting it right before.


Waxing Your Underarms
-
1Make sure hair is at least a quarter of an inch long. Because the wax will need to thoroughly adhere to any hair on your underarms, you need the hair to be at least .25 inches (0.6 cm) in order to use waxing as your method of hair removal. If your hair is too short, give it another few days before attempting to wax. Trim down any hair that is more than an inch long to prevent any complications or difficulties when waxing.[5]
- If the hair under your arms is very long, it could make waxing more painful than necessary. Trimming especially long underarm hair prior to waxing can help alleviate this.
-
2Exfoliate your underarms before waxing. Use a gentle exfoliating scrub, or simply a washcloth to exfoliate your underarms. This will remove any dirt from your pores and help prevent ingrown hairs when you are ready to wax.
- Try making your own gentle exfoliating scrub with a tablespoon of baking soda and enough mineral water to make a thin paste. Use your fingertips or a washcloth to gently rub the paste against your underarms, then rinse with warm water.
-
3Make sure your underarms are dry. Wax will not function properly if you apply it to wet skin. Before applying the wax, make sure your underarms are completely dry. This means no leftover water from exfoliating, and no sweat. You can even try dusting a little baby powder onto your underarms to ensure they are entirely dry.[6]
- A bit of baby or talcum powder can also help alleviate a bit of the pain associated with waxing, so even if your armpits are dry, consider dusting on a light layer for your own comfort.
-
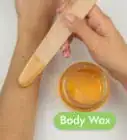
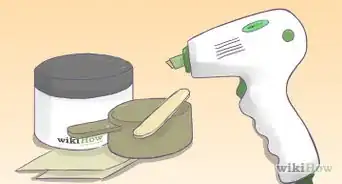
4Follow the directions on your chosen waxing product. Some waxing products can be applied cold or at room temperature, while others need to be warmed to be used. Whichever product you’re using, follow all directions on the bottle or box. This will ensure the product works its best.
- Make sure you stretch your arm up over your head and keep the skin of your underarms as tight as you can. This will help you make sure you apply the waxing strip evenly over your entire underarm, and insure you are able to wax away all hair.[7]
-
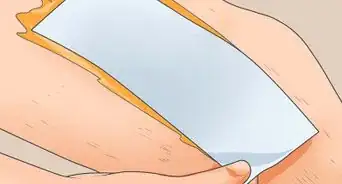
5Use an after-waxing lotion or gel. After you wax your underarms, you will want to soothe the skin. You can use a normal moisturizer, specifically one with soothing ingredients like aloe. Or, you can use a product made specifically for use after waxing. These products are available at drugstores. They not only soothe the skin after waxing, but can also help protect your freshly waxed follicles from infection or further irritation.
- Directly after waxing and prior to applying any cream or gel, you can also try putting an ice cube against your freshly waxed skin. The ice can numb the skin and soothe it instantly after waxing to prevent extra pain.


Using Hair Removal Creams
-
1Make sure you are not allergic to the cream. Some people with sensitive skin can have allergic reactions to the chemicals in hair removal, or depilatory creams. To make sure you aren’t allergic to the cream you’ve chosen, dab a small amount onto your skin. Try somewhere like your ankle or arm. If you have no reaction after a few moments of the product being on your skin, you should be fine to use that product.
- Red skin, a rash, or intense itchiness are all signs of an allergic reaction.[8]
- Always check the warning labels and ingredient lists on any skin product you use before using them.
-
2Use a depilatory cream made for sensitive skin. Since your underarms are particularly sensitive, choose a product that is specifically labeled and made for use on sensitive skin. Some depilatory cream brands offer specific creams for underarms and bikini areas, so try one of these. This will reduce the risk of skin irritation when you use the product.
- Even if you choose a product for sensitive skin, it’s still a good idea to do the allergy test prior to using it.
-
3Wash and dry skin before using the cream. You want to make sure you don’t have any lotion, deodorant, antiperspirant or skin oils on your skin when you apply the cream. This will ensure there is nothing acting as a barrier between the cream and your skin. Use a gentle soap when washing to make sure all products and oils are removed from the skin.[9]
- You will also want to make sure you don’t have any cuts in the area you’ll be applying the cream. This can be very uncomfortable and cause a stinging sensation.
-
4Apply the cream in a thick layer. Make sure not to rub the cream in. Instead, dab it over your skin and make sure you cover all the hair you want to remove. Use a thick enough layer to fully cover the area. The cream you bought may have come with a special spatula for spreading and removing, so you can use that. Or, you can use a wooden tongue depressor or put on a plastic glove and use your hand.[10]
- You can spread the cream with your bare hand, but you will want to wash your hands thoroughly with soap and water promptly after finishing.
-
5Follow all directions on the label. The label will specify how long to leave the cream on before wiping it off, and you should follow those instructions completely. Don’t keep track of the time in your head--use a watch or timer to make sure you leave it on for the exact amount of time. Leaving it on longer could result in skin irritation.[11]
-
6Remove the cream. Using the spatula that came with your cream, or with a washcloth, apply firm pressure and wipe the cream away. Use a downward motion. Make sure you apply even pressure when wiping away the cream, as this will remove both the cream and the hair in one motion. Extra rubbing could cause unnecessary irritation.[12]
- If you have any kind of negative reaction during the time the cream is on your skin, remove it. Burning, excessive or painful itching, or a rash are all signs of an allergic reaction. Even if you did a test patch somewhere else on your skin and had no reaction, it’s still a good idea to remove the cream if it causes a reaction when you use it.
-
7Rinse and dry your skin. Using warm water, rinse all the excess cream off of your skin. Make sure all the cream comes off. You don’t want any lingering and causing skin irritation or burning from staying on too long. You don’t necessarily need to use soap, but you can if you feel you need to. Or, if the directions on the label call for using soap to wash off the cream, follow those instructions.[13]
- Be careful not to rub your skin too harshly with washcloths or loofahs when rinsing the cream away. Your skin may be a little sensitive from using the cream, and doing so may cause irritation.
-
8Apply an after-lotion. Some depilatory creams will come with a lotion to apply after using the cream. If yours did, use that cream and apply a generous amount. If your depilatory cream did not come with an after-lotion, you can use a mild moisturizing lotion you have on hand. Consider using one that is unscented to refrain from applying any unnecessary extra chemicals to your skin.[14]


Considering Laser Hair Removal
-
1Remember that insurance will not cover these treatments. Since laser hair removal is a cosmetic procedure, most--if not all--insurance companies will not cover it under any policies. So, you will be paying out of pocket for your treatments. Laser hair removal can cost upwards of $150 per session, or more, depending on the size of the area being treated.[15]
- Many laser hair removal specialists offer financing options to pay for your treatments over time. Keep in mind, though, that these financing options can often come with interest rates and extra fees, and not making your payments can negatively affect your credit score.
-
2Choose an established dermatologist. Laser hair removal should always be performed by a board-certified dermatologist.[16] You can check the American Academy of Dermatology’s database to find a licensed dermatologist near you. Have a consultation with your doctor prior to the procedure to understand costs, possible negative side effects, and after-care. Use this consultation to make sure that laser hair removal is the right choice for you.[17]
- If you have dark skin, it's best to choose a dermatologist who has experience treating dark skin.[18]
-
3Keep in mind the treatment will take time. For most people, you will need multiple treatment sessions of laser hair removal to have full results. Each treatment will cost money, and it may take months to see the results you’re looking for. If you’re after a quicker hair removal option, sticking with shaving, waxing, and hair removal creams might be your best option.[19]
- Most people require 2-6 treatments, depending on the thickness and coarseness of their hair.
- Between treatments you will be able to shave, but you shouldn't wax or pluck the hair, which could interfere with the hair removal process.[20]
-
4Consider possible side effects. Although the most probable side effects are redness and swelling, there is a chance for other side effects as well. The skin may have discoloration, like lightening or darkening, in the treatment area.[21] This is mostly temporary, and will eventually fade. It’s also possible that scarring or even some mild changes in the texture of your skin.[22]
- Most other side effects are rare. Your doctor will go over all possibilities with you prior to beginning treatments.


Expert Q&A
Did you know you can get expert answers for this article?
Unlock expert answers by supporting wikiHow
-
QuestionWhat are side effects of laser hair removal?
 Adarsh Vijay Mudgil, MDDr. Adarsh Vijay Mudgil is a board certified Dermatologist, Dermatopathologist, and the Owner of Mudgil Dermatology, a state-of-the-art dermatology practice based in New York, New York. As one of the few dermatologists in the area to achieve board certification in both dermatology and dermatopathology, Dr. Mudgil specializes in all aspects of medical, surgical, and cosmetic dermatology. He received his Bachelor's degree with Phi Beta Kappa honors from Emory University and earned his Doctor of Medicine (MD) with Alpha Omega Alpha honors from the Stony Brook University School of Medicine. In medical school, Dr. Mudgil was among a handful of students nationwide to receive a coveted Howard Hughes Medical Institute Fellowship and Scholarship. He then completed his residency in dermatology at the Mount Sinai Medical Center in Manhattan, where he served as chief resident. Additionally, Dr. Mudgil went on to complete a fellowship at the prestigious Ackerman Academy of Dermatopathology. He is a fellow of the American Academy of Dermatology, the American Society for Dermatologic Surgery, and the American Society of Dermatopathology. Dr. Mudgil is also a member of the Mount Sinai School of Medicine teaching faculty.
Board Certified Dermatologist & DermatopathologistInflammation from the procedure can sometimes cause hyperpigmentation, especially if you have darker skin. I recommend you talk to your doctor to get a full idea of what to expect.
Support wikiHow by unlocking this expert answer.

-Step-14.webp)

-Step-10-Version-2.webp)
References
- ↑ http://www.self.com/flash/beauty-blog/2012/01/how-to-reduce-underarm-irritat/
- ↑ http://www.gillettevenus.com/en-us/how-to-shave/learning-to-shave/beginner-how-to-shave-guide
- ↑ http://www.self.com/flash/beauty-blog/2012/01/how-to-reduce-underarm-irritat/
- ↑ http://www.gillettevenus.com/en-us/how-to-shave/learning-to-shave/beginner-how-to-shave-guide
- ↑ http://www.healthcare-online.org/Underarm-Waxing.html
- ↑ http://www.healthcare-online.org/Underarm-Waxing.html
- ↑ http://www.healthcare-online.org/Underarm-Waxing.html
- ↑ http://www.hairfinder.com/techniques/hair_removal_creams.htm
- ↑ http://www.hairfinder.com/techniques/hair_removal_creams.htm
- ↑ http://www.hairfinder.com/techniques/hair_removal_creams.htm
- ↑ http://www.hairfinder.com/techniques/hair_removal_creams.htm
- ↑ http://www.hairfinder.com/techniques/hair_removal_creams.htm
- ↑ http://www.hairfinder.com/techniques/hair_removal_creams.htm
- ↑ http://www.hairfinder.com/techniques/hair_removal_creams.htm
- ↑ https://www.aad.org/public/diseases/cosmetic-treatments/laser-hair-removal
- ↑ Adarsh Vijay Mudgil, MD. Board Certified Dermatologist & Dermatopathologist. Expert Interview. 8 October 2020.
- ↑ https://www.aad.org/public/diseases/cosmetic-treatments/laser-hair-removal
- ↑ Adarsh Vijay Mudgil, MD. Board Certified Dermatologist & Dermatopathologist. Expert Interview. 8 October 2020.
- ↑ https://www.aad.org/public/diseases/cosmetic-treatments/laser-hair-removal
- ↑ Adarsh Vijay Mudgil, MD. Board Certified Dermatologist & Dermatopathologist. Expert Interview. 8 October 2020.
- ↑ Adarsh Vijay Mudgil, MD. Board Certified Dermatologist & Dermatopathologist. Expert Interview. 8 October 2020.
- ↑ http://www.mayoclinic.org/tests-procedures/laser-hair-removal/basics/risks/prc-20019438
About This Article

Waxing is an easy way to keep your underarms smooth and hair-free. Wait until your underarm hair is at least ¼ inch long so that the wax can stick properly. Make sure that your skin is completely dry and then apply the wax according to the package instructions. After you've finished waxing, cover your armpits with a soothing after-waxing lotion or gel to prevent skin irritation. You can also use a hair removal cream that is designed for sensitive skin to keep your underarms hair-free. Wash and dry your armpits before you begin to remove any potential barriers between your skin and the cream. Apply a thick layer of the cream and leave it on for the specified amount of time. Once the time is up, wipe the cream away with a damp washcloth. For more advice on keeping a woman’s underarms hair-free, like how to get laser hair removal, read on!