X
This article was co-authored by wikiHow Staff. Our trained team of editors and researchers validate articles for accuracy and comprehensiveness. wikiHow's Content Management Team carefully monitors the work from our editorial staff to ensure that each article is backed by trusted research and meets our high quality standards.
This article has been viewed 94,998 times.
Learn more...
Kitchen shelf liners can make your kitchen look more attractive and also help keep it clean. There are many different types of liners that you can use, but all should be installed in a similar way. Buy the materials you need, prepare your cabinets, and then line your shelves to add a nice little touch to your kitchen.
Steps
Part 1
Part 1 of 3:
Buying Your Materials
-
1Gather needed supplies. You’ll need a regular ruler and a quilting ruler to properly take measurements, as well as a notepad and writing utensil for writing them down. Get a pair of scissors or a rotary cutter to cut the liner. Some other supplies you need are: shelf liner, a cleaning cloth, all-purpose cleaner or vinegar, a cutting mat, and a squeegee.[1]
-
2Measure your cabinet shelves. Use the regular ruler to measure the length and width of a shelf that you plan on lining. Make sure to write down these measurements in a notebook.[2]Advertisement
-
3Calculate the amount of liner you’ll need. Multiply the length by the width measurement. Take that number and multiply it by the number of shelves you have. This will tell you approximately how much liner you need to buy.
- If your shelves measure 10 inches (25.4 centimeters) by 5 inches (12.7 centimeters) and you have 8 shelves in your kitchen that you want to line, you’ll multiply 10 in (25.4 cm) x 5 in (12.7 cm) = 50 in (127 cm) and then 50 in (127 cm) x 8 = 400 in (1,016 cm). In this example, you’d need to buy at least 400 square inches (1,016 cm) of liner.
-
4Decide on color, pattern, and material. Scan the aisle of a home improvement store to find patterns and colors that you like, whether it’s bright red polka dots or solid black. Contact paper is one of the more popular liner material options because it’s decorative on one side and has an adhesive on the other. You can also choose a non-slip material such as sponge or ribbed plastic to avoid issues in the future when you remove the liner.[3]


Advertisement
Part 2
Part 2 of 3:
Preparing for Installation
-
1Remove all food and dishes from your cabinets. Before lining your cabinet shelves, you’ll need to empty them out completely. Take out all of your non-perishable bottles, cans, and boxes of food as well as all dishes and cooking utensils. Put these items on a nearby flat surface that’s out of the way, such as your kitchen table.
-
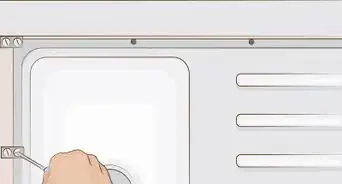
2Clean the interior with all-purpose cleaner or a vinegar solution. Soak a clean cloth in either all-purpose cleaner or vinegar diluted by water and wring out the cloth well. Wipe down the interior of your cabinets with the cloth. Use a toothbrush to scrub the edges, corners, and cracks.[4]
-
3Let the shelves air dry. Keep the cabinet doors open for a half hour or so after you’ve cleaned them so that they can dry out naturally. Touch the shelves after this amount of time has gone by to check that they’re fully dry.[5]


Advertisement
Part 3
Part 3 of 3:
Installing Your Shelf Liner
-
1Measure the liner material. Use the quilting ruler to measure your liner to fit the measurements of the shelves that you wrote down earlier. Mark the top and bottom of the paper with a pencil or pen.[6]
-
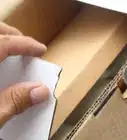
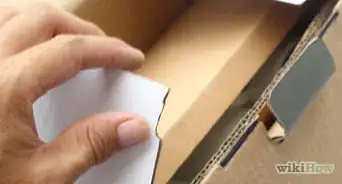
2Cut the liner material. Use scissors or place a cutting mat underneath the liner and then cut it with a rotary cutter. Use the quilting ruler as a guide while you’re cutting the liner. Repeat this process to create as many pieces of liner as there are shelves.[7]
-
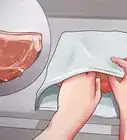
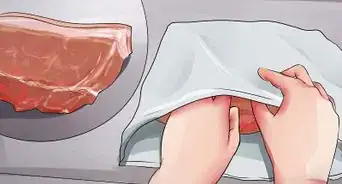
3Place the liner on the shelf and smooth it out. Take the backing off of your contact liner paper and carefully place it on your shelf. Go over the liner with a squeegee to eliminate any bubbles or wrinkles.[8]
- Put a small blob of reusable mounting putty in each corner of the cabinet before placing in spongy or plastic liner to secure it.[9]
-
4Repeat these actions for each shelf in your kitchen cabinets. One by one, take the pre-cut pieces of liner, place them in each shelf space, and smooth them out until all of your shelves are lined.[10]


Advertisement
Things You'll Need
- Ruler
- Notepad
- Pen or pencil
- Cleaning cloth
- All-purpose cleaner or vinegar
- Shelf liner
- Self-healing cutting mat
- Quilting ruler
- Rotary cutter or scissors
- Plastic squeegee
References
- ↑ https://www.thekitchn.com/how-to-line-drawers-and-shelves-lessons-from-the-kitchn-208331
- ↑ https://www.thekitchn.com/how-to-line-drawers-and-shelves-lessons-from-the-kitchn-208331
- ↑ https://www.familyhandyman.com/woodworking/shelves/how-to-line-drawers-and-cabinets-with-shelf-liner/view-all
- ↑ http://www.bhg.com/homekeeping/house-cleaning/tips/how-to-clean-cabinets/
- ↑ http://www.bhg.com/homekeeping/house-cleaning/tips/how-to-clean-cabinets/
- ↑ https://www.thekitchn.com/how-to-line-drawers-and-shelves-lessons-from-the-kitchn-208331
- ↑ https://www.thekitchn.com/how-to-line-drawers-and-shelves-lessons-from-the-kitchn-208331
- ↑ https://www.thekitchn.com/how-to-line-drawers-and-shelves-lessons-from-the-kitchn-208331
- ↑ https://www.familyhandyman.com/woodworking/shelves/how-to-line-drawers-and-cabinets-with-shelf-liner/view-all
About This Article

wikiHow Staff
wikiHow Staff Writer
This article was co-authored by wikiHow Staff. Our trained team of editors and researchers validate articles for accuracy and comprehensiveness. wikiHow's Content Management Team carefully monitors the work from our editorial staff to ensure that each article is backed by trusted research and meets our high quality standards. This article has been viewed 94,998 times.
Co-authors: 8
Updated: November 13, 2022
Views: 94,998
Categories: Kitchens | Kitchen Organization | Shelves
Advertisement