wikiHow is a “wiki,” similar to Wikipedia, which means that many of our articles are co-written by multiple authors. To create this article, 17 people, some anonymous, worked to edit and improve it over time.
This article has been viewed 86,278 times.
Learn more...
Designing your own wallpaper pattern ensures a unique look for your décor. You can be sure you love it and be sure it's completely, 100% you. There's a number of methods you can employ to be your own artist. Which speaks to you?
Steps
Using Fabric
-
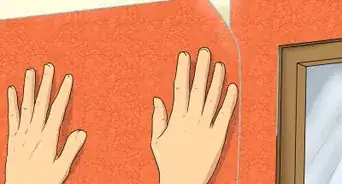
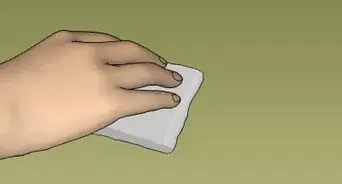
1Wash any dirt or film away from the wall you want to decorate. A clean rag and some multi-purpose cleaner should do the job just fine. Let the wall dry for a day or so before you cover it.
- If you don't have a standard multi-purpose cleaner laying around, some mild soap and water will work, too.
-
2Measure the height of the wall from floor to ceiling. Add 2 more inches (5 cm) to the measured height to add some wiggle room when you apply it to the wall. This is especially important for odd-shaped walls and walls with windows..
- Measure the width, too. If you're using panels, this is doubly important. You'll want to be sure the width of the wall doesn't leave your last panel at an awkward width – if it does, you may need to make a few cuts for it to line up.
Advertisement -
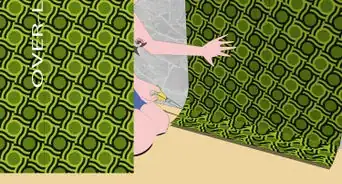
3Cut your chosen fabric to the calculated length to make one panel. You have two options here: one giant panel taking up your entire wall or several panels lining up with each other. If you choose the latter, be sure to match up any design on the fabric to maintain an even pattern before cutting the next panel.
- Alternatively, cut the fabric into panels so that they meet the width of the wall. For example, if your wall is 60" wide, you'll want five 12" panels. The main advantage of this (if not the only advantage) is that they're easier to work with and symmetrical. However, there will be seams and lining up that you'll have to worry about.
-
4Pour fabric starch into a clean pan and start at the top of the wall. This is the stuff that turns your normal, everyday fabric into something stiffer that'll pass as wallpaper. Use a sponge or paint roller to apply starch to the top half of the wall. A thin, even layer is best. Try to keep dripping to a minimum.
- Only do this if you have time to put up your panels afterward. You don't want to do this, have to leave, and come back to a dry wall that needs re-starched.
-
5Begin smoothly laying your cut fabric onto the starch from the top of the wall. This is easiest to do with at least two people – one person can place while the other smoothes out the bubbles.
- Leave 1 inch (2.5 cm) of fabric overlapping the ceiling. Temporarily hold the fabric in place with pushpins as it dries.
-
6Continue applying starch and smoothing the fabric down the wall. Once the top half is done, apply starch to the bottom of the wall and start smoothing the fabric slowly over it in a downward motion. Leave 1 inch (2.5 cm) of fabric overlapping the bottom edge of the wall.
- If any windows or doors are set into the wall, leave 1 inch (2.5 cm) of extra fabric around them as well.
- If you're applying multiple panels, make sure the side edges line up just how you like them. It may take a minute to get perfect, but it's a minute of work now for a lifetime of non-regret later.
-
7Apply starch evenly to the fabric itself. Don't worry – it'll soak in and won't change the look of your wallpaper. When it dries, it will disappear and leave the top stiff, too. Again, apply it evenly in a thin layer.
- Brush or smooth away wrinkles and bubbles in the fabric as you go. Any wrinkles or bubbles will be incredibly obvious and may ruin the look you're going for.
-
8Wait for the fabric to dry completely. When it is, trim away the excess fabric from the tops and bottoms of walls and around windows or doors. For the record, it's easier to create a hard, straight line with a box cutter or razor blade than scissors.
- And that's it! Enjoy your newly wallpapered walls.


Using a Stenciled Pattern
-
1Choose a stencil design, accent color for the design, and a wall color. Paint the wall with the selected background color if needed. If it's already a good color, you can skip right ahead to the stenciling.
- To paint the wall, mark off all the edges with painter's tape. If it's a dark color, cover it with primer first, let it dry, and then paint it your desired color. If it's a light color, you may be able to get away with just painting over it straight away.
-
2Decide how you want to position your stencil to form a wallpaper pattern. The only bounds here are in your imagination – is it going to be a single line of stencils? A curly-cue shape? Covering every inch of your wall? Once you've decided, use painter's tape to keep the stencil in place at the starting point of your pattern.
- Just keep in mind the length of time and difficulty of the overall concept you're planning. You may want to paint the Mona Lisa on your wall, but that makes it easy to mess up and is super time-consuming. When in doubt, keep it simple.
-
3Dip the tips of a stencil brush's bristles in your accent color's paint. Dab the brush onto a paper towel to remove excess paint. If you'd like, you can mix a couple of colors together for an intricate, unique look.
- There is such a thing as stencil paint, yes. It doesn't drip like wall paint does. That being said, it comes in pretty small containers. If you're stenciling your entire wall, it may make more financial sense to buy a large can of paint and just be extra careful.
-
4Dab the brush into the openings in the stencil design. Starting lightly, start creating small swishes of color inside the stencil – this method is called stippling. Hold the stencil firmly in place around the area you are painting to create sharp lines in your design.
- If you're working with multiple colors, cover every area with your first color before moving onto your second. This will make it much easier and quicker.
-
5Trace the stencil's four registration points with a pencil after painting. Once you're done with the first stencil, make small marks on its edges with a pencil to denote where it was. Then, when you lift it up and off the wall, you'll know where it was and where you should place the next image.
-
6Line up the stencil's registration points when moving the stencil to the next position in the pattern. If your stencils touch on any corner, use your registration point to make sure that it's right where it's supposed to be. Check that the placement is even by using a level.
- Once it is level, retape it in its new position with painter's tape on all edges. But be sure not to place the tape over the previous stencil – it may still need time to dry.
-
7Paint the rest of the pattern and move the stencil across and down the wall as necessary. Have the pattern reach to the edges of the wall and any trim to create the seamless appearance of wallpaper.
- If you mess up at any point in time and if you have the color available, just paint over the stencil. It's just a hiccough in the process – it won't ruin your pattern if you don't let it.


Using Decorated Paper
-
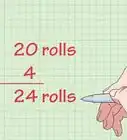
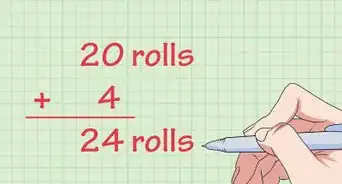
1Measure your walls to figure out how many sheets of paper you need. Once you've decided what kind of paper you want and you know what size it comes in, measure your walls, top to bottom and side to side. How many sheets is that?
- If it's not even, you'll have to figure out what you need to do. For example, let's say your wall is 60” across and your papers are 11” across. Do you want 5 pieces of paper that are 11” and 1 that's 5” across or 6 pieces of paper that all measure 10”? This is generally determined by how you want your seams to look.
-
2Line up your paper on the floor how you want it on the wall. Unless you're using plain, non-patterned paper, you'll need to know which piece to put where and how before you 'actually put it in place. The edges that touch should line up perfectly – if they don't, cut them to size or overlap them so that they do (or don't, depending on your preferences). Place them on the floor how you want them to look on the wall.
- Sometimes it works having a tiled look. That part is up to you – do you want them to be one cohesive pattern or a whole bunch of mini patterns?
-
3Place double-sided tape on all edges of each paper. Now that you have every piece sprawled out on the ground, flip it over and place double-sided tape on every edge. Start at one corner and work your way out.
- Don't skip a corner. If you do, you might end up with an edge of the paper coming up from the wall, and that is not a cute look for your interior decorating style.
-
4Start placing the sheets, peeling one edge of tape at a time. As you're holding the sheet of paper to the wall, start peeling the edge of one piece of tape, smoothing the paper against it as you go. As that part is secured to the wall, peel another piece of tape and smooth that side. Going one at a time will help get rid of any bubbles and make sure the paper lies flush against the wall.[1]
- Adjust as necessary. You may find that the piece of tape moves the paper just the teeniest bit, but somehow miraculously knocking off your entire pattern. In that case, just adjust. There's a reason you're using paper on your walls and not paint, you know.
-
5Keep placing the sheets until you're finished. Again, start from one corner and work your way out to keep your pattern cohesive and make it easier for you to place. If there's an excess paper hanging off the edges, take scissors or a box cutter to the edge and cut it right off. Then, that's literally it. Who knew it could be so simple?
- If you end up getting a bit sloppy, don't fret. Just cut off the dimensions you messed up or let it overlap. An exacto knife and a rule work wonders, but odds are no one will notice the overlap if you go the lazy route instead!


Using Book Pages
-
1Cut out pages from an old book. Think about how cool it would be if you had excerpts of your favorite book lining your wall. Pretty neat, huh? If you're willing to part with a copy, you can do just that. Carefully take a box cutter or exacto knife to the pages and cut them out close to the seam. Instant wallpaper.
- When you're finished, look at their sizes. Are they different? If so, you may wish to cut them all to the same size. That being said, there's no rule that says they have to be the same size. Heck, you could use multiple books that all have different size pages. It just depends on whether you want a more tile-like or collage-like feel.
-
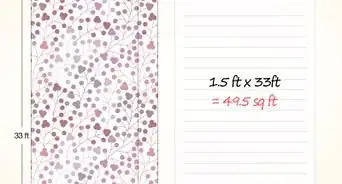
2Measure your pages and wall. How big are the papers that you're working with? Now, how big is your wall? It's gonna go a lot easier if you don't have to stop halfway through to cut out more paper (or, heaven forbid, buy another book). Knowing your measurements beforehand will let you know if you have to cut them to a different size, too.
- Let's say your wall is 70” across and 90” tall. Your papers are 7” across and 10” tall. Length-wise, you're fine: that's 9 sheets of paper at 10” tall, making 90”. But for the width, do you want 11 sheets that are 7” across and one sheet that's 3” or do you want to size them all down to 5” to make it perfect, or, say, 6.75” to make it “just about” right?
-
3Plan out your design. Odds are no two of your pages are the same, so what do you want the final wall to look like? Clear out a large area (like a big table or the floor), and start setting up your papers like you want them to look. You'll be glad you spent this time later when you don't have all the footnotes section accidentally lumped together.
- Because you're working with free-standing pages right now, be sure to turn off any fans and close the winds – or else you're going to have to enlist the help of a bunch of paperweights.
-
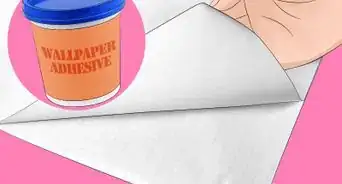
4Brush the backs of the pages with wallpaper paste and place. One at a time, brush the back of a page and place it on the wall. Start at a corner so it's easy to spread out from there. Don't try to do a bunch of gluing and then a bunch of placing – you don't want the paste to start drying on you.[2]
- After each page, take a second to make sure it's aligned correctly. If it's not, you still have time right then to adjust it before the paste dries.
-
5Seal with a surface top coat. Once all the pages are on the wall just how you like them, you're almost done. All that's left is sealing them with a non-yellowing, clear surface top coat. These come in both liquid and spray forms, but spray is much easier to work with. Cover the entire area with a thin, even layer, let it dry, and you're done.
- Technically, you could use a colored seal or even spray it with glitter. That part is up to you!


Using Contact Paper
-
1Measure your walls to determine how much paper you'll need. Most contact paper comes in rolls that are 18” wide by 75” long.[3] That being said, there's also a grid on the back that can help you easily size it to fit your needs. How big are your walls?
- If you do need to cut the width of the paper, take a razor blade, exacto knife, or box cutter and use the grid on the back, following the lines. Unless you're cutting it into crazy shapes, this grid makes it super easy and lets you keep the ruler in its drawer.
-
2Make a template for your design. Contact paper comes in a bunch of different colors and patterns. However, if you go for white or solid-colored contact paper, you could always put your own design on top of that. Now's your chance to design your very own wallpaper. What'll it look like?
- Paint is the obvious medium of choice, but your template could be for just about anything – glitter, felt, washi tape, you name it. With the right kind of glue, heck, you could line your wallpaper with bells.
-
3Paint or design your contact paper. Once you have your template figured out (incorporating in the dimensions, of course), design away. Spread the paper out on the floor or on some large, cleared surface and get to being creative. This will be the funnest part!
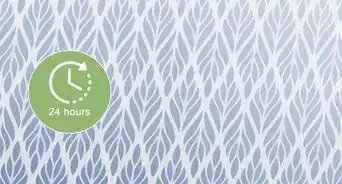
- Let each panel dry once you're done. Don't try to hang up the panels immediately – they'll need a solid 3-4 hours for you to safely work with them (depending on your design, that is).[4]
-
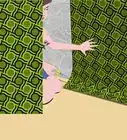
4With a buddy, slowly remove the backing and place on the wall, starting at the top. In one of the top corners of your wall, line up your paper with the backing still on. Once it's in place, start peeling off the backing slowly. As you do that and your friend is holding up the paper, have one of you smooth down the front as you go.
- Slowly move down the wall, in tandem smoothing and peeling off the back paper. Monitor your progress as you go – it's easy to inadvertently angle the paper to the right or left.
-
5Smooth out all the bubbles and adjust as necessary. As you're slowly going down your panel, smooth out all the bubbles before you continue adhering any further. This is easiest to do with a ruler or straight-edge, though the edge of your hand may work, too. You'll be glad you took your time – a wall full of bubbles probably isn't the look you're going for.
- The best part about contact paper is that usually it comes right off. So if you notice that you just flubbed up, immediately peel it back up and reapply. If you take swift action, pretty much any mistake with this DIY project can be remedied.


Things You'll Need
Using Fabric
- Scissors
- Fabric
- Water
- Measuring tape
- Pan
- Fabric starch
Using a Stencil
- Sponge or paint roller
- Stencil design
- Painter's tape
- Paint
- Stencil brush
- Paper towel
- Pencil
- Level
Using Decorated Paper
- Paper
- Double-sided tape
- Ruler or measuring tape
- Scissors, razor blade, or box cutter
Using Book Pages
- Book pages
- Scissors
- Ruler or measuring tape
- Wallpaper paste
- Non-yellowing sealer
Using Contact Paper
- Contact paper
- Art materials for design
- Ruler or level
- Scissors, exacto knife, or razor blade
- A friend (recommended)


References
About This Article
To make wallpaper with fabric, measure your wall space and cut the fabric to the correct dimensions. Next, apply a thin layer of starch to the top half of the wall, lay the fabric on top of the starch, and smooth out any wrinkles. Then, apply starch to the bottom half of the wall and slowly smooth the fabric over it in a downward motion. Finally, apply starch evenly to the fabric itself and let it dry completely. For tips on making wallpaper with materials like book pages and stencils, read on!