X
This article was co-authored by wikiHow Staff. Our trained team of editors and researchers validate articles for accuracy and comprehensiveness. wikiHow's Content Management Team carefully monitors the work from our editorial staff to ensure that each article is backed by trusted research and meets our high quality standards.
The wikiHow Tech Team also followed the article's instructions and verified that they work.
This article has been viewed 327,316 times.
Learn more...
This wikiHow teaches you how to use the "Liquify" filter built into Adobe Photoshop to make yourself appear more trim in a photograph.
Steps
Part 1
Part 1 of 4:
Preparing the Image
-
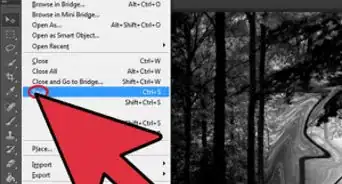
1Open an image in Photoshop. To do so, double-click on the blue app icon that contains the letters "Ps," click on File in the menu bar at the top of the screen, click on Open... and select the image.
-
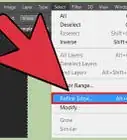
2Click Layers in the menu bar.Advertisement
-
3Click Duplicate Layer… in the drop-down and click on OK.
- You can give your new layer a different name otherwise it will be called "[Name of your first layer] copy."
-
4Click the "eye" icon next to the Background layer. It's in the Layers window in the lower-right part of the screen.
- This makes the Background layer invisible but leaves the original image so you can make another duplicate to try out different effects.


Advertisement
Part 2
Part 2 of 4:
Using the Freeze Mask Tool
-
1Click the duplicate layer in the Layers window.
-
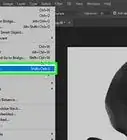
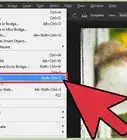
2Click Filters in the menu bar.
-
3Click Liquify….
- On Photoshop CS6 and earlier, check Advanced in the left pane of the window.
-
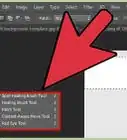
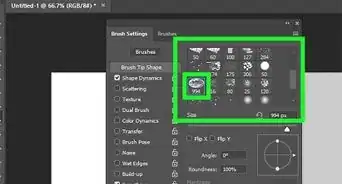
4Click the Freeze Mask Tool. It looks like a paintbrush with a gradient rectangle in the tool menu in the upper-left corner of the dialog box.
- Use the "Brush Size" and "Brush Pressure" settings in the right pane of the window to adjust the size and sensitivity of the brush. Smaller brushes will make for better details.
- Use "+" and "-" signs in the bottom-left of the dialog box to increase or reduce the size of the image.
-
5Use the Freeze Mask tool to draw over the parts of the image you don't want to change. For example, if you are trying to make your calf look thinner, draw along the parts of the calf that you want to stay in the image.
- Be careful not to over exaggerate the lines or the image will not appear realistic.


Advertisement
Part 3
Part 3 of 4:
Using the Forward Warp Tool
-
1Click the Forward Warp Tool. It looks like a downward-pointing finger in the tool menu in the upper-left corner of the dialog box.
- Use the "Brush Size" and "Brush Pressure" settings in the right pane of the window to adjust the size and sensitivity of the brush. A smaller brush will yield better results with this tool.
-
2Use the Forward Warp Tool to drag unwanted parts of the image toward the mask lines. For example, gently drag the parts of the calf you want to eliminate toward the mask lines you drew.
- It may take a couple times before you get the feel of the Forward Warp tool. Because the tool alters the shape of the pixels over which you drag it, the image can become overly-distorted very easily.
- Click Restore All in the right pane to undo the changes you've made and start over.


Advertisement
Part 4
Part 4 of 4:
Using the Pucker Tool
-
1Click the Pucker Tool. It looks like a square whose sides have been pressed inward in the tool menu in the upper-left corner of the dialog box.
- Use the "Brush Size" and "Brush Pressure" settings in the right pane of the window to adjust the size and sensitivity of the brush. A smaller brush will yield better results with this tool.
-
2Click or drag the Pucker Tool over unwanted parts of the image along the mask lines. For example, click along the mask lines you drew to get rid of the parts of the calf you want to eliminate from the image.
- The Pucker Tool works great to trim an image quickly, but it's very easy to overdo it and get some strange visual effects.
- Click Restore All in the right pane to undo the changes you've made and start over.
-
3Click OK in the right pane when you are satisfied with the results.
-
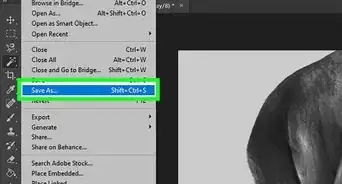
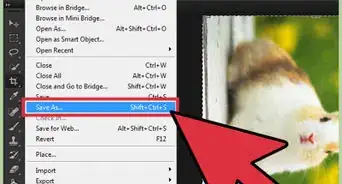
4Save your image. Do so by clicking on File in the menu bar and Save As…. Name your file and click on Save.


Advertisement


About This Article

wikiHow Staff
wikiHow Staff Writer
This article was co-authored by wikiHow Staff. Our trained team of editors and researchers validate articles for accuracy and comprehensiveness. wikiHow's Content Management Team carefully monitors the work from our editorial staff to ensure that each article is backed by trusted research and meets our high quality standards. This article has been viewed 327,316 times.
How helpful is this?
Co-authors: 17
Updated: July 1, 2021
Views: 327,316
Categories: Editing Photos Using Photoshop
Advertisement