This article was co-authored by Adam Kealing. Adam Kealing is a Professional Photographer based in Austin, Texas. He specializes in general wedding, destination wedding, and engagement photoshoots. Adam has over 11 years of photography experience. His work has been featured in Green Wedding Shoes, Style Me Pretty, Once Wed, and Snippet Ink. His work has won numerous awards with Fearless Photographers and Masters of Wedding Photography.
There are 8 references cited in this article, which can be found at the bottom of the page.
The wikiHow Tech Team also followed the article's instructions and verified that they work.
This article has been viewed 554,600 times.
Photoshop is to digital photographers what the dark room was to film photographers. Everyone, from professionals to hobbyists, gets their best photos after a little bit of touch up. The best way to turn a good shot into a great photograph is to fine-tune your image in "post," editing it to perfection.
Steps
Improving Color and Clarity
-
1Use the Brightness/Contrast sliders to get dark, complete blacks and vivid whites. No matter what picture you're editing, the difference between your darkest areas and your lightest areas (called Contrast) should be distinct. This leads to more compelling photos. Your goal is a well-lit picture with deep, dark blacks and bright, well-defined whites. Use the brightness to make sure the picture is still clear as well.
- Click "Image" → "Adjustments" → "Brightness/Contrast..."
- Make sure "Preview" is checked so you can see how the image changes as you move the slider.
- Almost all images can benefit from 10-15 points of higher contrast, at the least.
-
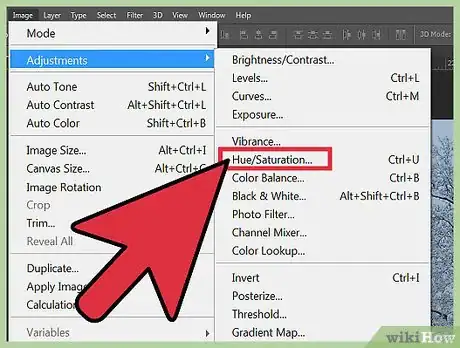
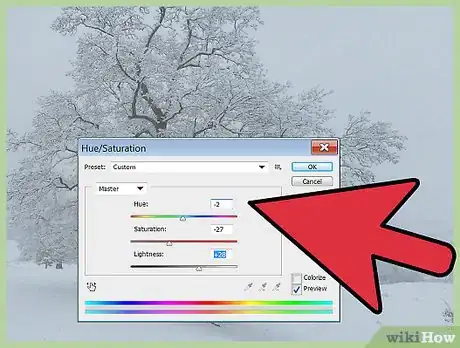
2Increase an image's Saturation to make the colors more vibrant and eye-popping. Going too far can make the picture look like something out of Willy Wonka, but saturation is a necessary adjustment in almost every shot, especially with a lower-cost camera.
- Click "Image" → "Adjustments" → "Hue/Saturation."
- Increase saturation by 5-10 points, adding a few points at a time until you hit your desired level.
- Slide the saturation bar all the way to the left to put the picture in black and white.
Advertisement -
3Edit the picture's hue if the whole thing is tinted the wrong color. This can happen under some indoor lights, which can make the whole shot look yellow or green. Hue settings, found along with Saturation, let you change the overall color palate of the picture for strange, artsy effects or to correct these all-over color issues.
- Click "Image" → "Adjustments" → "Hue/Saturation."
- Even small changes to Hue can make dramatic effects, so work slowly.
-
4Use the "Shadows/Highlights" settings to remove any overly bright areas and weaken dark shadows. The most common use of this is when the sun forms a big, unsightly bloom of white light in the corner of the picture, washing out part of the actual photo. Alternatively, it helps when a shadow obscures half of someone's face. Shadow/HIghlights targets the lightest and darkest parts of a shot directly while leaving the other areas intact:
- Click "Image" → "Adjustments" → "Shadows/Highlights."
- Lower the Shadow slider to make the dark areas lighter.
- Raise the Highlight slider to darken up any bright areas.[1]
-
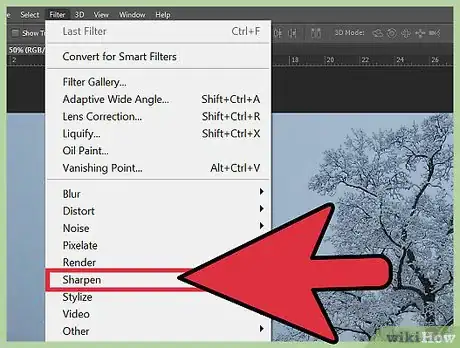
5Use the Sharpen filter to help combat semi-blurry or out of focus shots. This filter is not god, and can't fix seriously blurry photos. But it can make a serious difference for slightly "soft" shots, bringing back some clarity and definition in the photo's lines. To use it:
- Click "Filter" from the top Menu.
- Under "Sharpen...", choose "Sharpen" for a minor adjustment, and "Smart Sharpen" for a more detailed effect.
- Under "Smart Sharpen," use "Amount" to choose how severely you'll sharpen sharpen, "radius" to make more precise lines, and "Reduce Noise" to smooth out any over-sharpened areas.[2]
-
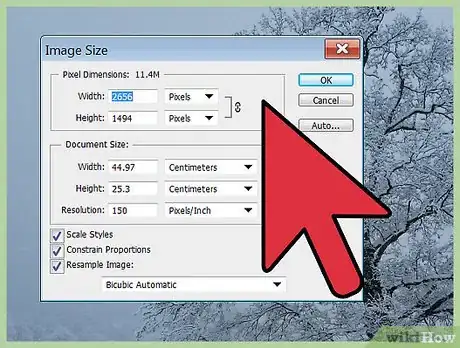
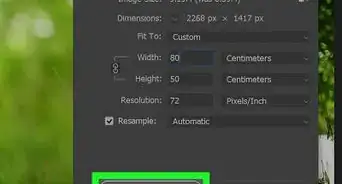
6Consider shrinking very blurry or lower-quality images to minimize the problem. The bigger the image, the more apparent the blemishes and issues. Shrinking the image will provide some clarity, as the pixels are more compact and our eyes do a better job filling over blurry or grainy areas. To shrink an image:
- Click "Image" → "Image Size."
- Choose whether or not to change the size in inches, pixels, or even as a percentage of the original.
- Make sure the chain icon is on -- this keeps the proportions of your new image the same instead of shrinking it unevenly.
- Cut 25% or so of the image, shrinking more if needed.
Improving Composition & Blemishes
-
1Crop pictures using the "Rule of Thirds" as a guide for compelling shots. Never assume a photo's original framing is the best option available. The Rule of Thirds is one of photography's oldest and most trusted guides. It states that if you cut the image in thirds horizontally and vertically (making 9 mini squares), the most interesting elements should always be the lines and intersections. In Photoshop, these lines appear automatically when cropping, making it easy to improve.
- Even small crops can dramatically improve a photo. Are there any unnecessary elements in the corners of the frame that you can eliminate to focus on more interesting things?
- Always put major lines, like the horizon in the example above, on a third line.
- To crop a photo, press "C" to pull up the crop tool.[3]
-
2Use the Red Eye Tool to simply clean up the eyes of any portraits. The Red Eye Tool is found under the Patch tool, which is found underneath the eyedropper icon in your toolbar. You can also press J to bring up the Patch tool, then click and hold on the icon to reveal the red eye tool. Once you have it, simply click and drag over the eyes to remove red eye.[4]
-
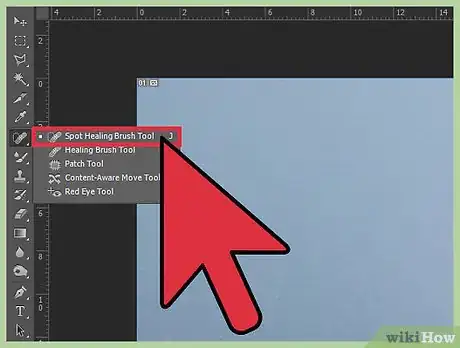
3Play with the spot healing brush to remove small blemishes. Want to get rid of that small pimple on your forehead? The spot healer is here to help. Click and hold the Patch tool (press "J") to find it, as it will pop up in the small menu under the Patch tool. This tool simply replaces the spot you click on with pixels surrounding it, blending them in perfectly. This means thin, small issues, like a zit or a power-line in the background, can be quickly erased without ruining the image.
- The healing brush works similarly, but you can tell it which pixels to replace from. To select the "healing area," hold the Alt/Opt key, click once, then start healing your blemish area.
-
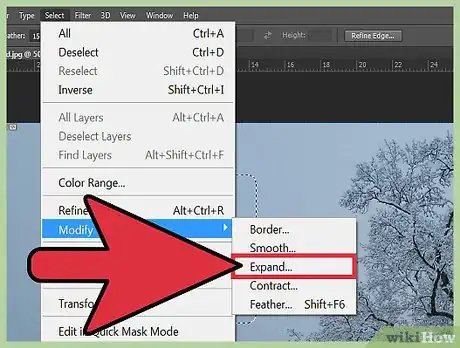
4Use the Content-Fill effect to remove objects and simple imperfections. For example, imagine there was some dirt on the lens that you missed, which put a big brown spot in the sky of your beautiful landscape shot. Content-fill can cover it up for you. To do so, use Quick Selection tool (found under the Lasso icon) to select the smudge. From there:
- Click "Select" → "Modify" → "Expand."
- Expand the selection by 5-10 pixels.
- Select "Edit" → "Fill."
- Select "Content Aware" in the Fill, dialogue box and select "okay."[5]
-
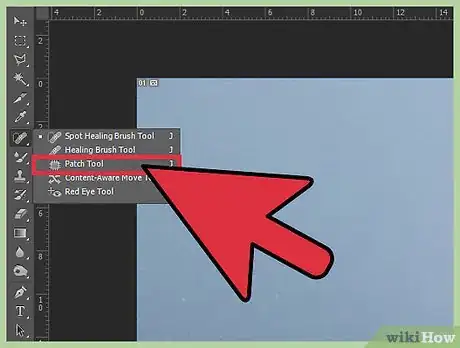
5Use the patch tool to replace small sections of a photo with another section of the photo. Imagine you've got a great shot of a soccer player in action but there is one fan in the background up against a fence that you want out of there. Of course, you need to remove him while keeping the fence, which may seem impossible when he's covering the fence up! The patch tool will take another section of the fence and duplicate it over your man to replace him.
- Use a selection tool (like "Quick Selection") to select the thing you want to be removed.
- Select the Patch Tool by pressing J. It can also be found underneath the eyedropper icon.
- Click on the selected area (the place you're replacing), but don't let go of the mouse.
- Drag the selected area to the spot you want to replace it with and let go of the mouse.[6]
Working Effectively in Photoshop
-
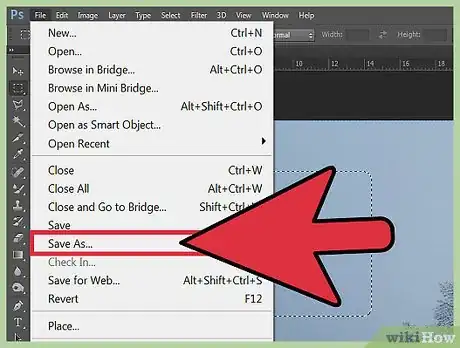
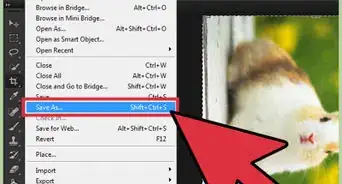
1Use the "Save as a Copy" feature to make a duplicate image before editing. It is the best practice, especially if you're new to digital editing, to always save a copy of your image before working on it. This allows you to experiment and edit without worrying about making a mistake. While you can also click "Undo," this gets much harder if you're trying multiple things at once, like cropping, tinting, sharpening, etc.
- Click "File" → "Save As," or simply press Ctrl+Shift+S (Windows) or Cmmd+Shift+S.
- At the bottom of the "Save As" menu, click "Save as a Copy."
-
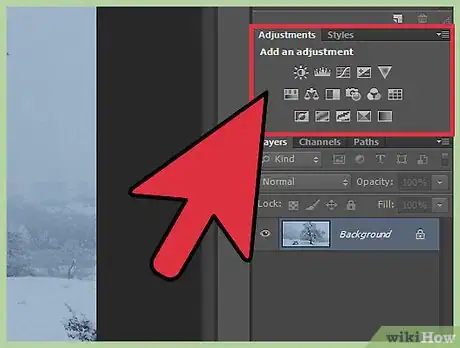
2Learn the power of Adjustment Layers to gain permanent control of most edits. The last thing you want to do is experiment color, contrast, saturation, etc. and not have the ability to fix it when you go too far. While you should always save a separate copy of an image before editing, Adjustment masks let you keep tinkering with these setting at any point in the future, including turning them on/off, without using "Undo."
- Click "Window" in the top bar.
- Select "Adjustments."
- Choose your adjustment, from Brightness/Contrast to Gradient Maps. Note how a new layer is created.
- Delete, re-order, or change the opacity of your layers at any time, or double-click to change the settings.[7]
-
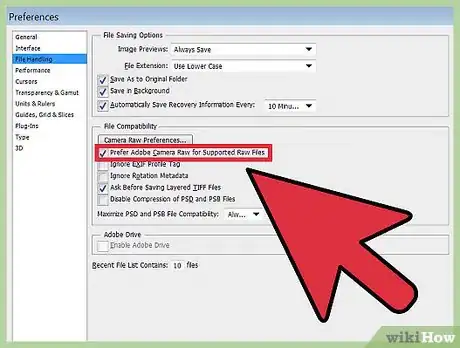
3Set Photoshop to open photos in "Camera Raw" mode to quickly fine-tune any photo without ruining the original. Camera Raw opens a new copy of your picture with sliders for color temperature, contrast, light control, clarity, saturation, and cropping. This allows you to make quick, basic changes with real-time sliders and effects. It will appear automatically when the picture is open if you set it properly:
- Click on "Photoshop" in the upper left corner.
- Click on "Preferences" → "File Handling"
- Under "File Compatibility," check "Prefer Adobe Camera Raw for Supported Raw Files."
- Click on "Camera Raw Preferences" and set JPEG and TIFF Handling to "Automatically Open all Supported."[8]
-
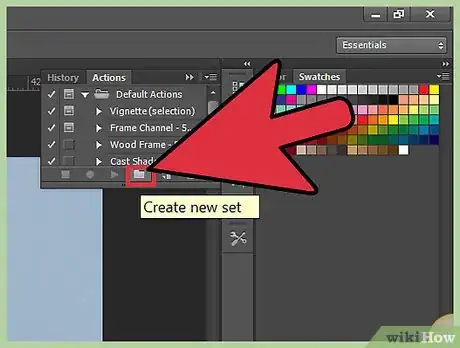
4Use "Batch Commands" to make the same edits on multiple photos automatically. Say, for example, you know that most of your images are a bit too dark, and they all could use an extra 10 points of Brightness. Instead of manually editing each photo, you can teach Photoshop to do it for you on many pictures at once. For learning's sake, say you want to add 10 points Brightness to 15 images:
- Click "Window" ↠ "Action" to bring up the Actions menu.
- Click "New Action" in the bottom of the menu and name it after whatever you're doing. The button looks like a sticky note.
- Click on "Image" → "Adjustments" → "Brightness/Contrast" and add your 10 points Brightness like normal.
- Click the square "Stop" button in the actions menu to end the recording.
- Click "File" → "Automate" → "Batch" from the top bar.
- Under "Play," select the action you just made (it will be whatever you titled it).
- Select "Choose..." and select the photos you want to edit.
- Check the boxes "Suppress File Open Option Dialogs" and "Suppress Color Profile Warnings" and hit OK to edit your images all at once once.[9]
Expert Q&A
Did you know you can get expert answers for this article?
Unlock expert answers by supporting wikiHow
-
QuestionHow do I improve image quality in Photoshop?
 Adam KealingAdam Kealing is a Professional Photographer based in Austin, Texas. He specializes in general wedding, destination wedding, and engagement photoshoots. Adam has over 11 years of photography experience. His work has been featured in Green Wedding Shoes, Style Me Pretty, Once Wed, and Snippet Ink. His work has won numerous awards with Fearless Photographers and Masters of Wedding Photography.
Professional Photographer
-
QuestionHow do I change my background in Photoshop?
 Community AnswerMake a path using the pen tool to your subject, or select your subject using the magic wand. Then, inverse the selection and delete or change the background.
 -
QuestionWhat is the cost for Photoshop?
 Community AnswerDepends on the version and where you buy it. The latest version may cost around $79.99-$99.99, unless you are able to find a special deal somewhere, get it on eBay, or something like that.
Things You'll Need
- Photoshop, Digital camera
References
- ↑ https://helpx.adobe.com/photoshop-elements/using/adjusting-color-saturation-hue-vibrance.html
- ↑ http://www.peachpit.com/articles/article.aspx?p=2224031&seqNum=2
- ↑ http://www.photographymad.com/pages/view/rule-of-thirds
- ↑ http://graphicdesign.stackexchange.com/questions/13703/how-do-you-use-the-redeye-tool-in-photoshop-cs5
- ↑ http://planetphotoshop.com/removing-objects-with-content-aware-fill-and-patch-in-photoshop-cc.html
- ↑ http://planetphotoshop.com/removing-objects-with-content-aware-fill-and-patch-in-photoshop-cc.html
- ↑ https://helpx.adobe.com/photoshop/using/adjustment-fill-layers.html
- ↑ http://layersmagazine.com/editing-jpegs-and-tiffs-in-adobe-photoshop-camera-raw.html
- ↑ https://www.itg.ias.edu/content/editing-batch-images-photoshop
About This Article
Working with a dull or blurry digital photo can be frustrating, but luckily, Photoshop can easily improve the look of your pictures. If your image looks too dark or flat, use the brightness and contrast sliders brighten it up and make the shadows and highlights more vivid. To fine-tune the lighting even more, use the shadows and highlights controls to separately adjust light and dark areas. You can also bring out or correct the colors in the picture with the hue and saturation controls. To fix a blurry image, use the “Sharpen” tool or shrink the image to make blurring and pixilation less obvious. Keep reading for tips on how to improve image composition with the “Crop” tool!

