This article was co-authored by wikiHow Staff. Our trained team of editors and researchers validate articles for accuracy and comprehensiveness. wikiHow's Content Management Team carefully monitors the work from our editorial staff to ensure that each article is backed by trusted research and meets our high quality standards.
This article has been viewed 36,708 times.
Learn more...
The kazoo is a fun musical instrument that's made of a hollow pipe connected to small, round holes. When you blow air into the pipe, it's carried into a thin barrier that bounces it back and forth through the kazoo to make a cool buzzing sound. Luckily, it's not that hard to make one—you can make a simple kazoo out of a comb or toilet paper roll, or a more complicated one out of wood!
Steps
Making a Kazoo with a Comb
-
1Purchase a fine-toothed pocket comb for your kazoo. You can purchase pocket combs from beauty supply and big-box stores. Select models that are 3 to 5 inches (7.6 to 12.7 cm) long and around 1 inch (2.5 cm) wide.[1]
- Don't purchase combs more than 1 inch (2.5 cm) wide or they won't work with your wax paper.
-
2Cut a 2 by 2 inch (5.1 by 5.1 cm) square from wax paper. Make sure that the square is a bit smaller than your comb's length and double its height. A 2 by 2 inch (5.1 by 5.1 cm) square should work for a fine-toothed pocket comb.[2]
- Use recycled wax paper from old gift wrap or cereal boxes, or purchase some from a grocery store.
- Don't use scissors without the help of your parents!
Advertisement -
3Fold your wax paper in half and place it over the comb's teeth. After folding the paper in half, press down on the folded edge to create a seam. Place this seam over the exposed teeth of your comb so that the wax paper extends toward the bottom of the comb and one layer of paper is on each side.[3]
- Position the square in the center of the comb.
- Try different types of wax paper, wrapping paper, and tissue paper to create different sounds.
-
4Attach the wax paper to the comb with a piece of tape. Break off a small piece of tape and use it to attach the open ends of the wax paper to the comb. Don't attach the paper too tightly or you will affect the vibration of your kazoo.[4]
- Use transparent tape for the best results.
-
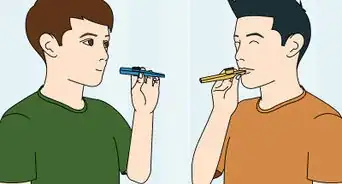
5Hum against the wax paper to create sounds. Make sure your lips are dry and put them against the paper along the teeth of the comb while holding it horizontally. Hum to play the kazoo. If you need to, adjust the tension of the wax paper to change the sound. Remove the tape and attach it higher up on the comb to decrease tension or lower to increase tension.[5]
- For the best results, hum into the kazoo instead of singing or blowing.
- Don't get the wax tissue wet or you will affect your kazoo's sound quality.


Creating a Cardboard Kazoo
-
1Poke a hole 2 inches (5.1 cm) from the end of a toilet paper roll. Mark 2 inches (5.1 cm) from the end of the tube with a pen or pencil. Now, place the pen or pencil vertically over the mark and press down until it pokes through the paper roll.[6]
- Be sure to press the pen or pencil completely through the roll. Afterward, the hole should be as big as the pen or pencil's circumference.
-
2Cut a square of wax paper 1 to 2 inches (2.5 to 5.1 cm) wider than the tube's diameter. The diameter is the width of the circle from one end to the other passing through its center point. Use a ruler or measuring tape to measure the diameter of one of the roll's ends. Mark off the measurement on the paper and then cut it. For example, if your tube has a diameter of 4 inches (10 cm), your square should be 5 to 6 inches (13 to 15 cm) in width.[7]
- Depending on the brand, the diameter of the roll should be anywhere from 4 inches (10 cm) to 4.5 inches (11 cm) wide.
- Buy wax paper at any grocery or big-box store.
-
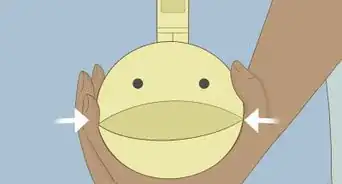
3Wrap the wax paper over the end of the tube with a rubber band. Place the wax paper over the end closest to the hole. Keep the paper centered so that it wraps over the tube evenly. Now, wrap a rubber band around the tube to hold the wax paper in place.[8]
- Cut off the excess paper below the rubber band with a pair of scissors.
-
4Press the open end lightly against your mouth and blow. As you blow, making singing or humming sounds, such as "duh" and "doo." Place your finger lightly over the hole on top of the kazoo as you blow into it. Press down to decrease airflow and release to increase airflow—this will change the sound of the notes the kazoo makes![9]
- Make sure your lips are dry to get the best quality sounds.


Making a Wooden Kazoo
-
1Purchase a 1 inch (2.5 cm) thick piece of hardwood. Visit a home hardware store and look at their selection of hardwood. Find a piece that is 4 inches (10 cm) long and 2 inches (5.1 cm) wide.[10]
- If you can't find the right dimensions, ask a staff member to cut a piece for you.
-
2Set the blade depth of your circular saw to 1⁄4 to 1⁄2 inch (0.64 to 1.27 cm). Place your hardwood piece onto a flat surface. Now, align the saw along the width of the hardwood so you can see how far the blade extends below it. Loosen the depth-adjusting knob or lever and pivot the base of the saw until the blade is 1⁄4 to 1⁄2 inch (0.64 to 1.27 cm) below the wood. Afterward, tighten the knob or lever.[11]
- Purchase a circular saw from a home improvement or big-box store.
- Don't try making a wooden kazoo without the help on an adult! Circular saws can be dangerous and should never be used without supervision.
-
3Remove a 1⁄2 inch (1.3 cm) wide strip from the hardwood. Use a measuring tape and pencil to mark 1⁄2 inch (1.3 cm) from the top of the 2 inch (5.1 cm) width of the hardwood. Hold the hardwood down firmly with your non-dominant hand and use your dominant hand to guide the saw across to wood. Be sure to apply downward pressure with your non-dominant hand to hold the wood steady.[12]
- After removing the strip, you should have a base piece of hardwood 4 inches (10 cm) long and 1.5 inches (3.8 cm) wide.
- Your remaining strip should be 4 inches (10 cm) long and 0.5 inches (1.3 cm) wide.
-
4Mark 3 vertical lines on the thin strip for your kazoo's holes. After removing the thin strip, measure 1.375 inches (3.49 cm) from one end of it. Now, draw a vertical line at this location—this is where the air holes will go. From here, measure 3⁄4 inch (1.9 cm) in each direction from this line and mark 2 more vertical lines. This is where you will drill each of the screw holes that attach the base to the strip.[13]
- Draw a circle in the center location on each of these vertical lines to guide your drilling.
-
5Clamp both pieces of wood together. Press both pieces of wood together—as if they were never cut apart—and place them between a clamp. Now, tighten the clamp, making sure that each piece is perfectly aligned with the other.[14]
- If you notice the wood pieces are not perfectly aligned, loosen the clamp slightly, realign them, and retighten it.
-
6Drill 3 3⁄32 inch (0.24 cm) wide pilot holes on the vertical lines. Attach a 3⁄32 inch (0.24 cm) bit to an electric drill. Align your drill bit into the center of each vertical line, press the trigger, and apply firm pressure downward. Drill 13⁄16 inch (2.1 cm) deep into the center hole (where air will exit) and 1⁄2 inch (1.3 cm) deep into the outside holes (screw holes).[15]
- Wrap masking tape around the drill bit and mark the 13⁄16 inch (2.1 cm) and 1⁄2 inch (1.3 cm) points using a pen to mark the depth.
-
7Increase the diameter of the center hole to 1⁄2 inch (1.3 cm). Start by using a 5⁄32 inch (0.40 cm) bit, followed by a 13⁄64 inch (0.52 cm) bit, and then a 1⁄4 inch (0.64 cm) bit. Now, increase your bit size by 1⁄16 inch (0.16 cm) until the diameter of the hole is 1⁄2 inch (1.3 cm).
- Be sure to increase the diameter for the entire 13⁄16 inch (2.1 cm) of the center hole's depth.
-
8Drill 1⁄4 inch (0.64 cm) deep into the center holes. Put a 7⁄32 inch (0.56 cm) bit on your drill. Now, drill 1⁄4 inch (0.64 cm) deep into each of the center holes.[16]
-
9Drive 2 wood screws into the center holes. Use 1⁄2 by 4 inch (1.3 by 10.2 cm) roundhead wood screws. Place your screws into the center holes and drive them down with your electric drill so that the heads are beneath the surface of the wood.[17]
- Purchase wood screws from a home hardware store.
-
10Drill a 3⁄32 inch (0.24 cm) pilot hole into the center of the base's width. Be sure it's on the width closest to the length of the base that you began taking your initial measurements from. Mark the center of the width at the spot 2 inches (5.1 cm) from the top or bottom. Drill the hole 1.625 inches (4.13 cm) deep and then increase the diameter of the hole to 1⁄2 inch (1.3 cm). This creates an "L"-shaped airway that connects that strip and the base.[18]
- Make sure the hole runs perpendicular to the 3 pilot holes.
- Increase the diameter by progressing from a 5⁄32 inch (0.40 cm) bit, followed by a 13⁄64 inch (0.52 cm) bit and then to a 14 inch (36 cm) bit. From here, increase the bit size by 1⁄16 inch (0.16 cm) until you get the desired diameter.
-
11Create a 1⁄8 inch (0.32 cm) pilot hole on the opposite end of the base. Now that you have an "L"-shaped airway in your wood, mark off the center on the opposite end of the base directly across from the blowhole. Drill a 1⁄8 inch (0.32 cm) pilot hole into this location all the way to the blowhole. Now, increase the depth to 3⁄16 inch (0.48 cm).
- Draw a horizontal line from the blowhole to the opposite end of the wood to help you align the new hole.
-
12Fasten a plastic garbage strip across the holes in the base wood piece. Cut a plastic garbage bag strip 11⁄16 by 2 inches (1.7 by 5.1 cm). Now, remove the screws from the 2 outside holes, take the strip off, and lay the plastic over them. Finally, place the strip back onto the base and reattach the screws.[19]
- You can also swap the garbage bag with a piece of wax paper.
-
13Blow into the blowhole while humming to create sounds. Press your lips firmly against the blowhole. Press your tongue against the roof of your mouth to make different sounds and cover the holes of the kazoo as you blow to change the notes.[20]
- Make “duh" and "doo" sounds as you blow to create different sounds.


Community Q&A
-
QuestionCan I make one from aluminium?
 Yol VerinriiCommunity AnswerYes, you can if you know how to work with a different material. Some kazoos are commonly made from metal, wood, plastic or even glass.
Things You'll Need
Making a Kazoo with a Comb
- Scissors
- Wax paper
- Comb
- Transparent tape
Creating a Cardboard Kazoo
- Toilet paper roll
- Rubber band
- Pen or pencil
- Wax paper
- Scissors
Making a Wooden Kazoo
- 1 inch (2.5 cm) thick hardwood
- Roundhead wood screws
- Sandpaper
- Garbage bag
- Electric drill and bits
- Screwdriver
- Crosscut and rip saws
- Scissors


-Step-17-Version-4.webp)


References
- ↑ https://ourpastimes.com/how-to-make-a-kazoo-out-of-a-comb-12302951.html
- ↑ https://ourpastimes.com/how-to-make-a-kazoo-out-of-a-comb-12302951.html
- ↑ https://ourpastimes.com/how-to-make-a-kazoo-out-of-a-comb-12302951.html
- ↑ https://ourpastimes.com/how-to-make-a-kazoo-out-of-a-comb-12302951.html
- ↑ https://ourpastimes.com/how-to-make-a-kazoo-out-of-a-comb-12302951.html
- ↑ https://pbskids.org/ptframe/pt_content_shell.html?/fetch/parentsteachers/activities/act/act-whatsthebuzz.html
- ↑ https://pbskids.org/ptframe/pt_content_shell.html?/fetch/parentsteachers/activities/act/act-whatsthebuzz.html
- ↑ https://pbskids.org/ptframe/pt_content_shell.html?/fetch/parentsteachers/activities/act/act-whatsthebuzz.html
- ↑ https://pbskids.org/ptframe/pt_content_shell.html?/fetch/parentsteachers/activities/act/act-whatsthebuzz.html
- ↑ https://boyslife.org/hobbies-projects/projects/7346/how-to-make-a-kazoo/
- ↑ https://www.familyhandyman.com/tools/circular-saws/circular-saw-tips-and-techniques/view-all/
- ↑ https://boyslife.org/hobbies-projects/projects/7346/how-to-make-a-kazoo/
- ↑ https://boyslife.org/hobbies-projects/projects/7346/how-to-make-a-kazoo/
- ↑ https://boyslife.org/hobbies-projects/projects/7346/how-to-make-a-kazoo/
- ↑ https://boyslife.org/hobbies-projects/projects/7346/how-to-make-a-kazoo/
- ↑ https://boyslife.org/hobbies-projects/projects/7346/how-to-make-a-kazoo/
- ↑ https://boyslife.org/hobbies-projects/projects/7346/how-to-make-a-kazoo/
- ↑ https://boyslife.org/hobbies-projects/projects/7346/how-to-make-a-kazoo/
- ↑ https://boyslife.org/hobbies-projects/projects/7346/how-to-make-a-kazoo/
- ↑ https://boyslife.org/hobbies-projects/projects/7346/how-to-make-a-kazoo
About This Article

You can make a simple kazoo by attaching a piece of wax paper to the teeth of a comb. Almost any fine-toothed comb you find around the house will do. However, if it’s more than 1 inch wide, your kazoo won’t work. Once you’ve found a comb, cut a 2 by 2 inch square from a piece of wax paper. Next, fold your wax paper in half and sandwich the comb in the middle of the two halves. To finish your kazoo, loosely attach the open ends of the wax paper to your comb with a couple of small pieces of tape. Now you can make some noise by bringing the wax paper to your lips and humming! For more tips, like how to make a kazoo from a cardboard tube, read on!