wikiHow is a “wiki,” similar to Wikipedia, which means that many of our articles are co-written by multiple authors. To create this article, 13 people, some anonymous, worked to edit and improve it over time.
This article has been viewed 109,390 times.
Learn more...
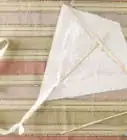
Kites are a fun toy for kids to play with on a windy day. They can provide hours of fun for kids of all ages. A basic kite is easy enough for a kid to make with a little help from an adult, and it can be made with a few supplies from the craft store! A child will delight in seeing their own homemade kite flying high in the sky!
Steps
Making the Frame
-
1Gather all the materials needed to make the frame. It’s helpful to have your materials close by and ready for you to quickly and easily make the frame. You can get these materials at your local craft store.
- 4 wooden dowels that are 3/16 inch in diameter
- Hand saw
- Craft knife
- String, twine, or fishing line
-
2Cut 3/16 inch diameter wooden dowels to the length of your kite supports. The vertical support of the kite will measure 24 inches. The horizontal support of the kite will measure 20 inches. Make sure to ask an adult for help when cutting the dowels.
- Measure the lengths of the dowels.
- Mark the dowels with a pencil at the desired length.
- Cut the dowels with a hand saw to prevent splintering.
Advertisement -
3Cut notches into the dowels. Use a craft knife to cut small notches into the ends of the dowels. Cut a notch on each end of the dowel perpendicular to the length of the dowel. The notch should go across the dowel, not be in line with it.
- Craft knives are very sharp, so make sure to get an adult to help you with cutting or cut the notches for you.[1]
-
4Mark the dowels. Use a ruler and your pen, pencil or marker to make measurements on the two dowels.[2]
- On the 24 inch dowel, make a mark 6 inches from one end.
- One the 20 inch dowel, make a mark 10 inches from one end.
-
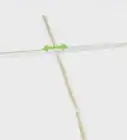
5Align the two dowels. Line up the two marks you made on the dowels by placing the shorter dowel on top of the longer dowel perpendicular to it. The two dowels should make a cross.
-
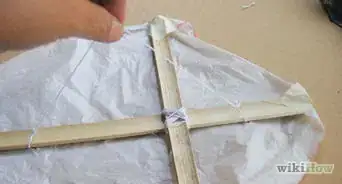
6Tie the dowels together. Use the string, twine, or fishing line to tie your dowels together where they meet in the center. Tie the string in a knot around the two dowels and then wrap the string around the dowels making an x shape as you wrap.[3]
- Hold the dowels perpendicular in a cross shape as you wrap the string around them.
- Make sure you are wrap the string tightly.
- Tie a knot in the string after you have securely fastened the two dowels together.
- Do not cut the string off after wrapping the dowels together, you will string the frame together next.
-
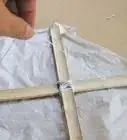
7Wrap the string around the outside of the frame of the kite. Bring the string up to top of the dowel cross and wrap it around the notch at the top.
- Pull the string around each of the four ends of the kite frame in a clockwise direction.
- Wrap the string around each dowel as you go around the frame.
- Bring the string back to the center to tie it off around the x in the center.[4]
- The string should be in the shape of a kite.
- Pull the string tight as you pull it around the dowels so it is taut.


Creating the Sail
-
1Pick material to make the sail from. You can make the sail of your kite from several different materials. Decide what look you want for your kite. Some materials can be decorated to make your kite unique. You can use any of the following:[5]
- Heavy duty garbage bag
- Lightweight paper
- Lightweight fabric
- Newspaper
- Plastic bag
-
2Get together all the materials needed to create the sail. You should have all of your tools and materials gathered in one place before you start a project.
- Material for the sail
- Scissors
- Strong tape
-
3Cut the sail of the kite. Lay the kite frame down on the sail material, and trace a slightly larger kite shape. The outline of the kite should be 1 to 2 inches bigger than kite frame. Use the scissors to cut out the kite shape on your sail material.
-
4Attach the sail to the kite frame. Fold the edges of the sail over the string on the frame and secure it with strong tape.
- Reinforce the top and bottom of your kite. Use tape to reinforce the top and bottom tips of your kite by placing 1 to 2 extra pieces of tape across them.


Attaching Your Kite’s String and Tail
-
1Gather the tools and materials needed to make the kite’s string and tail. Having all of your materials in one place before you begin will save you time as you are finishing up this project.
- Pen
- String
- Ribbon
- Tape
-
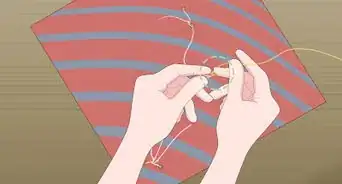
2Make the kite’s brindle. A kite’s brindle is a string that extends the length of the frame and has the flying string attached to it.
- Use a pen to poke a small hole in the top and bottom tips that you have reinforced with tape.
- Cut a 2 foot piece of string
- Tie the string in a knot around the top hole. Tie the other end to the bottom hole.
-
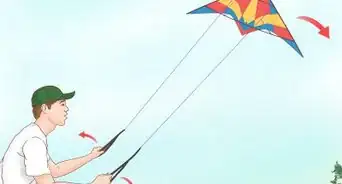
3Attach the flying string to the brindle above the point where the dowels cross.[6] Hold the kite up by the brindle. Find the point along the brindle where the kite hangs parallel to the ground; this is the spot where you want to attach the flying string. Tie the end of the string in a knot around the brindle. You will hold the rest of the string when you are flying the kite.
-
4Use the ribbon to create the kite’s tail. Attach the ribbon by tying it to the hole at the bottom tip, or by taping it to the bottom.
- Your tail should be about 6-20 feet long depending on the weight of your kite.
- Cut small pieces of ribbon to tie bows around the tail.
- Experiment with different lengths of tails for maximum stability.
-
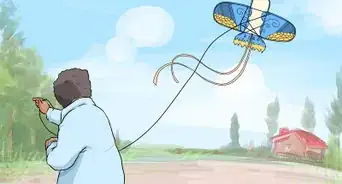
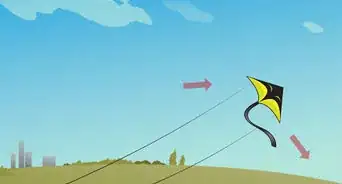
5Fly your kite. Take your kite out on a windy day to watch it fly! Bring tape with you to help fix any damages that might occur while flying or landing.


Community Q&A
-
QuestionHow do I make a kite if I don't have a hand saw?
 Community AnswerYou can simply cut it with either a knife or scissors, with a parent's supervision. A hand saw is just a more useful tool because it cuts the wood more precisely and neatly, but anything would do.
 -
QuestionDoes a kite need to have a tail?
 Community AnswerNot technically, no, but a kite without a tail will spiral and roll quite a bit, making it difficult to control.
 -
QuestionCan I cut a broomstick in half and use that in place of wooden dowels when making a kite?
 Larissa SementaCommunity AnswerNo. Brooms will just add unnecessary weight to the kite. Use wooden dowels. If you don't have them, use sticks you find outside.
Warnings
- Let an adult do the cutting with a craft knife and scissors. These are sharp and can easily cut you if you aren’t careful.⧼thumbs_response⧽
- The wood may splinter when cutting the dowels so be careful not to get injured.⧼thumbs_response⧽
- Fly your kite in an open area to prevent it from getting tangled on trees or buildings.⧼thumbs_response⧽
Items Needed
- Two lightweight 3/16” dowels. One 24 inches long and one 20 inches long.
- Lightweight paper, lightweight fabric, a heavy duty trash bag, newspaper, or a plastic bag
- Strong tape
- Lightweight string, twine or fishing line
- Ruler
- Pen,pencil,or marker
- Scissors
- Craft knife
- Ribbon
References
- ↑ http://www.pbs.org/benfranklin/exp_kite.html
- ↑ http://www.pbs.org/benfranklin/exp_kite.html
- ↑ http://www.stormthecastle.com/how-to-make-a/kite/make-a-traditional-kite.htm
- ↑ http://www.stormthecastle.com/how-to-make-a/kite/make-a-traditional-kite.htm
- ↑ http://www.skratch-pad.com/kites/make.html
- ↑ http://www.skratch-pad.com/kites/make.html
About This Article
To make a kite for kids, start by trimming wooden dowels so you have a 24-inch and 20-inch piece. Then, cut a notch into the ends of each dowel. Next, form a lowercase “t” shape with the dowels and tie them together with a piece of string. Then, bring the string around the edges of the kite through the notches in the dowels before tying it off in the center. Once you’ve completed the frame, cut the kite’s shape out of fabric or paper with a 1-inch border around the edge. Finally, fold the border of the paper over the string, and secure it with tape. For tips on how to add a string and tail to your kite, read on!