X
This article was co-authored by Jocy Paixão Fortes. Jocy Paixão Fortes is a DIY Seamstress and fashion enthusiast based in the Netherlands. Her DIY and travel themed YouTube Channel, joycy, has more than 100,000 subscribers.
wikiHow marks an article as reader-approved once it receives enough positive feedback. In this case, 85% of readers who voted found the article helpful, earning it our reader-approved status.
This article has been viewed 275,788 times.
Maxi skirts bring a comfortable, free-spirited energy to any outfit. On top of that, they are also very easy to make as far as skirts go. Here's what you need to do.
Steps
Part 1
Part 1 of 4:
Taking Your Measurements
-
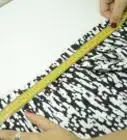
1Measure your hips. Use a soft tape measure to measure around the widest part of your hips.[1]
- Keep the tape measure parallel to the ground as you wrap it around your hips. Stick your thumb under the tape measure as you pull it taut to prevent yourself from accidentally making it too tight.
-
2Take your waist measurement. Use a soft tape measure to measure around your waist, just a little above your waist or where your waistband would usually rest.
- This may or may not be your natural waist, depending on how high you want the waistband of your skirt to come. Your natural waist is the skinniest part of your waist and usually crosses over your belly button.
- Keep the tape measure parallel to the ground as you wrap it around your waist. Stick your thumb under the tape measure as you pull it taut to prevent yourself from accidentally making it too tight.
Advertisement -
3Determine your desired skirt length. Use a soft tape measure to measure the distance between your waist and your ankles, or whatever length you want for your maxi skirt.
- Ankle-length is the standard length for maxi skirts, but you could make the skirt fall out anywhere between your lower-calf and ankle and still call it a maxi skirt.
Advertisement
Part 2
Part 2 of 4:
Preparing the Fabric
-
1Choose a knit fabric. To make a simple, comfortable, stretchy maxi skirt, you will need to choose a knit fabric with a bit of stretch to it.
- Choose knit fabric that is dark and/or heavy enough to block out light. Otherwise, you might need to wear a slip beneath your skirt.
- Choose a fabric with at least 25 to 40 percent stretch. In other words, if you cut 10 inches (25.4 cm), it should be able to stretch to a length of 12.5 to 14 inches (31.75 to 35.5 cm).
- Preferably, the fabric should not have much four-way stretch, since this will cause the skirt to become longer as time goes on.
-
2Purchase enough fabric and elastic. The exact amount of fabric and elastic you need for the skirt will vary based on your measurements.
- Do not buy "no-roll" elastic, since this type of elastic cannot be sewn into the fabric.
- The elastic should be about 3 inches (7.6 cm) wide.
- You will probably need 1 1⁄2 yards (1.4 m) to 2 yards (1.8 m) of fabric, but the exact amount will depend on your measurements. You should have enough fabric to wrap around you and enough to drape down to your desired length, at minimum. It's always recommended that you buy a little more fabric than you expect to use, just in case you make a mistake or in case you need more than you originally expected.
-
3Wash and dry your material and elastic before using them. Doing so pre-shrinks your material and makes your skirt ready to wear once complete.
- Follow the care instructions for your fabric and for the elastic to determine the proper way to wash them.
Advertisement
Part 3
Part 3 of 4:
Cutting and Sewing the Material
-
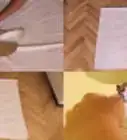
1Fold your fabric in half. Fold the fabric in half, paying careful attention to the grain of the knit so that the elasticity runs in the right direction.
- Fold your fabric so that the right sides are facing each other and the wrong sides are facing out.
- The grain of the knit fabric should run horizontally, or from side to side, rather than top to bottom.[2]
-
2Mark the top and bottom of the skirt. The top of your skirt should be half your waist measurement with an added 1 inch to 2 inches (2.5 cm to 5 cm) for a seam allowance.[3] The bottom of your skirt should be a total of 12 to 13 inches (30.5 to 33 cm) wider than your full waist measurement, so with the fabric folded in half, the bottom should be marked out as being 6 to 6.5 (15.25 to 16.5 cm) longer than the top.
- The top and bottom lines should be center-aligned with each other.
- Make sure that the distance between the top and bottom marks matches your desired skirt length, plus 1 inch (2.5 cm) for a seam allowance.
- Make your markings using a washable sewing pencil or piece of white chalk.
-
3Sketch connecting lines between the top and bottom. These lines will become the sides of your skirt. They should flair out gently from the ends of the top line to the ends of the bottom line.
- Note that if you make one of the sides correspond to the fold of your fabric, you can save yourself time by reducing the number of sides you will need to stitch up in half. If you cannot figure out how to create an angled line on the fold of the fabric, though, you can still cut the fabric out without either side being on the fold.
-
4Cut your pieces out. Pin the two layers of fabric together and use sewing scissors to cut two funnel-shaped pieces of fabric out according to the pattern you just drew.
- If you have a rotary cutter and cutting mat, use that instead for a more even, cleaner cut. Sewing scissors will work just fine in most cases, though.
- Take special care as you cut the fabric to prevent it from being stretched as you cut. If the fabric gets stretched as it gets cut, the pieces could end up being distorted.
-
5Stitch the pieces together along the sides. With the wrong sides still facing each other, sew along the angled lines, using roughly a 1/2 inch (1.25 cm) seam allowance on each side. Stitch up these sides completely from top to bottom.
- Check the width of the waist at this point. If it is too large and too loose, pin off the excess and sew in a little more to take the waist in. If it is too small and too tight, remove some of the stitches and resew the seam to make the waist larger.
- Use a straight stitch on your sewing machine. If sewing the skirt by hand, use a backstitch to provide greater strength.
-
6Hem the bottom. Fold the bottom of the skirt up by about 1 inch (2.5 cm). Pin in place before sewing it down.
- Use a straight stitch on your sewing machine. If sewing by hand, use a backstitch or special hem stitch, instead.
- When you fold the bottom up, make sure that the raw edge is folded over the wrong side of the fabric and that you tack the hem up from this wrong side to hide the stitching better.
Advertisement
Part 4
Part 4 of 4:
Adding a Waistband
-
1Cut a piece of fabric for your waistband. The fabric should be the same length as the circumference of your waist, with an added seam allowance of 1 inch (2.5 cm).
- Make sure that the grain of your waistband fabric goes in the same direction as the grain of your skirt.
- The piece of fabric for your waistband should initially be about 10 inches (25.4 cm) tall. When folded in half, this will give you a waistband that is 5 inches (12.7 cm) tall.
-
2Sew the elastic to this waistband fabric. Pin the elastic band to one side of the waistband fabric and sew a straight line down the lengthwise center to hold it in place.
- The elastic should be about 1 inch (2.5 cm) shorter than your waist measurement, but it needs to be able to stretch to match your waist measurement. If it is the same exact length as your waist measurement, though, it will not have as much holding power, so you skirt may end up feeling loose.
- As you sew the elastic, stretch it slightly so that it meets with the ends of the waistband fabric.
-
3Fold the waistband fabric in half and stitch closed. Fold the top of the waistband fabric over so that it overlaps the elastic band you stitched to the lower half. Sew along the lengthwise raw edges to complete the waistband piece and stitch together the open ends to form a full, connected circular band.
- When you fold the open ends together, fold the waistband in half with the wrong side facing out. Stitch the ends together with 1/2 inch (1.25 cm) seam allowance on either side. When you turn the waistband right side out, this seam should be hidden.
-
4Stitch the waistband to your skirt. Pin the waistband to the top wrong side of the skirt. Sew in place.
- Match the waistband seam to one of the side seams on your skirt.
- Pin the waistband so that the bottom right side edge of the waistband overlaps the top wrong side edge of the skirt. In other words, the waistband itself should be above the skirt and not on top of it.
- Use a 1/2 inch (1.25 cm) seam allowance on either side.
-
5Turn right-side-out. With the skirt right-side-out, flip the waistband down and over the top.
- When you initially fold the skirt right-side-out, the wrong side of the waistband should be visible. By folding the waistband down and over the top edge of the skirt, you turn the waistband right-side-out, as well.
-
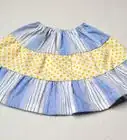
6Wear the skirt out and about. This skirt is durable, comfortable, and fashionable. Best of all, with this step, your maxi skirt is also complete!
Advertisement
Community Q&A
-
QuestionAbout how many yards of fabric do you need? Just a rough estimate will do.
 Community AnswerA good estimate is between 1.5 to 2 yards, depending on how stretchy it is. If you're a beginner, or trying this out for the first time, aim high (around 2.5-3 yards).
 -
QuestionWhat do I do if I make the skirt too long?
 Community AnswerYou may shorten the skirt by cutting off the extra length from the hem edge of the skirt and then re-hemming it. If the hem is already sewn in and you do not want to remove it, you could remove the waistband and take the extra length off of the top and then sew the waistband back in place.
Advertisement
Things You'll Need
- Knit fabric
- Knit elastic band
- Measuring tape
- Fabric scissors
- Coordinating thread
- Sewing machine or sewing needle
- Sewing pins
- Sewing pencil or chalk
References
About This Article

Jocy Paixão Fortes
DIY Seamstress
This article was co-authored by Jocy Paixão Fortes. Jocy Paixão Fortes is a DIY Seamstress and fashion enthusiast based in the Netherlands. Her DIY and travel themed YouTube Channel, joycy, has more than 100,000 subscribers. This article has been viewed 275,788 times.
Co-authors: 6
Updated: August 14, 2021
Views: 275,788
Categories: Sewing Skirts
Advertisement