This article was co-authored by wikiHow Staff. Our trained team of editors and researchers validate articles for accuracy and comprehensiveness. wikiHow's Content Management Team carefully monitors the work from our editorial staff to ensure that each article is backed by trusted research and meets our high quality standards.
The wikiHow Video Team also followed the article's instructions and verified that they work.
This article has been viewed 33,806 times.
Learn more...
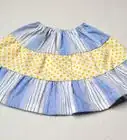
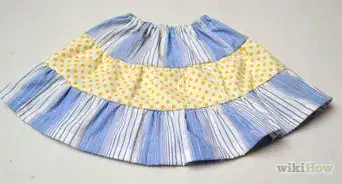
A gypsy skirt (also known as a boho skirt) is a long, flowing, multi-tiered skirt that is great for renaissance fairs, belly dancing, or for a bohemian look. You can make a boho skirt using one color of fabric or multiple colors of fabric, but keep in mind that this type of skirt requires a large amount of fabric. The hardest part of making a boho skirt is doing the calculations for the width and length of your tiers, but sewing the skirt is much easier. Try making a boho skirt for yourself or a friend using this simple strategy.
Steps
Calculating Skirt Measurements
-
1Gather your materials. Making a boho skirt is a simple process, but it does require a large amount of fabric and some other special sewing materials. Before you begin, you will need to gather:
- Fabric. Since the skirt requires a lot of fabric, it is a good idea to choose something lightweight and inexpensive. Lightweight cotton and broadcloth are good options. You can get all one color or get a different color for each of your skirt’s tiers. Make sure that you have done all your measurements and calculations before you begin so you know how much fabric you need to buy.
- Measuring tape
- Chalk
- Scissors
- Pins and a safety pin
- Sewing machine
- 2 inch wide elastic OR a ¼” (0.6 cm) cotton cord for a drawstring. You will need to complete your waist measurements to determine how much elastic or cotton cord to get.
-
2Measure for your waist size. Your skirt’s waistband piece will be large enough to fit easily around your hips, but it will be kept on your waist using elastic or a drawstring. Measure around your hips to determine how wide you need this piece to be and then add 2 inches (5 cm) for the seam allowance.
- For example, if your hip measurement is 45 inches (114 cm), then add 2 inches (5 cm) for a total of 47 inches (119 cm).
- Record this measurement because you will need it to determine the sizes of your other tiers.
Advertisement -
3Figure out how much elastic or drawstring you will need. You will need to know the size of your natural waist (or wherever you want the waistband of your skirt to be) to determine how much elastic or drawstring to buy. Measure your waist and record this measurement.
- If you are using elastic, add 2 inches (5 cm) to your measurement. For example, if your natural waist is 36 inches (91 cm), then you would add 2 inches (5 cm) for a total of 38 inches (97 cm) of elastic.
- If you are using a drawstring, then plan to get at least 20 inches (51 cm) more than you will need. This will provide enough slack to tie the drawstring. For example, if your waist size is 36 inches (91 cm), then get a drawstring that is 56 inches (142 cm) long.
-
4Measure to determine your skirt length. Next, measure from your natural waist to the place you want your skirt to stop. You can have your skirt as long or as short as you like, but boho skirts are usually on the longer side.
- For example, if you want your skirt to go to the floor, then measure from your waist down to the floor. If you want your skirt to stop mid-calf, then measure from your waist to the middle of your calves.
-
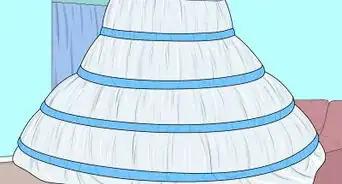
5Calculate the length of your tiers. Take the skirt length measurement and add 3 inches (8cm) for seam allowances and then subtract 2 inches (5 cm) for the waistband. Then, divide this number by 4 to determine the length of each of your tiers.[Image:Make a Gypsy Skirt Step 5 Version 2.jpg|center]]
- For example, if your skirt length is 81 inches (206 cm), then you would add 3 inches (8 cm) to get a total of 84 inches. Then, you would subtract 2 inches (5 cm) to get a total of 82 inches (209 cm). Divide 82 inches (209 cm) by 4 and you get 20.5 inches (52 cm) as the length of each tier.
- Keep in mind that a boho skirt can have three, four, or five tiers. If you want your skirt to have three tiers instead, then divide your final number by 3. If you want the skirt to have five tiers, then divide the final number by 5.
- Make sure to record this number as the length of your tiers.
-
6Determine how wide to make each of your tiers. The easiest way to determine the width of each of your tiers is to use the width of your waistband measurement. For a full flowing skirt, double the width of your waistband to get the width of your second tier, and then double the width of your second tier to get the third. If you plan to have four tiers, then double the width of the third tier to get the width for the fourth tier. If you plan to have five tiers, then double the width of the fourth tier to get the width for the fifth tier.
- For example, if your hip measurement for the first tier was 40 inches (107 cm), then your second tier would be 80 inches (203 cm), your third tier would be 160 inches (406 cm). If you want four tiers, then your fourth tier would be 320 inches (813 cm). If you want five tiers, then your fifth tier would be 640 inches (1,626 cm)! Keep in mind that doubling each tier will require lots of fabric, so it might be quite expensive to make a skirt this wide and flowing.
- You can also make your skirt narrower by adjusting the ratio of your other tiers compared with the waistband tier. For example, you could multiply the width of your first tier by 1.25 to get the width for the second tier, then multiply the width of the second tier by 1.5 to get the width of the third tier, and do the same for the fourth tier. This will still result in a full skirt, but it won’t be as full as doubling each of the tiers.


Cutting and Connecting the Tiers
-
1Mark and cut your fabric. When you have all of your measurements figured out, then you can begin marking and cutting your fabric to the widths and lengths you need. All of your tiers should be the same length, but each one will have a different width. Use the chalk to mark your fabric and then cut out your pieces.
- Try to keep the lines as straight as possible as you cut.
- Keep in mind that for wider tiers, you will likely have to cut out two or three strips of the same fabric if the bolt of fabric you have is not long enough.
-
2Connect the ends of your tiers. Start by sewing together the ends of each of your tiers. You may also need to connect multiple strips if you had to cut out multiple strips to get the length for some of your tiers. Line up the ends of your tiers so that the wrong sides are facing each other and then sew them together about ½” (1.3 cm) from the edge of the fabric.
- When you are finished, each of your tiers should be in a circle.
-
3Pin the tiers together. Starting with the bottom two tiers, pin the tiers together so that the right sides of the fabric are lined up. You will need to pleat—create small folds in—your bottom tier to match up all of the edges with the tier above it. Start by lining up the seams of the two tiers and then work around the skirt to pin the edges together.
- Make a pleat in the fabric of the bottom tier every couple of inches to ensure that you will be able to evenly line up the tiers.
- Remember when you are pinning that the bottom edge of the top tier will always be ungathered, and top edge of the bottom tier will always be gathered.[1]
- Sew the bottom two tiers together before pinning any more tiers.
-
4Sew the tiers together. When you have pinned the tiers together, take the tiers to your sewing machine and sew around the pinned edges of the tiers to connect them. Sew about ½” from the edges of the fabric. Remove the pins as you go.
- After you finish sewing together two of the tiers, pin and pleat the next tier to the tier below it and then sew the edges together as you did with the bottom two tiers. Keep repeating this process until all of your tiers are connected.
Finishing the Skirt
-
1Create the waistband. Fold over the top 2 inches (5 cm) of your top tier and pin it into place. Make sure to fold the fabric over so that the wrong sides are matching up and will not be visible. Then, begin to sew around the bottom edge of the fold to create the waistband.
- When you reach the end of the waistband, backstitch a couple of times to secure the stitches.
-
2Work your elastic or drawstring into the waistband. You will need to cut a small slit in the inside of your waistband to insert your elastic or drawstring. Cut through the inside layer of the waistband fabric only and not through both layers. Then, begin to work your elastic or drawstring through the slit.
- Whether you are using elastic or a drawstring, it helps to attach a safety pin to one end of the elastic or drawstring. This will make it easier to work the elastic or drawstring through the waistband.
- If you are using elastic, then you will need to sew the ends of the elastic together after you get the elastic all the way through the waistband. This will cause the top of the skirt to gather. Then sew the slit closed after you have secured the ends of the elastic.
- If you are using a drawstring, all you need to do to is work the drawstring through and pull the ends to adjust the waist to your liking. If desired, you can also use a buttonhole attachment to sew around the edges of the slit or stitch around the edges of the slit by hand.[2] This will help to reinforce the opening.
-
3Hem the bottom tier. To finish your skirt, you will just need to hem the bottom of the bottom tier. You can easily do this by pinning the bottom ½” (1.3 cm) of fabric under and sewing around the edge of the fabric. You can either use a straight stitch or a zigzag stitch to secure the hem.
- After you finish sewing the hem, cut the excess thread and your skirt is ready to wear!
Community Q&A
-
QuestionI want the skirt very full, but no tiers. How wide should it be at the bottom?
 T. ChinsenTop AnswererThe skirt bottom can be twice the measurement of your waist. It becomes difficult to gather and thread elastic for the waistband for that amount of fabric. A separate waistband should be made, and the skirt section gathered and attached to the waistband. If the fabric is very lightweight, you can use more to increase the fullness.
Things You'll Need
- Fabric in the color(s) of your choice. Lightweight cotton and broadcloth are good options. The amount you will need will depend on your measurements and calculations for the skirt, so do these before you buy your fabric.
- Measuring tape
- Chalk
- Scissors
- Pins and a safety pin
- Sewing machine
- 2 inch wide elastic OR a ¼” (0.6 cm) cotton cord for a drawstring. Complete your waist measurements to determine how much to get.

References
About This Article