This article was co-authored by wikiHow staff writer, Eric McClure. Eric McClure is an editing fellow at wikiHow where he has been editing, researching, and creating content since 2019. A former educator and poet, his work has appeared in Carcinogenic Poetry, Shot Glass Journal, Prairie Margins, and The Rusty Nail. His digital chapbook, The Internet, was also published in TL;DR Magazine. He was the winner of the Paul Carroll award for outstanding achievement in creative writing in 2014, and he was a featured reader at the Poetry Foundation’s Open Door Reading Series in 2015. Eric holds a BA in English from the University of Illinois at Chicago, and an MEd in secondary education from DePaul University.
There are 16 references cited in this article, which can be found at the bottom of the page.
This article has been viewed 62,211 times.
Learn more...
The PVC pipe drum, also known as a tubulum, refers to a thongophone made out of PVC pipes. Originally invented in Australia, the thongophone is a unique percussion instrument that looks kind of like a large xylophone and sounds like a cross between a hand drum and a bucket drum. You make the pipe drum by attaching PVC pipes of different lengths to a frame, and you play it by striking the opening at the top to send vibrations down the pipes. This is a fun instrument and children absolutely love banging on it, but making a pipe drum can be a difficult project. It involves cutting lots of lumber and PVC pipes, and it can be kind of tricky to keep all of the pipes lined up correctly.
Steps
Buying and Cutting Your Pipes
-
1Purchase at least 75 ft (23 m) of 2 in (5.1 cm) diameter PVC piping. Head over to your local construction store and buy your PVC pipes. You’ll cut each pipe to size, so it doesn’t really matter how long the individual pipes are so long as none of them are shorter than 140 inches (360 cm).[1]
- This style of pipe drum will ultimately look like a hurdle, or a large letter H with 2 pieces of wood connecting the sides by running across the middle. Your pipes will sit vertically in the middle of the frame you build and most of your pipes will extend at a 90-degree angle at the bottom of the instrument. Overall, it will look kind of like a big, standing pan flute.
- You only need 75 ft (23 m) of PVC piping if you’re using all 11 notes in the piano scale mentioned below. This measurement will cover every pipe you need with some extra left over in case you miscut a piece.
- You can use wider or thinner PVC piping if you prefer. The width of the pipes will not change the pitch of each note you end up playing, but a wider pipe will make the sound louder and more resonant. Pipes that are 2 inches (5.1 cm) thick tend to be a popular option because the volume is loud, but not overbearing.
-
2Grab 11 elbow joints with 2 in (5.1 cm) wide openings to extend the pipes. PVC pipe drums are typically played in a standing position, but the deeper notes require long pipes that are too tall to stand up vertically in 1 piece. You will cut these longer pipes to rest at a certain height, but some of the pipe will extend away from you once they reach the ground. To extend these pipes, pick up 11 elbow joints that match the thickness of your PVC pipes.[2]
- You do not need any PVC glue to attach the joints. They fit together by hand and PVC glue is designed to prevent leaks. Since you aren’t running liquid through the pipes, you don’t need PVC glue.
Advertisement -
3Measure out the lengths of the pipes for your notes and mark them off. The length of your pipe influences the note it will play when you strike the top of the pipe. There’s a complex formula to determine the lengths, but it’s easier to just cut them based on the tried and true lengths for the notes on a piano scale to get a wide range of sounds. Grab a measuring tape, measure each distance on the pipe, and mark it off with a permanent marker.[3]
- If you want to tune your notes to be perfect, cut each pipe a little long and sand the end down slowly after playing each note to compare it with the note on a tuner.
Notes and Corresponding Pipe Lengths:
G2 – 138.6 inches (352 cm)
A2 – 123.6 inches (314 cm)
B2 – 109.8 inches (279 cm)
C3 – 103.9 inches (264 cm)
D3 – 92.5 inches (235 cm)
E3 – 82.3 inches (209 cm)
F3 – 78 inches (200 cm)
G3 – 69.3 inches (176 cm)
A3 – 61.8 inches (157 cm)
B3 – 55.1 inches (140 cm)
C4 – 52.0 inches (132 cm)
-
4Soften the PVC with a silicone-based lubricant to make cutting easier. Set your first cut mark down between 2 saw horses. Then, spray a bead of silicone-based lubricant over the hash mark you made for the first cut. This softens the PVC and make it much easier to cut.[4]
- The silicone lubricant may wash some of the marker away, but you should still be able to see the basic outline of your cut. It’s not the end of the world if your cuts are off by fractions of an inch (or centimeter).
- WD-40 is the most popular product for this, but any silicone lubricant will work. You can also use cooking oil if you prefer.
-
5Cut the pipes to size with a PVC pipe cutter or handsaw. Put on a dust mask and protective eyewear. If you’re using a handsaw, brace the pipe with your nondominant hand and drag the teeth on the blade back and forth over the hash mark to cut the pipe to size. If you’re using a PVC pipe cutter, wrap the jaws around the pipe, close the handles, and move the handles up and down repeatedly to cut through the pipe.[5]
- Repeat this process with the lubricant and the cutter or handsaw for each pipe you need to cut.
- It’s easier to do this with PVC pipe cutters, but these are a specialty tool you may not have in your garage. There’s nothing wrong with using a handsaw for this.
-
6Measure and mark each pipe longer than your desired height for the instrument. Set your pipes down on a drop cloth in order from shortest to tallest. Then, choose a height for the pipes to sit when you play. For an average adult, 45–55 inches (110–140 cm) is ideal, although you can measure up to the player’s belly button for a more specific measurement. Measure down from each pipe and put a hash mark on any pipe that’s longer than your desired height.[6]
- Keep in mind, you need 2–4 inches (5.1–10.2 cm) of clearance underneath the elbow joint to account for the floor.
- To make sure the pipes sit vertically on the same level, you will cut each pipe that’s longer than your desired height and use 1 of your elbow joints to attach the remainder of the pipe. The elbow joints will not impact the note or sound at all, so there’s no harm in doing this if you’re aiming for accurate notes.
-
7Cut any excessively long pipes with a handsaw or PVC pipe cutter. Cut each pipe that’s longer than your desired height with a PVC pipe cutter or handsaw the same way you cut them before. For example, if you want the pipes to be 50 in (130 cm) tall, trim every pipe 50 inches (130 cm) or longer along the marks you made. Cut perpendicular into the PVC pipe with your circular saw along each mark you made to turn your longer pipes into multiple pieces.[7]
- Don’t forget to tack on 2–4 inches (5.1–10.2 cm) for the ground clearance.
- Don’t lose track of which length goes with which pipe. Keep your pieces laid out on the ground and put the 2 cut ends together to avoid getting mixed up. If you do get mixed up, just rearrange your pipes from shortest to tallest.


Constructing Your Frame
-
1Put on some gloves, a dust mask, and protective eyewear. To build the vertical frame, you’re going to cut some lumber. Put on some thick gloves, a dust mask, and protective eyewear to keep yourself safe. Set 2 sawhorses up outside or in a well-ventilated area and bring your circular saw out to cut your lumber.[8]
- You can always mount the pipes on any flat, vertical stand for an easier option. Realistically, anything that holds the pipes upright is fine if you don’t want to build a frame.
-
2Buy 30 ft (9.1 m) of 2 by 4 in (5.1 by 10.2 cm) boards and cut them to size as you work. For each board you cut, set the board on top of 2 saw horses and clamp them in place with hand clamps. To cut, keep both hands on the handle and pull the trigger to let the blade get up to speed. Slowly move the saw forward and let the blade drive through the wood.[9]
- The length you’re cutting to depends entirely on personal preference and the height you set for the instrument. If you want the pipes to be 50 inches (130 cm) off of the floor and you’re using 11 pipes, you’ll need 2 side boards that are 45–47 inches (110–120 cm) long, 2 railings that are 62 inches (160 cm) long, and 2 base pieces that are anywhere from 24–48 inches (61–122 cm) long depending on your preference.
- Get white boards if you want the wood to match the color of your PVC pipes.
- Any saw blade designed to cut wood will work for this.
-
3Measure off and cut 2 boards to make the sides of the frame. Set the height for the sides to be 3–5 inches (7.6–12.7 cm) shorter than the height you want the pipes to rest so that the pipes stick out past the frame. Measure off 2 identical boards and use your circular saw to cut them to size. These 2 boards will be the sides of the frame and they’ll stand vertically, parallel to your pipes.[10]
- For example, if you want the pipes to sit 40 inches (100 cm) off of the ground, cut your sides to be 35–37 inches (89–94 cm) tall.
- The sides will rest with the broad sides facing in. Just keep this mind as you go forward with the frame.
-
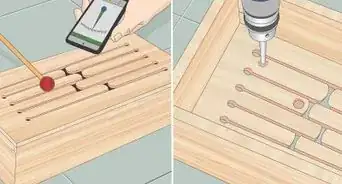
4Set the sides on the ground and spread your pipes out in between them. Place your 2 sides parallel on the ground on a drop cloth and arrange your pipes from short to tall in between these sides. Space your pipes out so that there are 3–4 inches (7.6–10.2 cm) of space between each pipe depending on your personal preference. Leave the same amount of space between the pipes on the ends and your sides.[11]
- You’re going to use pipe straps as brackets for your PVC pipes. These straps take up roughly 1 in (2.5 cm) on each side as they sit on the pipes, so 3 inches (7.6 cm) between pipes will give you enough space to mount your pipe straps on the same horizontal row.
- Keeping a consistent distance between your pipes will make it much easier to play your pipe drum since you’ll have an easier time committing the moves to memory.
Tip: While you’re spacing the pipes out, note the overall shape of the frame. This is what your instrument will look it—there are 2 sides boards and your pipes run parallel in between them. The 2 railings sit perpendicular to the pipes and sides, and you’re going to attach the pipes to the railings.
-
5Cut 2 railings to size to mount your pipes on the frame. Measure the distance from the outside edge of 1 side board to the outside edge of the other side board. This is the minimum length for your railings. Cut 2 identical pieces of wood to make the railings that will sit perpendicular to the sides and hold your pipes in place.[12]
- If you’re using 11 pipes that are all 2 inches (5.1 cm) thick and you want 3 inches (7.6 cm) between each pipe, your railings must be at least 62 inches (160 cm) long.
-
6Screw the railings into the sides where they overlap on the edges. On a flat surface, lay your railings down on top of your sides. Put your first railing in the center between both sides like you’re building an H-shape. Place the second railing 6–12 inches (15–30 cm) above the first railing so they both sit parallel to one another. Double-check both railings to make sure they’re perfectly perpendicular to the sides. Line the edges up on each railing so that they sit flush. Then, grab some 3 in (7.6 cm) wood screws. Drive at least 2 screws through each railing to attach them to the sides.[13]
- Double-check the base of the sides before doing this to make sure the sides are flush with one another. If they aren’t, your frame may end up a little uneven when you stand it up to attach your pipes.
-
7Stand your sides up on a flat surface and brace the frame on the bottom. Lift your sides and railings up and set them down on a flat surface. Balance them a little so that they rest on the thin bottoms of each side. Then, grab some cinderblocks or bricks and set them down inside of each side to brace your frame and hold them in place.[14]
- You’re about to install the base for the frame. The sides must be resting vertically to ensure that the boards on the bottom are flush with the ground.
-
8Lay down 2 symmetrical boards, perpendicular to each vertical side. Cut 2 boards to be 2–4 feet (0.61–1.22 m) long depending on how wide you want the base to be. Place 1 of these boards on the outside of each side, flush against the adjacent board and the ground, roughly in the middle of each base board.[15]
- This should look like an upside-down T-shape on each side.
-
9Drill the perpendicular boards to the sides to make your base. Grab 3-5 wood screws that are roughly 3 in (7.6 cm) in length. Run the screws through the base and into the side board where the 2 pieces of wood overlap on each end of the frame. Be careful while doing this, and enlist a friend to brace the base boards if you can, since these need to stay on the ground while you’re drilling.[16]
- This should look like a hurdle when you’re done.


Attaching Your Pipes
-
1Install your pipes from shortest to longest going right to left. Lay your pipes on the ground in front of your frame. Arrange them with the shortest pipes on your right and the longest pipes on your left. This way, your pipe drum will emulate the layout of a piano. The higher pitched notes will rest on the right and the lowest notes will sit on your left.[17]
- You can arrange them the other way if you really prefer, but it’ll be easier to memorize notes if you do it this way.
Tip: Make sure you lay your pipes down so that the lengths you cut to extend off of an elbow joint are sticking on the same side. You only install the top half of the pipes you cut and the short pipes directly on the frame. Those longer pieces you cut go on the bottom and stick out from elbow joints.
-
2Hold your first pipe in place against the 2 railings. Take your first pipe and hold it up on the frame. Use a spirit level to line it up to rest perfectly parallel to the sides. Use a measuring tape to ensure you keep your 3–4 inches (7.6–10.2 cm) of space between the side and the pipe. Double-check the height and make adjustments so the opening of the pipe sits at your ideal height.[18]
- This is much easier if you have a friend or family member helping you out. 1 person can hold the pipe and the other can line it up with the level and check the measurements.
-
3Wrap a pipe strap around the PVC where it meets the top railing. Grab a pipe strap, which is a flexible metal bracket for hanging pipes, and wrap it around the pipe where it meets the top railing in the middle of the board. Shape the pipe strap by hand and push the sides with the nail slots on them flush against the wood.[19]
- Pipe straps are cheap and extremely easy to work with. You can shape them by hand, but they hold their shape once you’re done adjusting them.
- Pinch the back of the strap behind the pipe where it’s close to the wood. Each pipe strap you install should have a circular shape around the pipe and 2 flat tabs sticking out against the wood.
-
4Drive wood screws through the slots on the strap to attach it. Grab some 1–2 in (2.5–5.1 cm) wood screws. Line the first wood screw up with the opening on the pipe strap’s tab and drill the screw into the wood to attach the first tab. Repeat this process on the second tab on the opposite side to finish installing your first pipe strap.[20]
-
5Attach an identical pipe strap on the second railing. With your first pipe strap in place, repeat this process on the railing below. Add a second pipe strap in the middle of the railing, wrap it around the PVC pipe, and drive 2 screws into the pipe strap to keep in place.[21]
- Using 2 pipe straps ensures your PVC pipes don’t bounce to the side every time you play them.
- If you ever need to replace a pipe, just loosen the screws on each pipe strap and slide the pipe out.
-
6Repeat this process for each PVC pipe you’re installing. Take your next pipe and line it up so that’s 3–4 inches (7.6–10.2 cm) away from your first pipe. Repeat the entire installation process by lining it up with a spirit level, adjusting the height so the opening sits level with the first pipe, and using 2 pipe straps to hold it in place on the railings. Do this for every pipe in your drum set.[22]
- Line your pipe straps up so that they’re level as well. If they end up overlapping for some reason, just stagger them as you install them so they create a kind of zigzag pattern on the railings.
-
7Attach the elbow joints and slide the pipe extensions into place. On the bottom of each pipe, slide an elbow joint over the end of the PVC pipe. The joints will slide into place and rest on the bottom. For the notes with extensions on the bottom, slide your pipes into the corresponding openings and let them stick out from the base of your drum.[23]
- If they’re in the right order, the pipes on the bottom should get progressively longer as you go from the highest note to the lowest note.


Playing the Drums
-
1Hit the top of your pipes with open palms for a simple way to play. The easiest way to play the drums is to just hit each note with an open hand. Strike the opening at the top of the pipe with an open palm so that your hand hits each portion of the PVC at the same time to make the sound. Keep in mind, your hands may get sore pretty quickly if you go this route.[24]
- When you strike the top of the pipe, air moves through it and the pipe vibrates at the same frequency as the air moves. The longer the pipe, the farther this vibration travels. This triggers a sound on the other end of the pipe, kind of similar to a hand drum.
- If you used a handsaw to cut your pipes, you must sand the opening at the top down if you’re going to use your palms. Just get some 200-grit sandpaper and run it around the rim at the top of the pipe to smooth it down.
-
2Grab a set of flip flops to make a simple set of drumsticks. For a simple set of drumsticks, grab some foam or plastic flip flops. Hold each flip flop by the heel and swing the front half of the flip flop down on top of the pipes. This will make your notes louder and you can easily replace the flip flops if they ever break.[25]
- If you want to prolong the lifespan of your flip flop drumsticks, wrap them in electrical tape.
Tip: You can glue a small piece of wood to each flip flop to give your drumsticks a stiffer sound.[26]
-
3Wrap some foam paper around stiff fly swatters for a smoother sound. Pick up 2 stiff fly swatters. Cut out some foam paper using scissors to match the size of the fly swatter. Glue the foam paper to each side of the fly swatter and let it dry for 2-3 hours. To hit the pipes with these sticks, hold the fly swatter by the handle and swing it down so that the flat head of the fly swatter strikes the opening of the pipe.[27]


Warnings
- Keep your hands away from any cutting tools as you’re using them. Always wear your dust mask, protective eyewear, and gloves when operating a power saw.⧼thumbs_response⧽
Things You’ll Need
- PVC pipes
- Elbow joints
- Permanent marker
- Silicone-based lubricant
- PVC pipe cutter or handsaw
- Measuring tape
- Sawhorses
- Lumber
- Circular saw
- Hand clamps
- Protective eyewear
- Dust mask
- Gloves
- Wood screws
- Spirit level
- Pipe straps
- Drop cloth
- Flip flops (optional)
- Scissors (optional)
- Electrical tape (optional)
- Wood handle (optional)
- Fly swatter (optional)
- Foam paper (optional)


References
- ↑ https://www.education.com/science-fair/article/design-musical-instrument-play-pitches/
- ↑ https://frugalfun4boys.com/how-to-make-pvc-pipe-xylophone-instrument/
- ↑ https://makezine.com/projects/pvc-pipe-instrument/
- ↑ https://www.bobvila.com/articles/cutting-pvc-pipe/
- ↑ https://www.bobvila.com/articles/cutting-pvc-pipe/
- ↑ https://frugalfun4boys.com/how-to-make-pvc-pipe-xylophone-instrument/
- ↑ https://frugalfun4boys.com/how-to-make-pvc-pipe-xylophone-instrument/
- ↑ https://www.ccohs.ca/oshanswers/safety_haz/power_tools/saw_circ.html
- ↑ https://www.popularmechanics.com/home/tools/reviews/a3769/4291889/
- ↑ https://frugalfun4boys.com/how-to-make-pvc-pipe-xylophone-instrument/
- ↑ https://youtu.be/6fsq2DcxPzU?t=28
- ↑ https://youtu.be/6fsq2DcxPzU?t=26
- ↑ https://frugalfun4boys.com/how-to-make-pvc-pipe-xylophone-instrument/
- ↑ https://frugalfun4boys.com/how-to-make-pvc-pipe-xylophone-instrument/
- ↑ https://frugalfun4boys.com/how-to-make-pvc-pipe-xylophone-instrument/
- ↑ https://frugalfun4boys.com/how-to-make-pvc-pipe-xylophone-instrument/
- ↑ https://drumsoul.files.wordpress.com/2016/12/how-to-build-a-blue-man-tubulum.pdf
- ↑ https://youtu.be/6fsq2DcxPzU?t=45
- ↑ https://frugalfun4boys.com/how-to-make-pvc-pipe-xylophone-instrument/
- ↑ https://youtu.be/6fsq2DcxPzU?t=42
- ↑ https://youtu.be/6fsq2DcxPzU?t=42
- ↑ https://frugalfun4boys.com/how-to-make-pvc-pipe-xylophone-instrument/
- ↑ https://youtu.be/6fsq2DcxPzU?t=50
- ↑ https://www.education.com/science-fair/article/design-musical-instrument-play-pitches/
- ↑ https://youtu.be/6fsq2DcxPzU?t=65
- ↑ https://youtu.be/_r-SY8Ug-94?t=203
- ↑ https://frugalfun4boys.com/how-to-make-pvc-pipe-xylophone-instrument/
- ↑ https://www.powelltribune.com/stories/sixth-graders-pvc-pipe-xylophone-wins-first-place-at-state-science-fair,24954
- ↑ https://www.simplemost.com/how-blue-man-group-creates-instruments/
About This Article