This article was co-authored by wikiHow Staff. Our trained team of editors and researchers validate articles for accuracy and comprehensiveness. wikiHow's Content Management Team carefully monitors the work from our editorial staff to ensure that each article is backed by trusted research and meets our high quality standards.
The wikiHow Video Team also followed the article's instructions and verified that they work.
This article has been viewed 274,291 times.
Learn more...
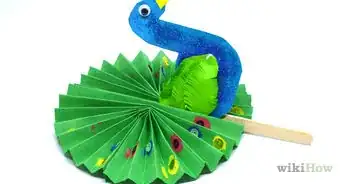
Paper butterflies are not only dainty and chic, they're also fun to make. Try your hand at origami to create one or, if you're more of a crafting beginner, fold a simpler version with pretty pleats. When you're finished, use your butterflies as decor or give them to friends and family as gifts.
Steps
Folding an Origami Butterfly
-
1Fold the paper in half, then open it and fold it in half the other way. Make sure to crease both of the folds. Line up the edges when you’re folding to ensure the crease is directly in the center.[1]
- If your paper is the same color or pattern on both sides, it doesn’t matter which side you start on. However, if one side is white, or the “backside,” begin with that side facing up.
Choosing the Perfect Paper for Your Butterfly
If you're a beginner, choose oversized origami paper. Bigger sheets are easier to work with.
For easy folding, use origami paper, because it is thinner than regular paper.
If you want to add visual interest, opt for textured paper like linen or felt cardstock.
For a dramatic accent, pick foil paper in a shimmery metallic.
-
2Fold the paper in half diagonally, open it, and fold on the other diagonal. Bring 2 opposite corners together to create the folds. Press down firmly to create defined creases. Repeat on both diagonals. Open the paper to lie flat after you fold it.[2]
- Your 4 folds should intersect in the exact center of the paper.
Advertisement -
3Bring the right and left creases together, creating a triangle. With the paper laying flat in front of you, press the right horizontal crease to the left one. As you do this, the paper should collapse onto itself in a triangle shape along the diagonal creases you made.[3]
- Press down on the triangle to crease the paper once it’s collapsed.
- If the paper isn’t folding properly, go back over your original creases again. If they aren’t defined enough, the paper will have trouble falling into the shape.
-
4Fold the 2 top corners into the center. When you created the triangle shape, it made 2 layers. Grab the corners on the top layer and line up their edges with the crease in the middle of the triangle.[4]
- Try to align the corners with the crease perfectly so they aren’t overlapping or so there isn’t a large gap between the edges in the center.
-
5Flip the triangle over and fold the bottom up, leaving a small tip showing. You aren’t folding it completely half. Instead you’re folding it about 1/3 up from the base of the triangle. Hold the fold in place gently with your hand.[5]
- Don’t crease the fold.
-
6Bend the top layer of the tip over the base. There are 2 layers at the tip of the triangle. Peel the top 1 forward, folding it over the wide triangle bottom you’re currently holding in place. The tip will be the head of the butterfly.[6]
- Crease the fold that you make with the tip. This will help secure the body of the butterfly in place and prevent it from unraveling.
-
7Pull down the pieces from the bottom layer to create the lower wings. With the top layer folded over, bring the bottom layer of the tip in the opposite direction. The points of the 2 triangular pieces should be facing down, away from the folded head.[7]
- It may help to hold the folded tip with your thumb while you pull the other pieces down so that the butterfly doesn’t come apart.
- Re-crease the folded tip after you arrange the bottom pieces if necessary.
- Trim the edges of the wings if you want a smaller butterfly.
Making a Pleated Paper Butterfly
-
1Fold the square piece of paper in half, creasing it. Line up the edges of the paper when you fold it to make sure you’re creating a line directly down the middle. Press firmly with your fingernail to form the crease.[8]
- Use any type of paper you’d like, whether it’s origami paper, colorful cardstock, or even pretty gift wrap.
- The size of your paper doesn’t matter, as long as it’s square. If you have a rectangular piece, simply trim it down so all of the edges are the same length.
-
2Unfold the paper and cut along the crease line. Use your scissors to cut the piece of paper in half. The groove of the crease should help guide your scissors in a straight line through the paper.[9]
- Make sure your scissors are sharp so they don’t tear or crinkle the paper.
- If you have trouble cutting in a line, hold your scissors against a straight edge, like a ruler, while you cut.
-
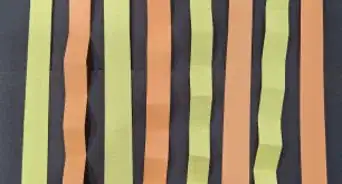
3Make accordion folds with one of the pieces of the paper. Fold a small piece lengthwise, then flip the paper over to fold it back onto itself. Continue flipping the paper from side to side as you fold along the entire length of the paper. Think of this motion as similar to making a pleat or a fan.[10]
- You can make the folds as thick or as thin as you'd like.
- Keep the folds all the same thickness, no matter what size you choose.
-
4Take the other piece of paper you cut and fold it in half lengthwise. Place the 2 longer edges on top of each other. Then create a crease by pressing down along the fold.[11]
- Try to make the crease as straight and even as possible so it splits the paper directly in half.
-
5Open it up and fold the 4 corners in toward the center crease line. Line up the edges straight along the crease. Your paper will now be in the shape of a hexagon, with 2 pointed ends formed by the folded corners.[12]
- Leave the corners folded. If they won’t stay in place, use a piece of double-sided tape or a little bit of glue under the flap.
-
6Flip the paper over and make accordion folds on each side of the crease. Fold one half the paper in towards the center. Then repeat on the other side. This will be the top half of the butterfly’s wings.[13]
- Make the folds as large or as small as you’d like, depending on the size of your paper.
-
7Bend both pieces of pleated paper in half. Press the pleats together and hold the paper between your thumb and forefinger. Carefully fold one end onto the other, creasing it firmly.[14]
- The paper won’t stay folded, but that’s okay. You just want to make a crease, so the paper is in a V-shape.
-
8Place 1 piece above the other and tie them together at the center. Arrange the 2 pieces so that they form a butterfly shape. Pinch them together while you tie string or cord around both pieces.[15]
- To secure the 2 pieces together better, you can add a dab of craft glue or hot glue in the middle.
- Having a friend hold the pieces together while you tie the string makes it easier to get a tight knot.
- You can also use ribbon or a pipe cleaner instead of string.
-
9Pull out the pleats to open up the wings. Scrunched-up folds don’t exactly resemble a beautiful butterfly. Gently pull the pleats apart so that the 2 pieces of paper look like 1 large wing on each side instead of 2 disjointed ones.[16]
- Be careful not to rip the paper when you’re arranging the pleats.
Fun Ways to Use Your Butterflies
Hang them on a string or ribbon to drape as a whimsical garland in your room.
Glue the butterflies to a piece of paper or a canvas as 3D art.
Give them as gifts around the holidays.
Place them on a bookshelf or coffee table as decor.
Turn a butterfly into a Christmas tree ornament.
Community Q&A
-
QuestionWhy is the picture not loading?
 T. ChinsenTop AnswererPlease be patient, as some of the pictures are actually mini looped videos and will take longer to load than a still photo.
 -
QuestionAre these the only types of butterflies that I can make with paper?
 Community AnswerNo, you can get creative and make any type of butterfly that you wish.
 -
QuestionWhat should be the size of the paper?T. ChinsenTop AnswererOrigami paper comes in 4" (10 cm) and 6" (15 cm) squares. You can make your own square of paper from a standard piece of paper so it would be 8.5" (21.5 cm) square. Use whatever size you have available. So long as the paper is square, you can make the butterfly in the article.
Things You’ll Need
Origami Butterfly
- 1 square piece of paper
Pleated Paper Butterfly
- 1 square piece of paper
- 1 piece of string, cord, or ribbon
- Scissors
- Double-sided tape (optional)
- Glue (optional)
References
- ↑ https://108contemporary.org/fa-content/uploads/2018/07/Origami-CK-Combined.pdf
- ↑ https://108contemporary.org/fa-content/uploads/2018/07/Origami-CK-Combined.pdf
- ↑ https://youtu.be/nWjEYlMZnhE?t=1m28s
- ↑ https://youtu.be/nWjEYlMZnhE?t=2m7s
- ↑ https://youtu.be/nWjEYlMZnhE?t=2m25s
- ↑ https://youtu.be/nWjEYlMZnhE?t=2m25s
- ↑ https://youtu.be/nWjEYlMZnhE?t=2m57s
- ↑ https://www.thriftyfun.com/Pleated-Paper-Butterfly.html
- ↑ https://www.thriftyfun.com/Pleated-Paper-Butterfly.html
- ↑ https://www.thriftyfun.com/Pleated-Paper-Butterfly.html
- ↑ https://www.thriftyfun.com/Pleated-Paper-Butterfly.html
- ↑ https://www.thriftyfun.com/Pleated-Paper-Butterfly.html
- ↑ https://www.thriftyfun.com/Pleated-Paper-Butterfly.html
- ↑ https://www.thriftyfun.com/Pleated-Paper-Butterfly.html
- ↑ https://www.thriftyfun.com/Pleated-Paper-Butterfly.html
- ↑ https://www.thriftyfun.com/Pleated-Paper-Butterfly.html
About This Article

To make a paper butterfly, grab a piece of origami paper, fold it in half, unfold it, and then fold it in half the other way. Next, fold the paper in half diagonally, unfold it, and fold the opposite diagonal. Once you have 4 folds intersecting in the exact center of the paper, bring the right and left creases together to create a triangle. With this triangle shape, you should now have 2 layers, so grab the corners of the top layer and line up their edges with the crease in the middle of the triangle. Flip the triangle over and fold the bottom up just enough to leave a small tip showing. Take the top layer of that tip and bend it over the base, then pull down the pieces from the bottom layer to give your butterfly its lower wings. For more tips, including how to make a pleated paper butterfly, read on!