This article was co-authored by wikiHow Staff. Our trained team of editors and researchers validate articles for accuracy and comprehensiveness. wikiHow's Content Management Team carefully monitors the work from our editorial staff to ensure that each article is backed by trusted research and meets our high quality standards.
The wikiHow Video Team also followed the article's instructions and verified that they work.
This article has been viewed 99,807 times.
Learn more...
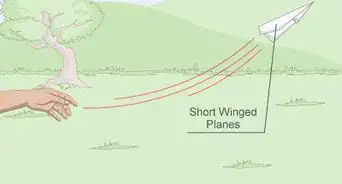
Paper airplanes are really flimsy and often don't fly as well as you'd like. Luckily, there are a few methods for creating paper gliders that use simple physics to fly with much more grace and ease. Some of these methods make gliders that look like airplanes, and others look nothing like what you'd expect a glider to look like. Regardless of what they look like, these gliders are easy to make and fun to use.
Steps
Making a Cardboard Glider
-
1Mark a glider body shape in cardboard. Find a piece of cardboard. Using a pen or pencil, draw a plane body shape in the cardboard. The exact shape is up to you, but it should have a tail and a head. Use this image to give you a basic idea of what kind of shape you should make.
- Rounded shapes work better than angular ones.
- You can use another stiff paper material like cardstock as well.
-
2Cut out the body of your glider from a piece of cardboard. Use your scissors to cut out the glider body shape you drew in the cardboard.Advertisement
-
3Cut out the wings. Use a pencil or pen to mark two wing shapes in the piece of cardboard. The fore wing must be the a little lesser than the length of the glider, and the tail wing must be about half of that. Cut the wing shapes out with scissors.
- You can use this image as a guide for what the wing shapes should like, but the exact shape is up to you.
-
4Cut out slits for the wings. Measure the height of your wings. Mark two lines in your plane that are the length of these measurements, with the bigger one near the middle of the body and the smaller one near the tail end. Use a sharp knife to cut out the slits.
-
5Glue the wings in place. First stick the wings through the slits and position them so that they stick out evenly on both sides. Then glue them in place. Don't use a glue stick; they're not strong enough. Use something like PVA glue, or something similar.[1]
-
6Attach a paper clip or two onto the nose of the plane. Throw it to test its flying ability. You want to add paper clips until it can easily be thrown forward. Without enough weight, the plane will be difficult to send forward with force.
-
7Add modeling clay to the nose optionally. Roll and spread some modeling clay along the nose to make a rounded nose shape. You can do this in addition to or instead of the paper clips.
- Experiment with different combinations of modeling clay and paper clips to see what makes your plane fly best.

Crafting a Circular Glider
-
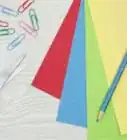
1Get a square of paper. You can use any kind of paper for this glider. Origami paper works well but regular printer paper will do fine.
- The bigger the paper, the better the plane will fly.
- If you're starting with a rectangular piece of paper, make it into a square with the following method.
- Measure the length of the shorter side of the paper. For standard printer paper, this is 8.5".
- Mark the point along the longer side of the paper that's as long as the shorter side. So for standard printer paper, use your ruler to mark a spot 8.5" up the longer side.
- Draw a horizontal line using the mark as a guide.
- Cut along that line.
-
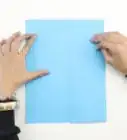
2Make a valley fold. Take two opposite corners of the paper and make them meet. Fold the paper in half this way and crease it well. It should now look like a triangle.
-
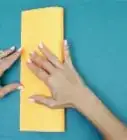
3Fold the creased edge up. Turn your paper so that the triangle points away from you, with the creased edge facing you. Fold the creased edge on itself a little ways, something between half an inch and an inch, depending on how big your piece of paper is. Crease well.
- If you're using 6" origami paper, fold it up about 1 cm. If you're using standard printer paper, fold it up about 1".
-
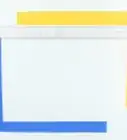
4Bend the paper into a partial circle. Fold the two ends of the paper toward each other so that the folded up edge is on the outside. Fold it roughly in a circle shape.
- At this point you should be holding the paper so that it makes a ring by holding the two ends of the triangle near each other. The edge that you folded up and creased should be on the outside of the ring.
-
5Complete the circle. Stick one of the thin folded up edges into the opening in the other as far as it will go, so that the paper is circular in shape.
- The 1cm to 1 inch thick folded edges are what you're sliding into one another.
- You'll still need to hold the paper in the ring shape as it hasn't been secured with tape yet.
-
6Work out the creases. Use your fingers to work out the creases in the paper so that it's as circular as possible. Smooth the circle shape out.
-
7Secure the shape. Use a little tape to secure the glider's circular shape. Just take a small piece of regular clear tape and wrap it around where the two ends meet and form the ring.
-
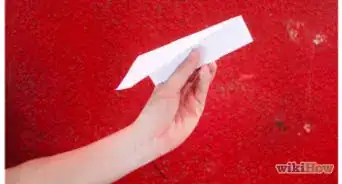
8Throw your glider. Hold the glider by the pointed end between your index finger and thumb. Hold it as high as you can, preferably from over a balcony or the like, and let go. It will fall and start gliding forward.[2]


Building a Loop Glider
-
1Gather your materials. For this glider, you'll need paper, a drinking straw, a ruler, a pencil, paper clips, tape and scissors.
- Any kind of paper will work, but thicker paper, like index cards, will work better. If you use index cards, make sure you get the large, 3x5" kind.
-
2Cut three strips of paper. Use your scissors to cut three equal, 1" wide strips out of the paper. If you're using 3x5" index cards, these strips will be 1" wide and 5" long.
- You can cut three 1" wide strips by first making three marks along one side of the paper that are one inch apart. If you're using index cards, do this on the shorter side. If you're using printer paper, do this on the longer side.
- Then make three marks on the opposite side that are also three inches apart.
- Then use a ruler and draw a straight line connecting the marks across the paper, so that you have three 1" thick segments to cut along. Cut along the lines.
-
3Tape one of the strips into a loop. Take one of the strips of paper and fold it into a loop with the two ends overlapping a little. Tape the two overlapping ends together so the loop holds its shape.
-
4Tape the other strips into a loop. Overlap two of the ends of the other two strips on top of each other by about an inch. Tape them together. Then form the new, twice as long strip into a loop and tape it together.
- You should now have two loops of paper, one twice the size of the other.
-
5Attach the loops to the straw. Use a paper clip to attach the smaller loop to one end of the straw. Then do the same with the other loop, on the other side of the straw.
- The easiest way to do this is to slide the paper clip onto the loop, then slide it into the opening in the straw.
-
6Throw your glider. Hold the glider in-between your thumb, index, and middle finger in the middle of the straw. Throw it like a spear at a slightly upward pointing angle.[3]


Community Q&A
-
QuestionWhere should I fly it first?
 Community AnswerYou want somewhere where it will be easy to test and not windy. If it is not windy outside, you could try it, but be careful it doesn't go to far out of sight or lose it. If it is not a good day to test the glider, try somewhere in your house where there are no objects in the way.
 -
QuestionHow do I make a mini paper glider?
 Community AnswerUse a smaller size of paper, and fold it to scale as you would a larger glider.
 -
QuestionCan the glider fly far?
 Community AnswerDepending on how well you build your glider and how you throw it, it should go pretty far.
Things You'll Need
Cardboard Glider
- Cardboard or card-stock
- Pencil or pen
- Scissors
- Glue
- Paper clips
- Modeling clay
- Exact-o knife or other sharp knife
Circular Glider
- Paper or origami paper
- Scissors
- Tape
Loop Glider
- Paper or index card
- Scissors
- Pencil or pen
- Drinking straw
- Paper clips
References
About This Article

To make a paper glider, start with a square piece of paper. Take the 2 opposite corners, make them meet, and fold the paper in half this way so that it looks like a triangle. Next, turn the paper so the triangle points away from you and fold the creased edge up about 1 inch. Then, fold the 2 ends of the paper toward each other and stick one of the edges into the opening of the other to create a circular shape. Finally, use a little tape to secure the shape where the 2 ends meet and give your new glider a try! For tips on making a sturdy paper glider out of cardboard, read on!